Paintshop Pro 2023 question
Oct 15, 2022 13:21:31 #
Robert Willson
Loc: Palmetto, Florida
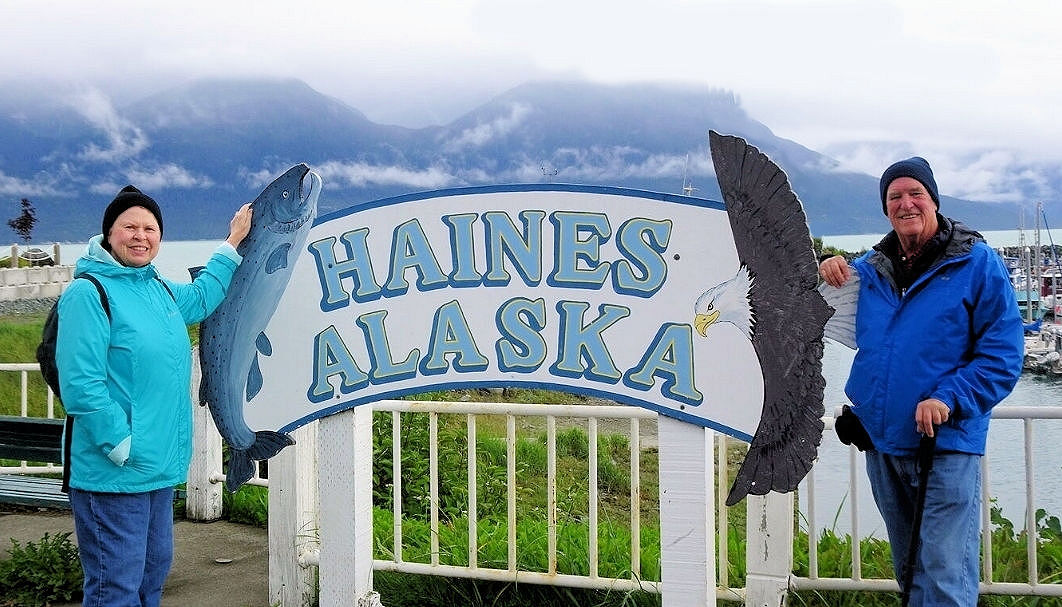
My wife and I just returned from an Alaskan Cruise and I'm working on the 1000 photo's. I'm trying to merge two picture into one with my wife on one side of the sign and me on the other.
I've been reading the Corell Paintshop Pro PDF manual and reviewing the video's but am having a problem with the merging of the pictures. I get one picture on top of the other with the lettering on the sign all messed up. I'm not able to move one layer to line up the lettering on the sign.It must be me, since I find the instructions very confusing.
My question, Is there a UHH member that could give me a step by step instructions on doing this and would they recommend a good book?
Thank you in advance for any help you can give.
Bob


Oct 15, 2022 13:38:43 #

That is going to be difficult in blending because two photos were not taken from same spot/angle.
I would widen the first photo with blank area to right, then crop you at the eagles tail and left, then save that, paste as new layer over first shot. Your mountain in background will be shorten a little but not noticeable.
I would widen the first photo with blank area to right, then crop you at the eagles tail and left, then save that, paste as new layer over first shot. Your mountain in background will be shorten a little but not noticeable.
Oct 15, 2022 13:45:57 #
Robert Willson wrote:
My wife and I just returned from an Alaskan Cruise... (show quote)
For this I do not know.
But if you were on a cruise as you say there should be a couple of hundred people to take a shot of the both of you. Next time try that.
Try this the next time.
Check out People Photography section of our forum.
Oct 15, 2022 14:48:46 #
Stardust wrote:
While I was waiting for a microwave lunch, here is what I did in about 5 minutes. This is just capture off screen since your photos were not downloadable. As stated photos do not line up - wife has full length, your legs cut off below knee, etc. - but here is what I was trying to describe vs doing an overlay that won't match up.That is going to be difficult in blending because two photos were not taken from same spot/angle.
I would widen the first photo with blank area to right, then crop you at the eagles tail and right, then save that, paste as new layer over first shot. Your mountain in background will be shorten a little but not noticeable.
I would widen the first photo with blank area to right, then crop you at the eagles tail and right, then save that, paste as new layer over first shot. Your mountain in background will be shorten a little but not noticeable.
Oct 15, 2022 17:03:41 #

Stardust wrote:
While I was waiting for a microwave lunch, here is what I did in about 5 minutes. This is just capture off screen since your photos were not downloadable. As stated photos do not line up - wife has full length, your legs cut off below knee, etc. - but here is what I was trying to describe vs doing an overlay that won't match up.
I think that's a cool shot, and it certainly looks like an awesome place. Love those mountains with the cloud covering 🌈🌈🌈🌈🌈
Oct 15, 2022 17:07:26 #
Robert Willson
Loc: Palmetto, Florida
Thanks Stardust, That's just what I was looking to do. Now I just need to figure out the correct steps, so I can do it myself.
Oct 16, 2022 09:46:28 #
StanMac
Loc: Tennessee
Stardust wrote:
While I was waiting for a microwave lunch, here is what I did in about 5 minutes. This is just capture off screen since your photos were not downloadable. As stated photos do not line up - wife has full length, your legs cut off below knee, etc. - but here is what I was trying to describe vs doing an overlay that won't match up.
Excellent job there, Stardust!
Stan
Check out Landscape Photography section of our forum.
Oct 16, 2022 14:11:30 #
Robert Willson wrote:
My wife and I just returned from an Alaskan Cruise... (show quote)
I don't think they have produced a book since Paint Shop Pro version9, and there were 3 books produced at this version.
Larry
Oct 16, 2022 14:14:05 #
Stardust wrote:
While I was waiting for a microwave lunch, here is what I did in about 5 minutes. This is just capture off screen since your photos were not downloadable. As stated photos do not line up - wife has full length, your legs cut off below knee, etc. - but here is what I was trying to describe vs doing an overlay that won't match up.
What program did you use to produce this composite?
Larry
Oct 16, 2022 14:57:24 #
r1ch
Loc: Colorado
Robert Willson wrote:
My wife and I just returned from an Alaskan Cruise... (show quote)
This is an quick and easy way of doing this and there are other/better ways as you learn your tool
First you must be in advanced editing mode tab.
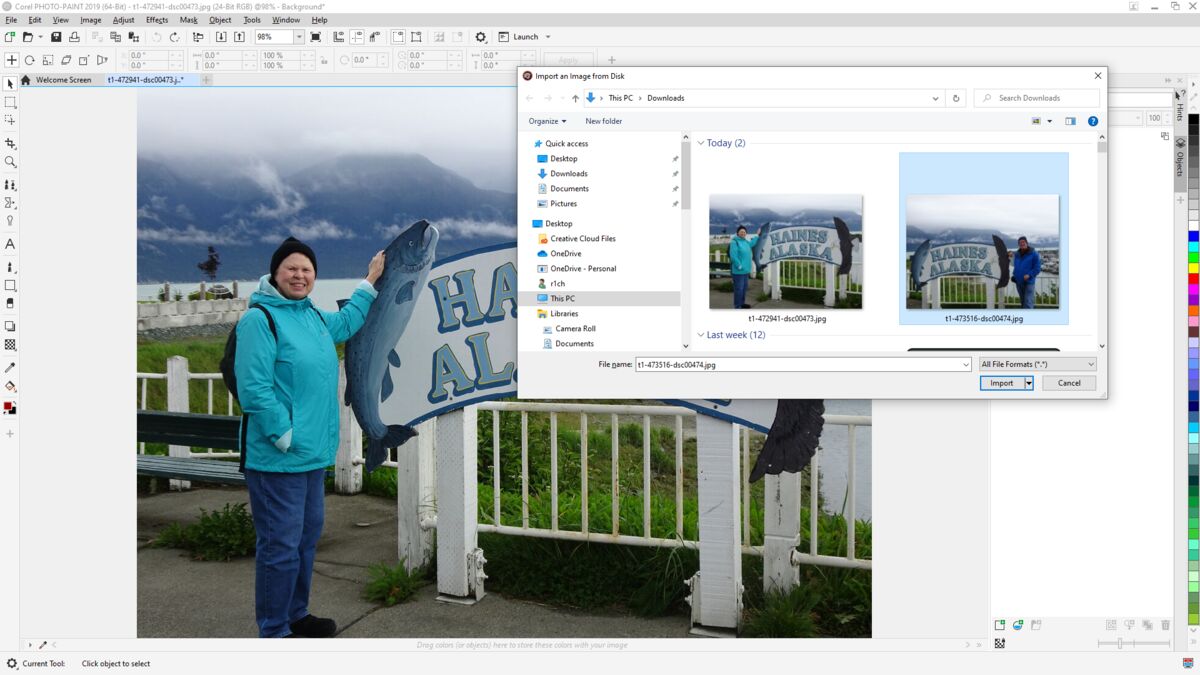
First use file open to open the first image. Make sure on the right you have object mode tab available and you see the word background, if not click on objects at the top of the screen, scroll down and make sure the word object at the bottom is checked.
First image below: click on File, then import and click on the second image, then import.
Second image below: you will see a small version of the second picture click on the first picture
Third image below: you will see in the objects in the right background and background 2
Fourth image below: Then click on Object, then create object from background, in the object pane you will see background and object one.
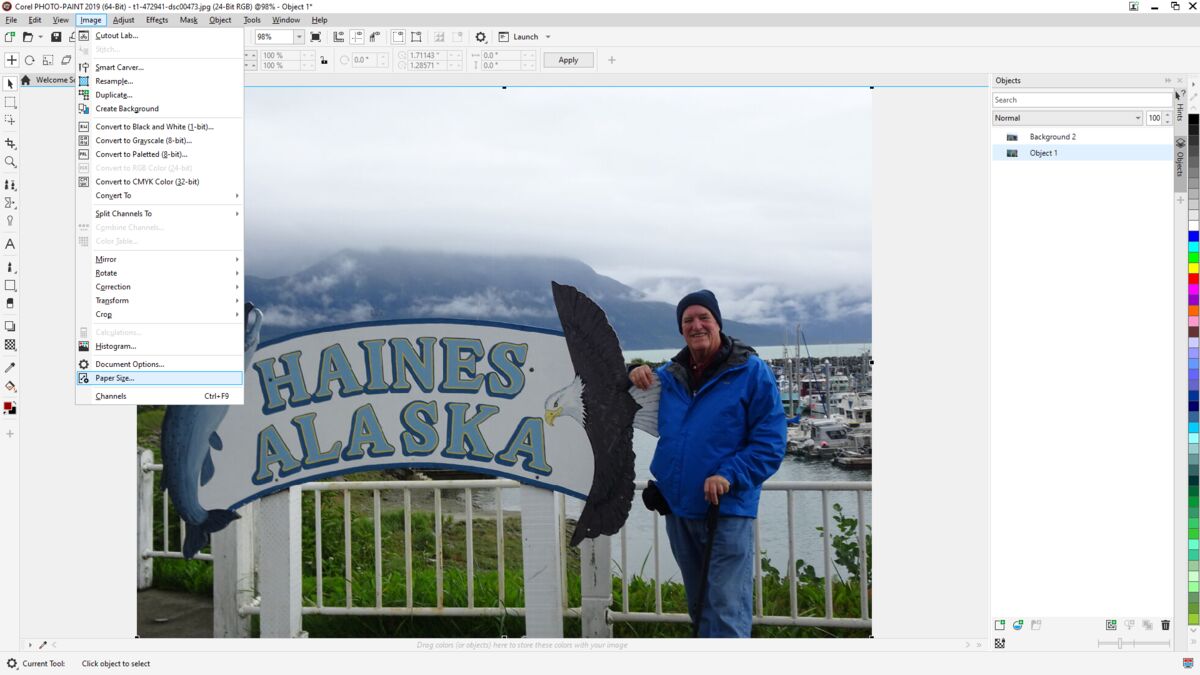
Fifth image below: Then click on image, then paper size.
Sixth image below: In the image dialog box, double the size of the width in the top box (in this case from 3 inches to 6.42867 inches. And in content placement click center right. Then click ok
Seventh image below: Click on the image, slide it around until it lines up (mine is not lined up on purpose so you can see the two images)
Eight image below, click on the erasure swatch on the left, looks like a half black half white rectangle. At the top setting make sure opacity is set to 0, it will probably be set at 99. Then erase the parts. If nothing happens, then select the other object in the right hand pane (you will probably want object 1, not background or you will see squares. Then crop the image when done.


Oct 16, 2022 15:32:59 #
John H.
Loc: Central Washington State
I have an old Nikon D40X (? 15 years) that has a timer, and it can be triggered remotely. (I've forgotten the distance for that.) Surely, these things are still being built into cameras. Cell phones, I don't know.
Of course, this isn't an answer to the question.
Of course, this isn't an answer to the question.
Check out Sports Photography section of our forum.
Oct 17, 2022 11:12:20 #
DBQ49er wrote:
I currently use Paintshop Pro Ultimate 2022 but should be able to do in most programs that have decent features. It was just a quicky on low res screen captures.What program did you use to produce this composite?
Larry
Larry
Oct 17, 2022 11:27:43 #
John H. wrote:
Curious if triggering remotely why the timer? Also would normally require a tripod, not usually recommended on bus & boat trips. On the very rare cases I want to be in a photo with my wife (prefer behind the lens) I usually just ask someone in the group who also has a DSLR or high end camera. I make sure my camera is set wide enough in case shot is not level or I want to crop for composition.I have an old Nikon D40X (? 15 years) that has a timer, and it can be triggered remotely. (I've forgotten the distance for that.) Surely, these things are still being built into cameras.
Oct 18, 2022 16:13:44 #
r1ch
Loc: Colorado
Robert Willson wrote:
My wife and I just returned from an Alaskan Cruise... (show quote)
Here is a better explanation...
https://kb.corel.com/en/127054
But if you have any other software that can stitch panorama image together into a panorama that would be a heck of a lot easier.
Oct 22, 2022 15:31:52 #
Robert Willson
Loc: Palmetto, Florida
Thank you very much R1ch for the step by step instructions.
I'm going to try it on another set of photo's.
Just a note, Although we were on a cruise ship, we went out by ourself's and there was no one around that could take our picture.
I'm going to try it on another set of photo's.
Just a note, Although we were on a cruise ship, we went out by ourself's and there was no one around that could take our picture.
If you want to reply, then register here. Registration is free and your account is created instantly, so you can post right away.
Check out The Dynamics of Photographic Lighting section of our forum.