what could be done to give more "3D-look"
Aug 18, 2021 07:51:12 #
Wallen wrote:
The photo gained enough volume given by the contrast of the shadows but the
stacking destroyed the natural 3D effect of blurring/lose of detail by distance.
Putting back/enhancing that contrast of sharpness/detail can make it look to have more depth.
stacking destroyed the natural 3D effect of blurring/lose of detail by distance.
Putting back/enhancing that contrast of sharpness/detail can make it look to have more depth.
Thank You Wallen.
Oh! Great new! So I will try to shoot it again (OK, it will be another romanesco!)
But no focus stacking...just with different apertures settings in order to get one (perhaps!) with a better effect.
In other words: why to do it tricky if it can be done simply?
 Very nice tip, has to be tested
Key for this "assignement" remains to find out which focal lenght and aperture value.
Any suggestion? (I shoot APSC)
Aug 18, 2021 08:00:07 #
RLSprouse
Loc: Encinitas CA (near Sandy Eggo)
The lighting in this shot seems to be fairly even from the left and the right. If you are going to shoot it again, I would try a stronger lighting ratio, i.e. one side lit more brightly, less so on the other side. Directional lighting is what creates the feeling of depth.
~ Russ.
~ Russ.
Aug 18, 2021 08:15:58 #
jerryc41 wrote:
Very nice. I thought it was some kind of underwater structure.
Thank you! Glad You like it.
Well, this is not an underwater product.
For underwater products, Mr. "Yorkiebyte" is much better skilled to offer some "strange ocean products"!

ref=OldShellStation
As Gene 51 says...its a kind of broccoli. Very decorativ on the dishplate.
Not very tasteful if cooked only under steam pressure

But if served "à la Gene 51" = with garlic+butter...it could be "enjoyable"?

Add to it some Pouilly-Fuissé (Pros't Cany143)
and You should get mini 2 great HGG's members happy Aug 18, 2021 08:19:45 #
RLSprouse wrote:
The lighting in this shot seems to be fairly even from the left and the right. If you are going to shoot it again, I would try a stronger lighting ratio, i.e. one side lit more brightly, less so on the other side. Directional lighting is what creates the feeling of depth.
~ Russ.
~ Russ.
Thank You Russ...I agree...lighting ratio was quite poor.
for this constructiv tip!Aug 18, 2021 09:20:53 #

3D = an out of focus foreground, followed by a SHARP subject/middleground, followed by an out of focus backround ....
Aug 18, 2021 09:37:24 #
DavidPine
Loc: Fredericksburg, TX
Dan' de Bourgogne wrote:
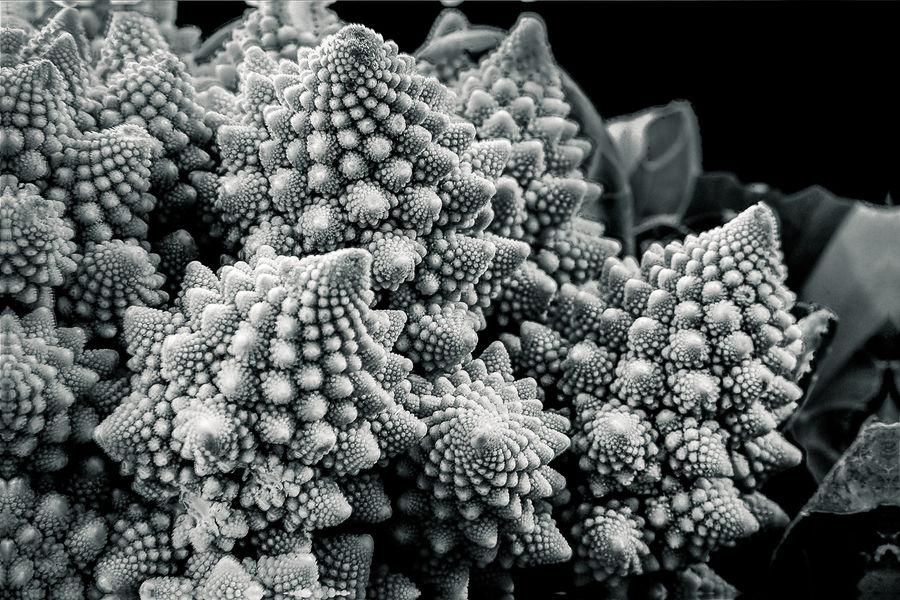
I like this vegetable (un chou Romanesco): Mother Nature gave it this nice "fractal structur"
I took this picture last winter...7 images "focus stacked"...and edited the result B/W for its graphic look.
I would like the image gets more "3D-feeling".
Is there something which could be done now afterwards in post-treatment?
I took this picture last winter...7 images "focus stacked"...and edited the result B/W for its graphic look.
I would like the image gets more "3D-feeling".
Is there something which could be done now afterwards in post-treatment?
Focus stack.
Aug 18, 2021 10:24:58 #
larryepage wrote:
I would like to see a version with only the front grouping stacked, letting the parts of the image in the background be out of focus. Or perhaps only the ones at the medium distances in focus. Limiting the depth of field can be an important tool for generating the 3D look you are seeking...
I was thinking just the opposite. There is no distracting background, only the very detailed subject. Nearly infinite DoF would bring it to life.
The idea of limiting DoF is an old routine fall back for scenes, but this image is not a scene, it’s a very tight detailed closeup.
Acoarst I can’t actually create more DoF by editing but I can fake it a bit, just to show what I mean. Below are quick edits done in my phone, the original and a very simple edit.
I’m not suggesting the harsh contrast is more aesthetic. I’m just using contrast and sharpening to show how maximum DoF produces a much more dimensional presentation for closeups.
Also I cropped off areas that wouldn’t sharpen well, and so I cropped the original to have matched examples.
.


Aug 18, 2021 10:48:58 #
aflundi
Loc: Albuquerque, NM
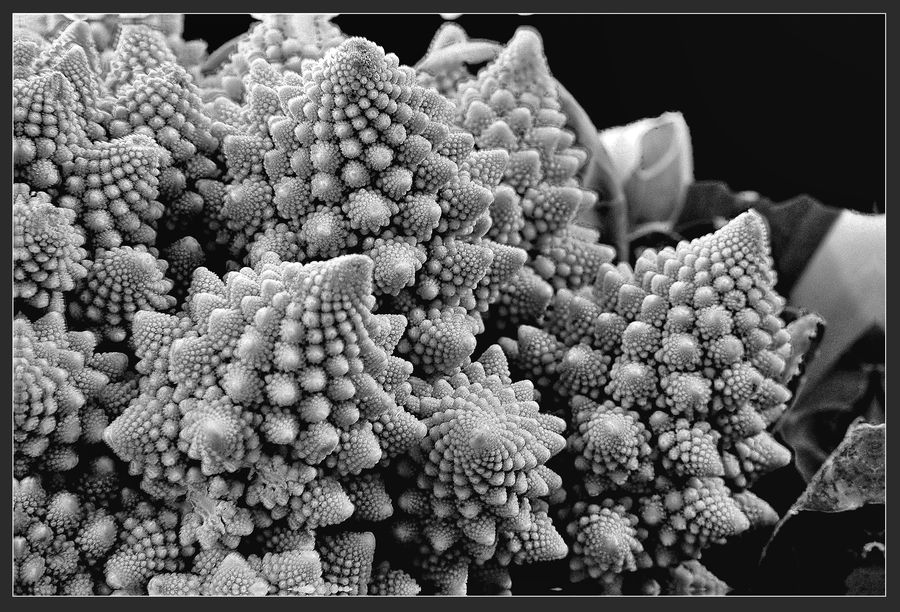
Dan' de Bourgogne wrote:
I like this vegetable (un chou Romanesco): Mother Nature gave it this nice "fractal structur"
I took this picture last winter...7 images "focus stacked"...and edited the result B/W for its graphic look.
I would like the image gets more "3D-feeling".
Is there something which could be done now afterwards in post-treatment?
I took this picture last winter...7 images "focus stacked"...and edited the result B/W for its graphic look.
I would like the image gets more "3D-feeling".
Is there something which could be done now afterwards in post-treatment?
You already have the 7 images. Leave off the last 3 and use the front 4 to restack. You get the idea. Just because you took 7 images, doesn't mean you have to combine all 7.
If you are artistic, you can burn the shadow areas a bit more, and dodge the lit areas.
--alan
Aug 18, 2021 11:06:57 #

As someone suggested earlier, if you still have the original images, restack them deleting one or two of the furthest while keeping all the close ones in the stack.
Aug 18, 2021 11:16:54 #

What an interesting question with even more interesting answers/suggestions. I cannot offer any different 3D treatment ideas but will state that you have gotten an awful lot out of that vegetable already. The stacked original is quite a unique image.
Aug 18, 2021 11:56:40 #
Dan' de Bourgogne I agree with User ID here... building contrast with sharpening and/or a contrast (S) curve brings out bias relief... thereby aiding in the creation of an aura of depth.
btw the spiral you've chosen to illustrate here is actually a Fibonacci pattern... the same pattern of seeds within a sunflower which follows the Fibonacci sequence, or 1, 2, 3, 5, 8, 13, 21, 34, 55, 89, 144...1 If you remember back to math class, each number in the sequence is the sum of the previous two numbers. ... This number is exactly the golden mean.
The seeds of sunflowers display a two-dimensional pattern involving the Fibonacci sequence. The seeds of a sunflower form two spirals, called parastichies, one set eminating from the center in a clockwise direction, the other in a counter-clockwise direction.
Since many are now becoming aware of the Fibonacci sequence which is the bases of the DNA double helix molecule also based on the golden section, and are numbers in the Fibonacci series and their ratio.
The only two differences that distinguish DNA from RNA: (a) RNA contains the sugar ribose, while DNA contains the slightly different sugar deoxyribose (a type of ribose that lacks one oxygen atom), and (b) RNA has the nucleobase uracil while DNA contains thymine. Yes Covid is simply an RNA molecule.
For those with a background in mathematics and bio medicines I would suggest a much deeper dive into the origins of life itself... again the Golden Ratio, ϕ = 1.61803
https://www.ncbi.nlm.nih.gov/pmc/articles/PMC6047800/
While those who prefer the cinema might remember the "Da Vinci Code" yes this is it...
It is truly a surreal quality that seemingly holds the mysteries of our virtual existence and the creation of life itself.
Not a subject of many theological institutions but a truly awesome clue as to our own origins and it is being pursued in earnest by the most brilliant minds in the scientific community.
Thank you for sharing your Fibonacci sequence Dan' de Bourgogne
Aug 18, 2021 12:13:33 #

Bearing in mind that the opposite of 3D would be "flat", there are various recognised antidotes to flatness, including contrast and sharpness. In more general terms the antidote to flatness is to increase vividness. To enhance the effectiveness of those adjustments they could be applied selectively to the near stuff, while perhaps selectively applying the opposite to the far stuff.
Another thing you don't want is for the background (the far stuff) to be more eye-catching than the foreground (the near stuff). One of the main culprits for making things eye-catching is brightness, and in your image the brightest parts of the image are the background stuff along the top of the frame. That can be reversed by selectively applying darkening and brightening as required.
When luminosity contrast (brightness v darkness) is in danger of being overdone, another way to add contrast is to use split toning, where the brights and the darks are given complementary colours. Since warm colours advance and cool colours retreat you want to add the warm tint to the brights and the cool tint to the darks. If you don't want the image to be noticeably tinted you can keep the added tints to the level where they're present but not noticeable. They will still add to the contrast between light and dark even when barely noticeable. But if you're willing to tolerate a noticeable tint, split toning can produce some interesting effects in B&W images.
The strength of the adjustments and their overall effect is, as always, a matter of taste.
.
Aug 18, 2021 12:13:47 #
User ID wrote:
I was thinking just the opposite. There is no dist... (show quote)
I agree User. I applied gross sharpening and upped the local contrast. Of course the
extra contrast blew out the highlights even more than what they were so I
downed the highlight levels.
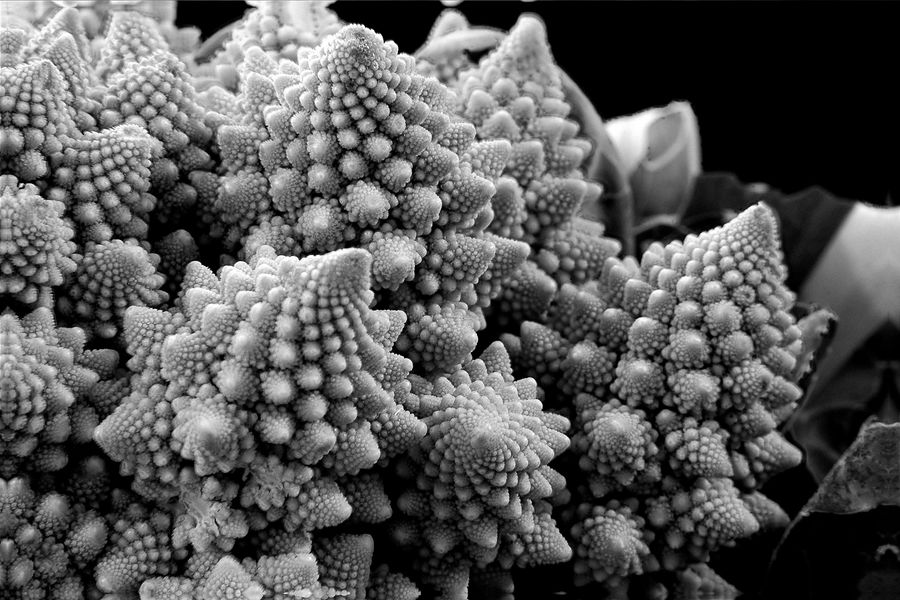
One other thing that adds depth (that most painters never omit) ... a frame ;-)
And a nice image to begin with Dan
Aug 18, 2021 12:21:03 #

…ok…so I have been following along and I have a question…how can focus stacking and automatic exposure bracketing (and exposure fusing…aka HDR) and even exposure to the right (ETTR)…and Ansel Adams’ zone system…be included to create more depth with this image…can you be focus stacking and exposure bracketing at the same time or is it simpler to use ETTR and Adams’ zone system or all four…? Or am I completely off base with this question…?
Aug 18, 2021 12:24:55 #
Forget about stacking. For me it sacrifices the tree dimensional aspect of the picture. Not everything has be in focus, otherwise the picture goes flat. Light control and focus are your best tools. Good luck.
WJH
WJH
If you want to reply, then register here. Registration is free and your account is created instantly, so you can post right away.