When should I used the High ISO setting on my camera?
Aug 13, 2021 10:39:55 #
For me getting an "acceptable shot" is the most important thing. If that means a higher shutter speed, and higher ISO, so be it. I do not worry about "too much noise" at the time of capture. That does not mean that I do not think about noise as I decide on my needed exposure settings.
Aug 13, 2021 10:45:58 #

For something like hummingbirds I shoot manual with auto ISO. Usually it’ll be my widest aperture and a speed that gives me a little wing blur. I think that gives me a more natural looking shot than frozen wings. If need be Topaz Denoise does a great job.
Aug 13, 2021 10:47:06 #
petrochemist
Loc: UK
BebuLamar wrote:
Then in that case you have a couple of choice, to increase the ISO or to not take the picture.
Sometimes there's the additional option of adding light - not always appropriate but often overlooked.
Aug 13, 2021 10:56:10 #

petrochemist wrote:
Sometimes there's the additional option of adding light - not always appropriate but often overlooked.
When adding light is an acceptable option, I usually prefer that to raising ISO above my tolerance range.
The ideal is working in a studio, where you can do whatever you want for an image. Some 'gotchas' are available light night weddings in candle-lit venues, Friday night high school football in dim stadiums, night time street surveillance work...
Aug 13, 2021 11:05:33 #

petrochemist wrote:
Sometimes there's the additional option of adding light - not always appropriate but often overlooked.
OK agree! So basically use the high ISO when you have to. Back in the film days many times I decided not to take the pictures than using high ISO film.
Aug 13, 2021 11:13:13 #
Aug 13, 2021 11:30:14 #
Grey Ghost wrote:
I recommend using whatever it takes to get the shot. If high ISO is what it takes then go for it!
Thaz really the ONLY way to get the shot and it also teaches the user what can be expected. The user gradually learns that there isn’t just one ISO speed number representing “The Limit”.
Knowing what ISO 25600 looks like, the user may decide that a given scene or subject will, or will not, look OK at that noise level. Acoarst you take the shot anyway but you also know it’s probably not a keeper. What to do about that ? Assuming you’re shooting to raw files, here are a few things:
• Get closer using a shorter faster lens.
• Know what your editor can do with it.
• Reduce shutter speed and use bursts.
• Auto bracket your ISO.
• Auto bracket your shutter speed.
• Make a new plan.
• Stuff you learned from experiments.
Aug 13, 2021 12:00:32 #
amfoto1
Loc: San Jose, Calif. USA
Overthehill1 wrote:
Trying to minimize noise.
I suggest you do a series of test shots with your camera(s) and learn how they perform at different ISOs. Pick out a good detailed subject in moderate light conditions. Then start with a low ISO for the first shot and make each successive shot at double the ISO: 200, 400, 800, 1600, 3200, 6400 etc. (Those are one stop increments.)
You'll need to adjust shutter speed to compensate and keep the exposure correct (you could just use "A" or aperture priority auto exposure, so the camera will automatically adjust the shutter speed each time you adjust the ISO).
It would be best to do the above test on a tripod so the camera remains on the subject and maybe even turn off AF and image stabilization, so that all shots are the same other than the changes to ISO and corresponding change to shutter speed.
If you shoot RAW, the camera will not apply any noise reduction to your images. But if you shoot JPEGs, it will. You may want to turn off the camera's noise reduction or do separate series of shots with and without it enabled.
You also should experiment with different post-processing methods. Most of the programs used for that have some form of noise reduction. Personally I use Lightroom and Photoshop for my post-processinig, both of which have NR features. But I don't use them for that... Instead I have a plug-in called Imagenomic Noiseware that I like to use... but only on higher ISO images (occasionally ISO 1600... but mostly only on ISO 3200, 6400 or higher).
Digital noise isn't your only concern. Yes, it increases with higher ISOs. But higher ISOs also makes for less dynamic range. For example, according to the Photos to Photos website testing of the D500 shows 10.66 stops of dynamic range at ISO 100, dropping to 9.73 stops at ISO 200, 9.16 stops at ISO 400, 8.15 stops at ISO 800, etc. etc. You may not be able to see the difference very well on your computer screen, because those are limited in how much dynamic range they can display, too. But I bet you can see the difference if you compare ISO 100 with ISO 3200 (over 4 stops DR loss) or ISO 12800 (more than 6 stops loss).
It also makes some difference the subject you're shooting. For example, animal fur or other subject detail can "hide" digital noise.
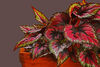
The image below was a test shot done with one of my Canon 7D Mark II at ISO 16000 (yes, 16 thousand... not 16 hundred). It was shot RAW (no in-camera NR) and only processed through Lightroom with that program's default noise reduction.


As you can see from the enlarged detail crop above, there definitely is noise in that image. Partly due to subject detail "hiding" much of the noise, I was pleasantly surprised how usable an ISO 16000 image was! It would be printable in a moderate size such as 8x10 or 8x12. However, I did have to adjust the contrast quite a bit in this image, because the dynamic range was greatly reduced at such a high ISO. The Photons to Photos website/DXO Mark tests show that the 7DII renders less than 4 stops of DR at ISO 16000. (And it shows D500 is pretty much the same.)
I think you're approaching this backward. Rather than trying to set a ceiling... instead of trying to pick a maximum ISO you'll use, I would suggest you simply learn to always use the lowest ISO possible. Sometimes that will be ISO 100... other times it might be ISO 6400 or even ISO 12800. Use whatever ISO is necessary to "get the shot"... whatever ISO makes for a fast enough shutter speed along with the aperture you want to use.
Don't be afraid of high ISOs. Learn to deal with the noise (and more limited dynamic range). Explore your options to reduce the noise, if needed.
I do avoid "expanded ISOs". I don't know about the D500, but most digital cameras have them. My 7DII have a "native ISO range" from 100 to 16000. It can be "expanded" to 25600 and 51200.... but I never do so. The reason is that "expanded ISOs" are done differently than the "native" range. In very simplistic terms, the native range is "hardware" adjustments, while the expanded ISOs are actually underexposed images that have been "pushed" by software. You could achieve the same thing by shooting at the camera's highest native ISO, then brightening up the image in post-processing. This is exactly the opposite of what you want to do to minimize noise!
Which brings me to my final points. To minimize noise in images, avoid underexposure like the plague! Any time you have to brighten up images in post-processing it will amplify the appearance of images. Another thing is to take care about image sharpening. I shoot RAW, so no sharpening is applied by my camera. I always make sharpening one of the final tasks in image processing.... I always do it after the image has been resized for it's final use, and always, always, always long after any noise reduction is done. (If you sharpen before doing any noise reduction, it will increase the appearance of the noise!) It's important not to get too heavy-handed with noise reduction too (it "robs" fine detail from the image, along with the noise), while also not over-sharpening images.
Aug 13, 2021 12:09:12 #
billnikon
Loc: Pennsylvania/Ohio/Florida/Maui/Oregon/Vermont
Overthehill1 wrote:
Usually shoot at 200-400 on my D500 and D7000. But when I photograph hummingbirds or in lower light situations, I turn it on above 640. At what point does it make a difference?
For hummingbirds you need a minimum of 1/4000 sec. So, up your ISO until you can shoot at 1/4000 of a second.
Aug 13, 2021 12:11:27 #
cahale
Loc: San Angelo, TX
Overthehill1 wrote:
Usually shoot at 200-400 on my D500 and D7000. But when I photograph hummingbirds or in lower light situations, I turn it on above 640. At what point does it make a difference?
When you leave 100, or whatever is native to your camera.
Aug 13, 2021 12:32:12 #
Lots of Good advice here, so I won't repeat, but will add what I started as an apprentice in a commercial studio, the first lesson I learned is that Pros test everything. And the only way to KNOW what your equipment will do is to test it beforehand . The D500 has a great sensor, it will probable behave a bit differently than the older D7000 (also good).
It has already been pointed out that Proper exposure gives the best quality, but ISO invariant sensors change that to some degree. But I also think it is good practice to get as much as possible 'in camera'.
Every camera's sensor is best at Base ISO, so some bias toward that is a good idea. But Getting the picture is the most important thing, you buy good cameras because they give you flexibility, use it when you need to. Many HB photographers use flash for action stopping ability, but you can also use it to keep ISO low if you find the quality to be better. The best answer is to TRY IT for yourself. Then you will KNOW.
Good luck
Aug 13, 2021 13:01:03 #
User ID wrote:
If your not seeing the difference in your pictures... (show quote)
What all the answers seem to suggest is that there is no straight answer because a) your use of the pictures matters (how much they will be cropped or enlarged, etc.) and b) your picture-taking opportunities can range from candid shots or street shooting (hand held), sports, wildlife, to static landscapes, buildings, tabletops, etc. The available light is also a factor--some people wait for better light rather than going to any settings that fail to accomplish your purpose.
I used digital for 10 years before I ever tried any ISO but the lowest, or one stop up. I was used to film in view cameras, where the aperture home base was f22 and the shutter from one second to maybe 1/10th second, ISO 125. This of course made me used to the tripod and a ponderous method. In an emergency with digital (a deer in the garden at dusk at 50 yards, handheld), I tried ISO 3400 or whatever the highest was on that camera, braced against a door frame, and was amazed at how well it worked. In film days I would never stoop to ISO 400, which was the most popular film, so of course I just never shot some things in some light.
If motion (including the motion inherent to magnification--telephoto, cropping, or enlargement: motion is magnified by these) is an issue, the lowest usable speed is a minimum priority limit (and a tripod opens up more discretion). If shutter speed is all right for motion, aperture becomes the priority. Lenses no longer show depth of field for a given aperture and distance (as they used to do), but a simple chart can be used as a guide. I generally used one aperture smaller on 4x5 than the suggested one for a given focal length and distance to be safer; but both extremes (wide open or closed all the way down) are not the sharpest settings for lenses in general, so they are only used when a particular reason applies. I start ISO low, but raise it when either shutter speed or aperture DOF is not otherwise workable. I consider what I am going to shoot, and what the lighting will be, and set an ISO that will generously cover the speeds and apertures I need for the pictures I want. One method is to set the shutter and aperture manually for the prevailing conditions, then put the ISO on automatic. If that will push you into noisy ISO levels (how much do you want to enlarge the pictures?), either wait for better light, or plan on a tripod.
What makes such questions complicated is that we may be using different lenses on different cameras, and nobody has everything handy for every shot. If we are caught shooting action with a crop-camera, long lens, and heavy clouds, ISO may be our only friend.
Aug 13, 2021 13:20:42 #

I have set my camera to an auto ISO setting and make other settings manually. This works well.
Aug 13, 2021 13:23:40 #
RichKenn
Loc: Merritt Island, FL
I think noise is over rated. I don't hesitate to use 1600 on my D-7200 if I want to stop action or hand hold a long lens. Sure, you can spot noise if you blow the shot up to 100% but print it at 300 ppi and you won't see it..
Aug 13, 2021 13:41:07 #
If you want to reply, then register here. Registration is free and your account is created instantly, so you can post right away.