Photographing a scrapbook
Aug 6, 2021 18:09:02 #

maciej wrote:
I am doing a similar project. I do use a copy sta... (show quote)
Yes, reflections can be a problem, especially on the pages that I used metallic paper...plus the photos are glossy! I will keep your suggestions in mind when I start this project. Thank you.
Aug 6, 2021 18:11:39 #
charlienow wrote:
You are welcome. br br If all of the originals h... (show quote)
I would love to view your book. I have done digital scrapbooks with the digital images for the younger boys. I used Creative Memories software that is no longer available. Also, I have done books with Shutterfly. Thank you for sharing.
Aug 6, 2021 18:15:22 #
GrandmaG wrote:
I did a few practice shots at 3.5 and left the pages in the book. For better results, I think I will take the pages out of the book. I have a few good soft boxes I may try with my buff lights. Thank you.
Soft boxes are rather troublesome for copying. Directional lighting, arranged symmetrically, is key. If soft is all that you have, make some snoots for them.
Aug 6, 2021 18:17:36 #
User ID wrote:
Soft boxes are rather troublesome for copying. Directional lighting, arranged symmetrically, is key. If soft is all that you have, make some snoots for them.
I can do that. Thanks!
Aug 6, 2021 18:23:10 #
First, please accept my condolences.
Next, if suspending the camera under a tripod, put it on a table and buy a 7-inch torpedo level.
Place it across the lens and level it.
Rotate it 90 degrees around the lens and level.
Repeat until it is dead level.
You are now square with the tabletop.
Place picture on table between tripod legs.
Stop lens down for greater depth of field and use flash placed to the side at 45 degrees to the tabletop.
Experiment with aperture and flash settings until you get what you want.
Once locked down, snap away!
Aug 6, 2021 18:26:54 #
fetzler
Loc: North West PA
GrandmaG wrote:
WOW, lots of good information. Some of the pictures in the book were those that I took of pictures that were too large to scan. I laid them on the ground outside and I remember that I had a lot of trouble with camera angle and hot spots from the sun. How do you arrange the lights for copying and what lights do you use? I was wondering about the 85mm lens. I've never used Adobe Acrobat but I see I can download a trial of it.. Thank you for this information.
You can actually use a variety of lights. I have used photofloods (these are old fashioned and super hot), electronic flashes and regular light bulbs (High CRI Led lights are fine), and LED light panels. If you are using copy stand it may have light fixtures built in. You will need two lights placed at a 45 degree angle from plane of the image. This will create even lighting and reflections will not come into the camera. I have light stands for works on a wall or easel. Using your camera light meter and a sheet of paper verify lighting is even. Flashes work just fine but are a little harder to get right. (remember you will need two with diffuses - Kleenex may be OK) You will of course need a tripod unless you use a copy stand.
After studying your lenses I think the 85 mm has the best shot to work. Longer focal lengths are less likely to give you distortion issues. If the lens is is too long the working distance becomes so long that the set up won't fit in the room. Zoom lenses are not a great choice as these likely have the greatest distortion. Don't forget you can rent a macro lens with an 80-100mm focal length . (assuming FX or DX format camera)
Adobe Acrobat is for document creation and is available by subscription. The Acrobat distiller component allows one to make a press ready pdf file. Using Microsoft Publisher may also be a good route also for setting up the pages you could also add a title page , forward, etc to the document. The output can a pdf file. Some printers can use your publisher file directly. Foxit Editor appears to be a full featured competitor to Acrobat ( https://www.foxit.com/shopping/) at a cheaper price. The Idea is to get an electronic copy that has formatted pages for book printing or electronic viewing.
Aug 6, 2021 23:16:41 #
fetzler wrote:
You can actually use a variety of lights. I have ... (show quote)
The sample shots I did with the 85 mm and they were placed on the floor. I had to get quite far away to get the whole image in the frame. It might be easier to put the page on an easel against the wall. I have light stands and I do have a couple of LED lights that I could use. Thanks for the tips on how to set up the lights.
I will look into the software choices you mentioned.
I’m now wondering if I need to make the images wider to allow for a binding edge.
Aug 7, 2021 00:16:27 #
smussler
Loc: Land O Lakes, FL - Formerly Miller Place, NY
Najataagihe wrote:
First, please accept my condolences. br br br Ne... (show quote)
Before doing all that, first check if table top is level. Have an older house? With settling, even the floors may not be level.
I just moved into a new house with ceramic tile floors, needed some shims to get my dinning room table to sit level, or at least stop rocking - 3 legged pedestals on each half of the table.
Good luck with your project, getting ideas here for how to share about 30 years of my dads family 35mm slides.
Aug 7, 2021 01:08:48 #
Najataagihe wrote:
First, please accept my condolences. br br br Ne... (show quote)
Ok, I think there’s a level like that around here (I had to google it). I’m hoping this tripod method will work because a copy stand with lights is $340 plus. The whole idea to photograph is to save the gist of scanning. Plus, I’m thinking that the results will be better. Thanks for these instructions.
Aug 7, 2021 01:14:15 #
smussler wrote:
Before doing all that, first check if table top is level. Have an older house? With settling, even the floors may not be level.
I just moved into a new house with ceramic tile floors, needed some shims to get my dinning room table to sit level, or at least stop rocking - 3 legged pedestals on each half of the table.
Good luck with your project, getting ideas here for how to share about 30 years of my dads family 35mm slides.
That’s true. Most houses, old or new are not level nor square. With settling, we’ve had to readjust doors. Hanging pictures and window treatments was always a challenge to get straight as well.
It seems a lot of hoggers have done projects like this. I knew I would get a lot of help here. Thanks for your input.
Aug 7, 2021 03:12:59 #
RodeoMan
Loc: St Joseph, Missouri
GrandmaG wrote:
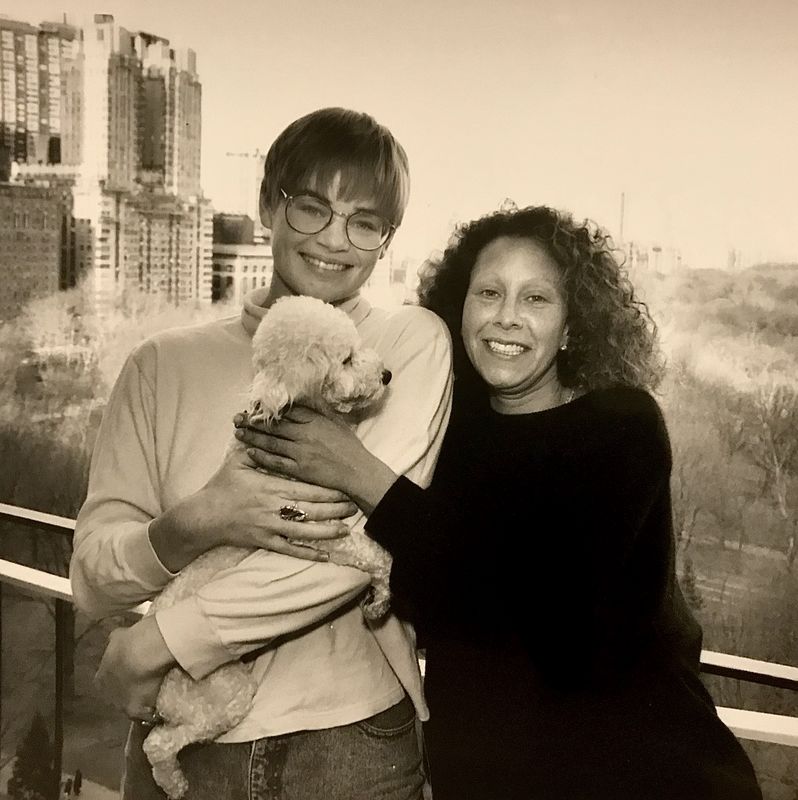
Thank you for the condolences. He was sick for 1 1/2 years with cancer and just turned 80. He was 9 years older than me and we were married for 35 years. Here's an example of what I'm dealing with. The first two were taken with the 85mm lens, hand held. Not too bad. I think I can deal with this. I changed the aspect ratio to 1:1 and only adjusted the crop in LR. Some layouts may give my more trouble. I just have to figure out a stable setup for the camera.
Thank you so much. Good luck with your project.
Aug 7, 2021 12:05:17 #
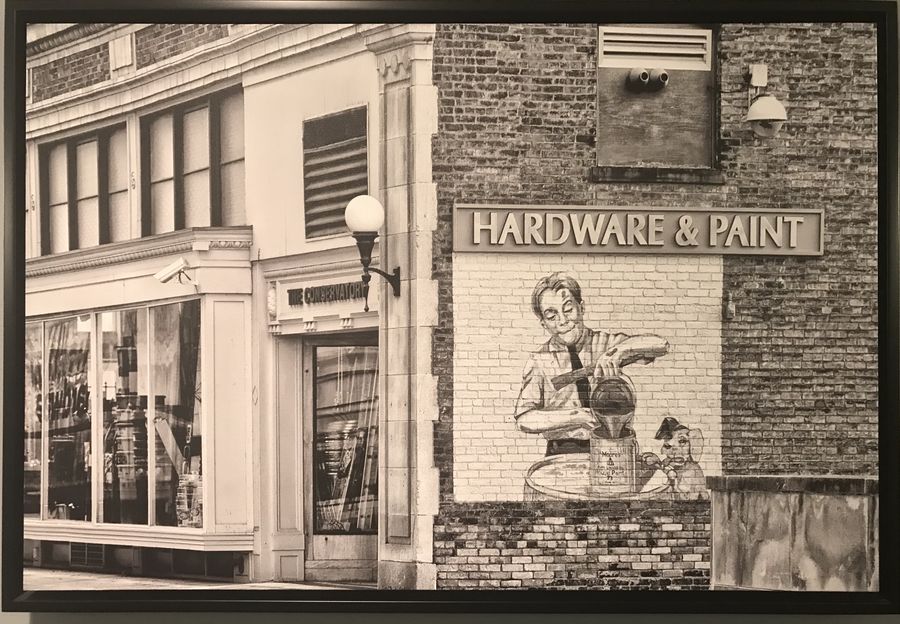
Much fine advice throughout the thread. Follow it as much as is possible but don’t be intimated by perfectionism. The first photo below is a quick copy job by phone, lit by the room’s overhead lighting fixture. It was made to illustrate a question in a phone conversation, just a family matter, not for any aesthetic purposes, and yet it looks great. All PP was done in the phone. Original is a small print, about 5x7”.
The second image below is also a copy by phone, of a large print on a hallway wall in a public place, done with dim ambient lighting. Copying can be far less scientific than some geeks will insist, but acoarst be as “scientific” as is practical (for you).
.
The second image below is also a copy by phone, of a large print on a hallway wall in a public place, done with dim ambient lighting. Copying can be far less scientific than some geeks will insist, but acoarst be as “scientific” as is practical (for you).
.
Aug 7, 2021 14:00:49 #
User ID wrote:
Much fine advice throughout the thread. Follow it ... (show quote)
Thank you. Great job. I especially like the 2nd picture. The phones are quite amazing nowadays.
Aug 7, 2021 16:19:11 #

GrandmaG wrote:
Thank you for the condolences. He was sick for 1 1/2 years with cancer and just turned 80. He was 9 years older than me and we were married for 35 years. Here's an example of what I'm dealing with. The first two were taken with the 85mm lens, hand held. Not too bad. I think I can deal with this. I changed the aspect ratio to 1:1 and only adjusted the crop in LR. Some layouts may give my more trouble. I just have to figure out a stable setup for the camera.
My condolences
 Lovely shots of a hearty, exemplary husband and companion
🌀☀️💞☀️🌀
Aug 7, 2021 23:18:45 #
joecichjr wrote:
My condolences Lovely shots of a hearty, exemplary husband and companion
🌀☀️💞☀️🌀
Lovely shots of a hearty, exemplary husband and companion🌀☀️💞☀️🌀
Thank you! He was very good to me.
If you want to reply, then register here. Registration is free and your account is created instantly, so you can post right away.