Is it Best to Expose for Your Subject, the Background or In-Between in bright sunlight without flash or reflectors?
Feb 4, 2021 18:48:52 #
a6k
Loc: Detroit & Sanibel
Terminology can impede understanding. “Expose for” is imprecise. If the subject is middle gray then spot metering it makes sense. But if it’s a dark subject then not. On a clear sunny day the “sunny 16” method will not lead you astray much. But adding a full stop to compensate for a dark subject is reasonable even though it may blow out the sky in places. You don’t need a meter for this case.
I would add that any camera that gives you a real-time live view solves this problem nicely as well.
Since a scene like this is going to present you with choices, The exposure should preserve the maximum PP potential which means that exposing as much as possible short of blowing important areas of highlight is the most prudent to do. It also minimizes noise.
Using native ISO is also best for low noise. Sharpness and detail are in opposition to noise.
If shooting raw then adding 2/3 stop to sunny 16 EV equivalent is unlikely to blow important highlights assuming good PP. Raw is usually exposed about that much lower than JPG by the camera even if using “raw+jpg”. You can verify this easily for your gear.
Feb 4, 2021 21:08:12 #

I could not extract the exposure data for your first image but whatever you did it was easy to recover the shadow detail. The blow out background is not much of a distraction.
Two summers ago the starlings got into a space between the frame and the aluminum siding in an overhang on a balcony on our house. The nested in there. There were dozens of them and they made a terrible mess. We decided not to disturb them- in the fall they launched all their fledglings outside of our window. Nice!
Very ingenious birds!
I did not photograph them. I shot several large commercial assignments that summer, just to pay for the damage they did!
Feb 4, 2021 22:02:40 #

a6k wrote:
Terminology can impede understanding. “Expose for”... (show quote)
An understanding of the Zone System frees one from spotmeter misinterpretations. If you have a dark subject and you want to use the meter's reading, you simply reduce the amount of light based on the tonal value you are reading, and vice versa. When you are comfortable you can take a proper exposure of three cats - a grey one, black one and white one - by reading the grey and using that reading without adjustment, or the white cat and exposing higher, or the black cat and exposing lower. Sunny 16 can work, but is useless in open shade, under a tree, or in highly reflective environments like snow or light colored beach sand. It's better to understand subject reflectance and read your scene from darkest to brightest areas and place the subject that you read with the meter where you want it to be. I've been using the Zone System ever since I first heard of it back in 1970, and it has yet to fail me. Naturally, with black and white film, there were many variables that could determine the overall contrast of an image, and in those days, whether or not you captured enough shadow detail.
Feb 4, 2021 23:26:55 #
Shooter41
Loc: Wichita, KS
Gene51 wrote:
Here is a practical example, taken with a D810 and... (show quote)
Dear Gene51...Thank you for showing me photographic examples so that I can truly understand your meaning. (I am amazed that you can shoot a 600mm Sport hand held at 1/320 second. You must not drink much coffee or have nerves of steel!) Please stay safe my friend.
Feb 4, 2021 23:37:01 #
Shooter41
Loc: Wichita, KS
E.L.. Shapiro wrote:
I could not extract the exposure data for your fir... (show quote)
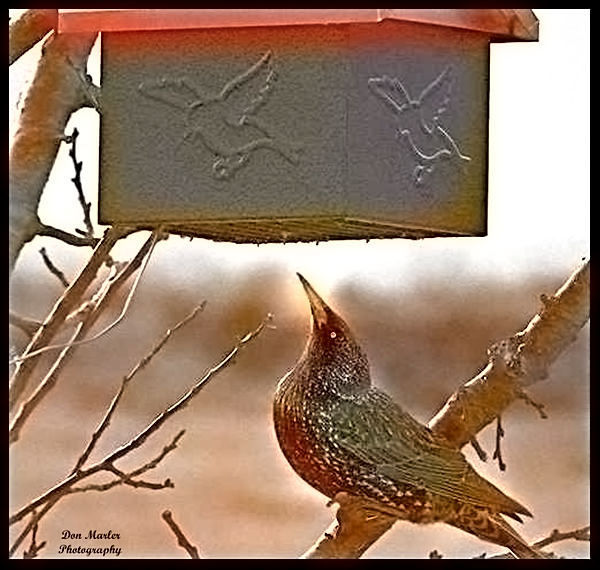
Dear E.L.Shapiro...The exposure data for my first image of the Starling looking up at the suet in the bottom of the feeder and figuring out that he could reach up and eat while standing on a branch was: Sony RX10M4; 1/1250 second; Manual mode; F8; ISO 1000; focal length 183.43 mm and no flash. It was nice of you for not disturbing the nesting Starlings. Thank you for sharing.
Feb 5, 2021 00:52:04 #
IDguy
Loc: Idaho
For birds I always use point focus and metering. I also shoot RAW so have some flexibility with background. And am getting better at replacing background in Photoshop. New sky replacement is awesome.
Feb 5, 2021 05:17:26 #
Shooter41 wrote:
Dear Gene51...Thank you for showing me photographic examples so that I can truly understand your meaning. (I am amazed that you can shoot a 600mm Sport hand held at 1/320 second. You must not drink much coffee or have nerves of steel!) Please stay safe my friend.
Thanks!
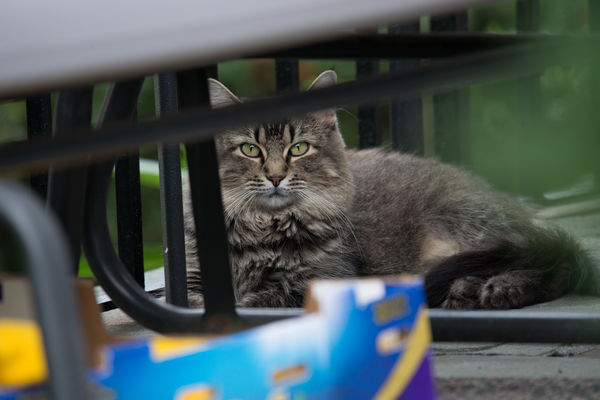
This is my first slow shutter speed shot, hand held at 600mm and 1/25 sec, F8, ISO 400 using a D800. You know it's hand held because no feral cat would put up with setting up a tripod or monopod. The stabilization on that lens is pretty good. More current lenses, like the Tamron G2, have even better stabilization. It helps that cats can sit completely motionless for seconds at a time, especially as they try and figure out if you present a threat or not. This feral was one of a small community of cats that I was feeding and housing during the winter in outside shelters. She was a fat, happy feral.
I drink about 4-5 cups of espresso a day. And cognac or bourbon.

Feb 5, 2021 12:56:03 #
Shooter41
Loc: Wichita, KS
Gene51 wrote:
Thanks! br br This is my first slow shutter speed... (show quote)
Dear Gene51...
You drink 4-5 cups of espresso a day along with cognac or bourbon? You must have a iron gut along with nerves of steel. I appreciate learning about the Tamron G2 excellent stabilization, I think I will see if they have one that will fit on my Canon EOS 6D, Mark II. Instead of the espresso and cognac, I will have a glass of warm milk to calm my nerves and sooth my Crohns tummy. Stay well my friend.
Feb 5, 2021 16:10:22 #
a6k
Loc: Detroit & Sanibel
Gene51 wrote:
An understanding of the Zone System frees one from... (show quote)
As always, Gene51 is correct and says it well. But this one line might be confusing:
If you have a dark subject and you want to use the meter's reading, you simply reduce the amount of light based on the tonal value you are reading, and vice versa.
When you meter a dark subject the camera "assumes" it is a middle grey subject. in order to make the dark subject come out dark in the image you do have to reduce the amount of light (aperture, speed or both) of the exposure. How much? That depends on how much darker the subject is than the middle gray for which your camera is calibrated (either by you or just the factory). It seems counter-intuitive to reduce exposure when you already metered a dark subject but it is correct as stated.
I have been a fan of the zone system since the late 60's and my Kodak ?-X days. It needed to be adapted a bit for 35mm roll film vs. the sheet film that Adams et al used, but it is a correct approach. There is no contradiction between the Zone and Sunny 16 but Sunny 16 for good daylight is fast and accurate. No it won't work as well for conditions outside its box such as a subject in shade unless you want to keep the original appearance of the scene. The Zone was very useful in adjusting the contrast of B&W prints to match both ends of the film's curve. But for film (Zone was for film originally) the exposure limits were at the opposite end from digital's hard limit at the maximum. There are many good articles on how to use Zone concepts for digital. Adams would have done that but as far as I know he did not, ever.
The good news is that the newest digital cameras have well over 10 stops DR which is roughly comparable to "latitude" in film. The new Sony alpha 1 claims 15 stops. That makes events like Gene's owl very feasible if used well.
Feb 5, 2021 16:37:36 #
Leitz
Loc: Solms
Shooter41 wrote:
When photographing outdoors in natural bright sunl... (show quote)
It's best to expose for the part of the scene where you want the best exposure.
Feb 5, 2021 16:49:57 #
Shooter41
Loc: Wichita, KS
Leitz wrote:
It's best to expose for the part of the scene where you want the best exposure.
Dear Leitz...Your advice is both simple and accurate! Thank you.
Feb 6, 2021 04:40:35 #
a6k wrote:
As always, Gene51 is correct and says it well. But... (show quote)
Thanks!
The key is to know your camera. Test your camera at different ISO settings, because higher ISO will generally have less dynamic range. Also, it does help to be able to visualize tonal values as you meter read your scene. Look at the high, the low, an make a judgement about where the other tones fall into the spectrum. In those golden olden days I use to have an amber filter to help me visualize a color scene as monochrome.
The camera's meter and hand held meters make no assumptions. They are dumb devices and only tell what they see. It has always been up to the photographer to interpret the results - and any assumptions being made are those by the photographer. The only counter-intuitive part is if you are reading the entire scene with either a center-weighted, matrix or average setting on the camera - then you'd have to use exposure compensation differently - I find that approach less reliable, fussy and counter-intuitive and as a result I rarely use it.
Today, after 55 yrs, I've gotten pretty good at judging a scene and it happens on autopilot most of the time. But sometimes, like with strong backlight or sidelight, I will point the camera's spotmeter at the subject, if it is a dark colored bird with detail, I will underexpose, anywhere from 1/2 stop to one stop, sometimes as much as two stops if the bird is black and the lighting is flat. It's really a judgement call. On the other end, egrets, gulls, and other white birds, or birds like eagles with white heads and tails, I will read the white and add 2 stops or more to the reading. I already know from past experience with the camera the limit of how much exposure I can add before the highlights blow out, much in the same way I knew how much I could subtract and still record deep shadows with details when using negative film.
The problem with explaining this is that it is a little hard to visualize. But having the benefit of being able to make a test exposure, check the back of the camera for histogram, blinkies and zebra stripes and just a high magnification view of the area in question - is far better than taking multiple test exposures, bracketing, and crossing one's fingers that you nailed the exposure then going into the darkroom to develop the film and swearing a lot when you didn't get it right.
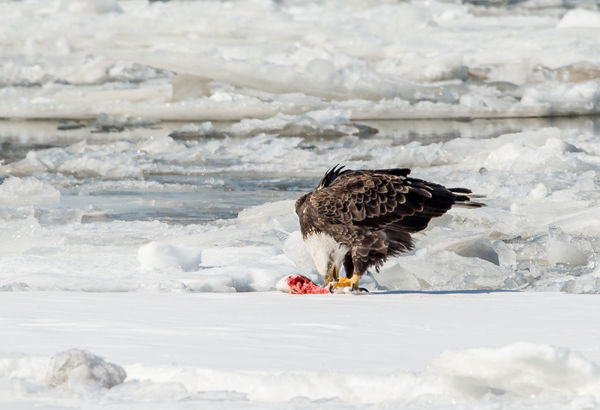
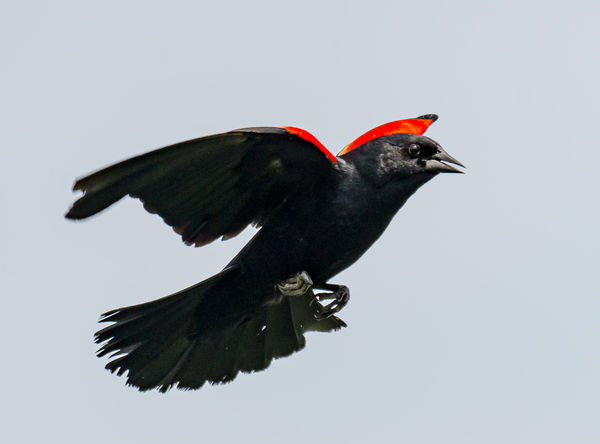
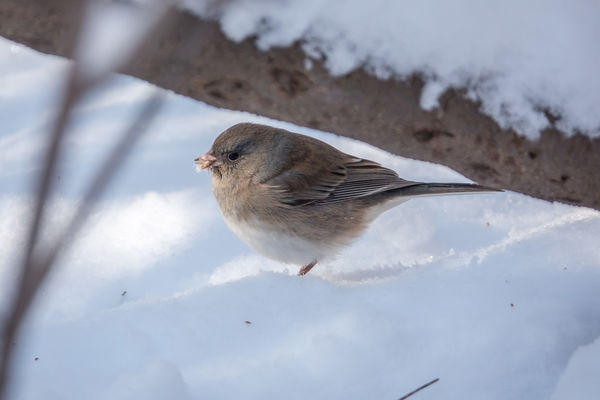
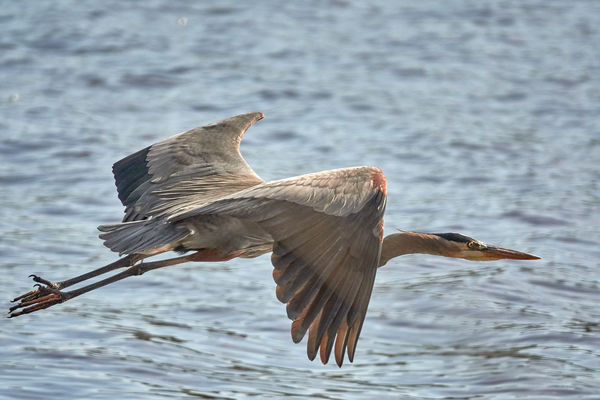
Shots like the ones below always presents challenges to those unfamiliar with the zone system, but with practice they can be a cakewalk.

Feb 6, 2021 09:15:48 #
Shooter41
Loc: Wichita, KS
Gene51 wrote:
Thanks! br br The key is to know your camera. Tes... (show quote)
Dear Gene51...
The image you shared with the black bird with red tipped wings is wonderful. That is the goal I am reaching for with the Starlings and Woodpeckers. I just read about the "noise, grain and color shift that my shooting at ISO2500 has caused, so I am going to drop back the the "Native ISO" of 200 on my Sony Rx10M4, slow my shutter speed, open my aperature and cross my fingers as I do test shoots and compare different settings and get to know my camera better, as well as the lighting at different times in my back yard.
I want to let you know that I took your advice and sent off for the Tamron telephoto lens with excellent image stabilization and anticipate it will arrive next Monday. Can't wait.
Thank you for being my mentor, buddy.
Shooter41
Feb 6, 2021 10:42:06 #
a6k
Loc: Detroit & Sanibel
Shooter41 wrote:
(snip) so I am going to drop back the the "Native ISO" of 200 on my Sony Rx10M4, (snip)
Shooter41
Shooter41
The native ISO on mine is 100. You may want to check that.
Feb 6, 2021 21:09:20 #
Shooter41 wrote:
Dear Gene51... br The image you shared with t... (show quote)
Thanks!
These images were taken with the RX10M4.


If you want to reply, then register here. Registration is free and your account is created instantly, so you can post right away.