Isopod
Jan 13, 2021 21:42:01 #
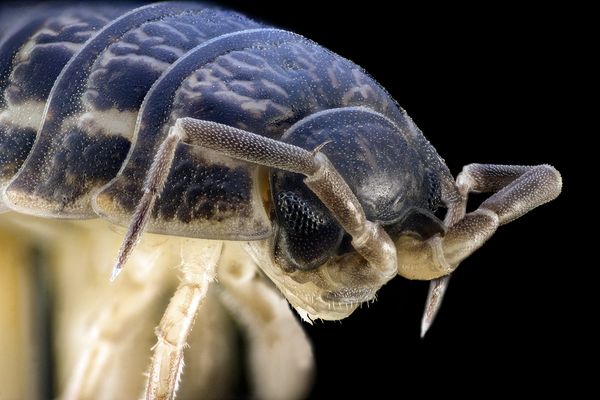
This is one of my Woodlouse, "Pill Bug", "Rollie Pollie", or whatever name they may go by that I staged for a focus stacking session as an end to my maddening lighting experiments and a return to the obedience of the Laws of Light.
Gosh knows that I have experimented with an untold number of means and methods over the past few years now with varying degrees of success and multitudes of duds. It was always one of those, "I thought it was a good idea at the time" ventures.
What I've learned is that lighting is a cruel mistress when not treated right and more importantly the Laws of Physics are not just good ideas, they are the Law.
Here's what we all know so well about our lighting:
1. Light travels in both particle and wave forms. Simply put, light enables humans and other animals to see as well as to be captured on our camera's sensor.
2. Diffused light is a soft light with neither the intensity nor the glare of direct light. It is scattered and comes from all directions. Thus, it seems to wrap around objects and it is softer and does not cast harsh shadows.
3. Diffused light brings out vivid details because there are no specular highlights or sharp shadows to distract attention.
What works and what does not work so well:
1. Direct light source on the subject is undesirable in many ways.
2. Putting diffusion material on the light source itself helps...however...the diffused material placed on the light source now becomes the light source.
3. A better solution is to separate the diffusion from the light source and to place the diffusion close to the subject (close being a relative term to the size of the subject). By placing the diffusion close to the subject, the diffusion material becomes the light source of the subject...not the initial light source.
4. Diffusing in a manner that allows light to bathe the subject will provide a more even appearance and help open up shadows cast by features of the subject onto itself.
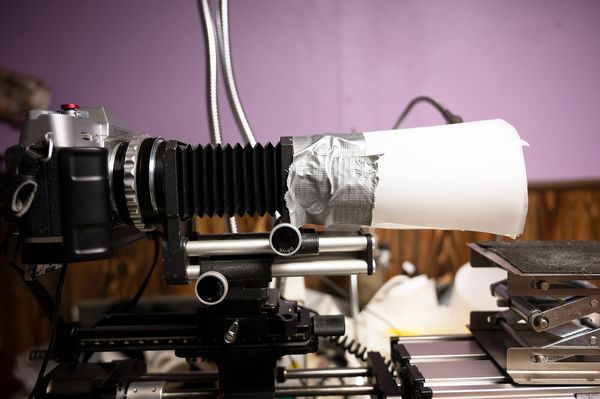
So...I returned to what I knew all along by taking near transparent drink cup and placing vellum tracing paper over it. Vellum tracing paper is durable and it is recognized as a good diffusing material. I cut a hole in the bottom to fit over the tube that serves as a lens hood and cut a section out of the length so that it will pass over the mounted specimen and allow the camera to move forward and back.
Then comes the magical part which is finding the distance to place the lights so that the "circle of light" spreads enough to cover its area of the diffuser...no round spot of light desired. I use three lights so each has to cover 1/3rd of the diffuser.
Lastly, set the shutter speed by watching the histogram in the camera. I keep my ISO at its lowest (200) and I have no aperture control of the objective I use, thus I only have one camera variable...shutter speed.
Attached are pictures of what will most likely be my lighting mainstay for mico sessions.
Gosh knows that I have experimented with an untold number of means and methods over the past few years now with varying degrees of success and multitudes of duds. It was always one of those, "I thought it was a good idea at the time" ventures.
What I've learned is that lighting is a cruel mistress when not treated right and more importantly the Laws of Physics are not just good ideas, they are the Law.
Here's what we all know so well about our lighting:
1. Light travels in both particle and wave forms. Simply put, light enables humans and other animals to see as well as to be captured on our camera's sensor.
2. Diffused light is a soft light with neither the intensity nor the glare of direct light. It is scattered and comes from all directions. Thus, it seems to wrap around objects and it is softer and does not cast harsh shadows.
3. Diffused light brings out vivid details because there are no specular highlights or sharp shadows to distract attention.
What works and what does not work so well:
1. Direct light source on the subject is undesirable in many ways.
2. Putting diffusion material on the light source itself helps...however...the diffused material placed on the light source now becomes the light source.
3. A better solution is to separate the diffusion from the light source and to place the diffusion close to the subject (close being a relative term to the size of the subject). By placing the diffusion close to the subject, the diffusion material becomes the light source of the subject...not the initial light source.
4. Diffusing in a manner that allows light to bathe the subject will provide a more even appearance and help open up shadows cast by features of the subject onto itself.
So...I returned to what I knew all along by taking near transparent drink cup and placing vellum tracing paper over it. Vellum tracing paper is durable and it is recognized as a good diffusing material. I cut a hole in the bottom to fit over the tube that serves as a lens hood and cut a section out of the length so that it will pass over the mounted specimen and allow the camera to move forward and back.
Then comes the magical part which is finding the distance to place the lights so that the "circle of light" spreads enough to cover its area of the diffuser...no round spot of light desired. I use three lights so each has to cover 1/3rd of the diffuser.
Lastly, set the shutter speed by watching the histogram in the camera. I keep my ISO at its lowest (200) and I have no aperture control of the objective I use, thus I only have one camera variable...shutter speed.
Attached are pictures of what will most likely be my lighting mainstay for mico sessions.
Jan 14, 2021 06:35:04 #
sippyjug104 wrote:
This is one of my Woodlouse, "Pill Bug",... (show quote)
Fantastic explanation of lighting. Gary
The best is this will work in most forms of photography, not just macro/micro.
Jan 14, 2021 12:48:29 #
Manglesphoto wrote:
Fantastic explanation of lighting. Gary
The best is this will work in most forms of photography, not just macro/micro.
The best is this will work in most forms of photography, not just macro/micro.
Thanks, Manglesphoto. I have boxes full of DIY diffusers and lightboxes. I've tried ever so many different light sources. I expect to see my photo on the wall of LOWES someday as the 'Customer of the Year' for buying all of the 'stuff' I use for my lighting experiments.
I'm a retired mechanical system designer so I truly understand how the Laws of Physics rule over my intentions. However being stubborn is also in my background so I'm driven to try and try again.
In macro photography the three elements are very close distance to each other...the camera lens, the subject and the illumination. In micro photography it is even more so where the subject nearly touches the tip of the lens.
Of course I realized that raw light was far too harsh and blew out highlights, cast harsh shadows and produced specular highlights. No good whatsoever.
Diffusion is the logical solution. I know, I'll put diffusing material on the bulb of the lights!!! That'll do it! UH..no, it will not. Although it is an improvement is simply moves the source of light from the 'bulb' to the diffusing material. It produces the same problems although not as distinct. Fair result, yes...best result, no.
Then the light bulb came on in my head and I asked myself "Why does an overcast day provide good lighting results?" The answer is that the Sun is the original light source some 93-million miles away. The cloudy sky becomes illuminated by the Sun. NOW...the soft clouds becomes the light source. The soft light source is a distance away YET relatively close to the subject compared to the distance between the Sun and the clouds.
And that is how it truly works and who am I to try to change the way the universe works.
Jan 14, 2021 17:35:18 #
I really like the textures and cool toned lighting. Enlarging by download is a reward! Well done.
Jan 14, 2021 18:03:11 #
Mark Sturtevant wrote:
I really like the textures and cool toned lighting. Enlarging by download is a reward! Well done.
Thanks, Mark. I plan on staying with this arrangement for a while.
Jan 14, 2021 18:16:06 #

Gary, you've articulated the principle behind the softbox for portraiture - get it close to the model and the light is softer. Great setup! I always enjoy your photos and discussions.
Jan 14, 2021 21:58:56 #

Very nice explanation of lighting technique. I'm sure that shutter speed varies greatly with magnification and subject but on average what shutter speed do you use? Thanks again for posting great info.
Jan 14, 2021 23:22:26 #
ecobin wrote:
Gary, you've articulated the principle behind the softbox for portraiture - get it close to the model and the light is softer. Great setup! I always enjoy your photos and discussions.
Thanks, Elliott. I believe that each type of photography has the same aspects of lighting just in different ways of applying it. Landscapes and wildlife of course have to mostly rely on natural lighting which places the photographer at the mercy of mother nature.
Jan 14, 2021 23:40:33 #
naturepics43 wrote:
Very nice explanation of lighting technique. I'm sure that shutter speed varies greatly with magnification and subject but on average what shutter speed do you use? Thanks again for posting great info.
Thanks and I enjoy sharing what I do and how I do it. I most often use a 5X industrial microscope objective as the lens for the camera. I mount it on a bellow and I can obtain varying amounts of magnification by extending and retracting the bellows although 5X is what it is designed for.
Microscope objectives are categorized by their "NA" which stands for numerical aperture. Mine has a NA of .13. Lenses that are extended to obtain magnification are subjected to an "effective aperture" which is much different than what the f/stop on the lens may read. For example a 1:1 macro lens that is put on extension tubes to produce 3X magnification when the lens shows an f/stop of f/5.6 would have an effective f/stop of f/22.4 which is why diffraction may be very apparent.
I shoot with constant light and I use a mirrorless camera. This allows me to see exactly what the shot will look like and what the histogram and exposure meter show. With no aperture to adjust, no change in lights, ISO set at 200, white balance set for the lighting there is only one thing for me to play with and that is the shutter speed.
My shutter speed changes based on how bright the subject is such as a yellow and white moth or a black cricket. My most often shutter speeds range from 1/8th second for the darker subjects up to 1/30th second for the brightest subjects.
Jan 15, 2021 14:02:17 #
Jan 16, 2021 15:15:50 #
Jan 16, 2021 16:45:22 #
tinusbum wrote:
excellent!! doesnt get any better than this
Thanks, Tinusbum. Illumination is truly an art and I view your work as mastery of the craft which I'm hoping to achieve myself someday.
If you want to reply, then register here. Registration is free and your account is created instantly, so you can post right away.