Cleaning and Restoring Old Negatives
Jan 4, 2021 10:56:27 #
ragon
Loc: Wisconsin
I have a lot of old family B&W film negatives that I want to invert, but many of them, after inverting, show up like these. What can I do to clean them up and remove the lines vertical and horizontal? I have used lens wipe and isopropol alcohol on a few which has cleaned up smudges, fingerprints, etc. but the striations? are still there.

Jan 4, 2021 10:58:18 #

This may help you a bit. https://kodakdigitizing.com/blogs/news/how-do-you-clean-your-negatives
--Bob
--Bob
ragon wrote:
I have a lot of old family B&W film negatives that I want to invert, but many of them, after inverting, show up like these. What can I do to clean them up and remove the lines vertical and horizontal?
Jan 4, 2021 11:06:41 #

Jan 4, 2021 11:29:24 #
The striations look more like scratches rather than dirt. What are you using to scan and what software are you using to invert? For cleaning I use a Rocket blower and PEC pads. For extremely dirty negatives I use PEC12 sparingly. I do take a scan prior to using PEC12 as it can easily make the situation worse.
Jan 4, 2021 17:38:25 #
Jan 4, 2021 17:42:09 #
ragon
Loc: Wisconsin
rmcgarry331 wrote:
The striations look more like scratches rather than dirt. What are you using to scan and what software are you using to invert? For cleaning I use a Rocket blower and PEC pads. For extremely dirty negatives I use PEC12 sparingly. I do take a scan prior to using PEC12 as it can easily make the situation worse.
I'm using a flat bed scanner and PS Elements to invert. The striations aren't dirt, but they aren't scratches either.
Jan 4, 2021 20:15:57 #
That explains so much. The method using a hack to scan with a flat bed scanner rarely works well. First the negative needs to be held flat, usually requiring some type of negative holder. The platen on your scanner will not itself flatten the negative enough. The scanner will pick-up any texture in your reflector through the negative or transparency. I'm seeing both problems in your sample image. I'm not sure the original size of the negative, but you may need to create a negative holder out of cardstock to hold the negative flat. Once it is flat, place it over a diffused light source and photograph it using a digital camera. Then use PSE to invert the image. Note if the striations are still there then they are scratches on the emulsion layer of the negative. The dust and scratches filter in PSE should help.
A better option would be to use a photo scanner like the Epson V series. Although, they look like flat bed scanners, they have negative holders and a top down light source for handling negatives and slides. Current models include a license to SilverFast scanning software, which can handle the inversion of negatives, as well as clean-up dust and scratches in the scan.
A better option would be to use a photo scanner like the Epson V series. Although, they look like flat bed scanners, they have negative holders and a top down light source for handling negatives and slides. Current models include a license to SilverFast scanning software, which can handle the inversion of negatives, as well as clean-up dust and scratches in the scan.
Jan 5, 2021 00:32:45 #
ragon
Loc: Wisconsin
Would this be a good one? Epson Perfection V600 Color Photo, Image, Film, Negative & Document Scanner
Amazon has them for $230. Description:About this item
Create extraordinary enlargements from film: 6400 x 9600 dpi for enlargements up to 17 Inches x 22 Inches. Maximum Scan Area 8.5 x 11.7 inches. TPU 2.7 x 9.5 inches
Remove the appearance of dust and scratches from film: Digital ICE for Film
Remove the appearance of tears and creases from photos: Digital ICE for prints
Restore faded color photos with one touch: Epson easy photo fix included
Scan slides, negatives and medium format panoramic film: Built in transparency unit
Achieve greater productivity: Energy efficient Ready Scan LED light source means no warm up time, faster scans and lower power consumption
Convert scanned documents into editable text: ABBYY FineReader Sprint Plus OCR
Take your photos further: ArcSoft PhotoStudio included, to help edit and enhance your digital images
Quickly complete any task: Instantly scan, copy, scan to email and create PDFs with four customizable buttons
Jan 5, 2021 06:49:40 #
Great scanner, I have the earlier model the V550. If you are on Windows the Epson software will work, however you can go to the Epson support site and it will take you to a link for a free download of SilverFast SE. You will need the serial number off your scanner, to download and install, but that is the better software to convert negatives.
Jan 5, 2021 08:30:35 #

The first step is to examine the negatives under magnification, with the light striking the surfaces at various angles, to see if those striations or scratches are actually there. If they are not visible on close examination then the issue is in the scanner or scanning method that others have suggested. another TEST WOUD BE TO SCAN A FRAMe OF CLEAR AND CLAN FILM AND SEE OF THE INTERFERENCE EXISTS DUE TO POOR CONTACTA IN THE SCANNER.
To remove surface or embedded dirt from negatives, alcohols are not advisable. There are film cleansers that contain one or more of these chemicals that can help dislodge dirt or remove grease without dissolving the base or the emulsion: methyl chloroform, trichloroethylene, and perchloroethylene. Someof these cleaners also contain a lubricant that restores flexibility to a film that has become brittle.
Another cleaning method for very dirty negatives is rewashing in a solution of Photo-Flo (wetting agent)> Immerse the negate in a solution of Photo-Flo and water diluted 1:200, The solution should be at about 68 degrees (F)- soak for a few minutes, gently help dislodge with your fingers or a very soft cloth. Then wet the film in the solution again and hang to dry in a dust-free area- do no sponge or squeegee the surface.
These cleaning methods are for dirt, grease, some fingermarks, etc., NOT scratches.
WARNING: Before attempting ANY cleaning procedure, scan the negative, as is, just in case the negative is damaged in cleaning- you will still have an image that may be able to be restored by other means.
Scratches are sometimes caused in the original porcessing- some photofinishers used roller transport processing machinery for a film that can cause linear scratches. Sometimes they are caused by the photographer excessively tight-winding the film after removing it forms the camera. Other times, static or synch marks are caused by long-term storage of negatives in a rolled-up fashion.
Good luck with your project.
Jan 5, 2021 09:34:40 #

Alcohol is a serious NO...Regular isopropyl contains water, and may end up causing more damage
Jan 5, 2021 10:51:50 #
They look like scan lines to me. The negative must be very dense (overexposed). The light part of the image appears to be from fogging of the negative. Scanners have a very hard time with dense negatives. If you tried to print the negative in the darkroom you wouldn't get the scan lines but you would have problems with long exposure times and flat contrast.
Jan 5, 2021 11:23:34 #
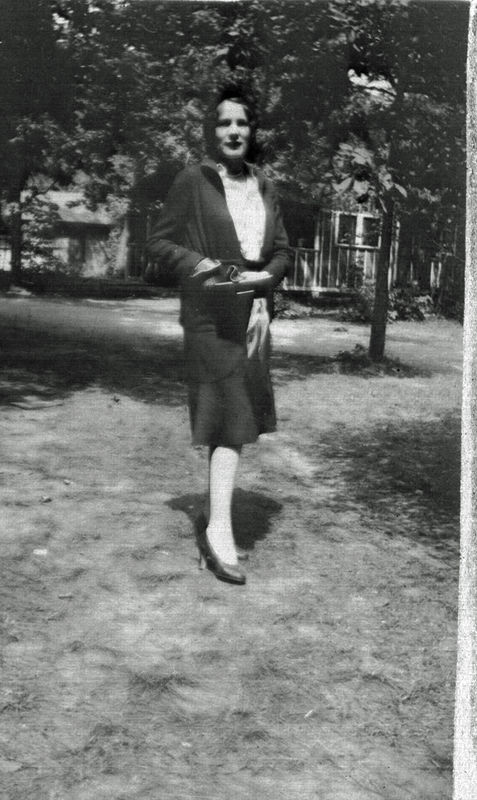
ragon
Loc: Wisconsin
Thanks for all the suggestions. I should have shown another scan and inverted negative using same method as the first image I posted. Here it is. Much better than most of the scans. There are a few like this one that seem to be OK.
Jan 5, 2021 12:06:04 #
As others have said, using a scanner that is designed to scan negatives will make most of your problems go away. The Epson 600 is a great one - and it does flatbed as well as transparencies. Those striations don't look like dirt of other problems on the negative - its almost like a recording of whatever texture is on your flatbed. It doesn't show up much on the dark parts of the image, but mostly light, which would make sense if light was bouncing off the scanner pad. At any rate, if the negatives mean anything to you, it's better to bite the bullet and get a scanner for the specific job.
Jan 5, 2021 12:06:05 #
rmcgarry331 wrote:
That explains so much. The method using a hack to... (show quote)
I believe you are imaging the platen of the scanner through the negative. As per above, a photo scanner will eliminate this.
If you want to reply, then register here. Registration is free and your account is created instantly, so you can post right away.