It's not the lens, it's me 😖
Dec 2, 2020 15:30:15 #
a6k
Loc: Detroit & Sanibel
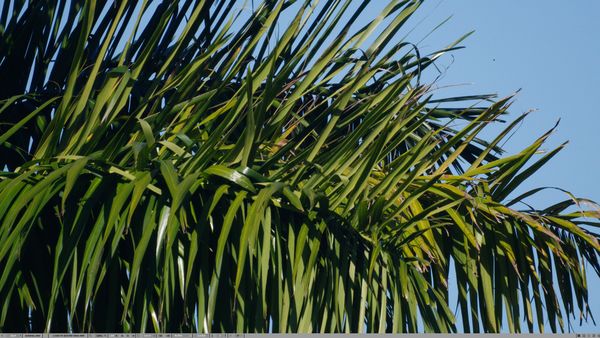
After two tours of the nearby wildlife refuge with my Minolta 500/8 reflex on my Sony a6500 for which I got disappointing results, I tried some test shots.
This is a screen capture of a shot using F8 (no choice), 1/1600 second, ISO 400. I set the camera to manual exposure for that and it's basically a "sunny 16" exposure. I had steady-shot turned on and braced the camera on a railing. I used the lens in manual focus mode but I do have an adapter, LA-EA4, that can auto focus this lens. It's slow and noisy and clunky so this was done using the LA-EA3 adapter.
Some math that may interest some: the linear difference between the original and this portion is 54%. The camera is a 1.5 crop so the image you see here is about the same as if it were taken with a 1500 mm lens on a FF camera.
The screen was displaying 1:1 on my 4K monitor (smaller pixels, finer appearance). The image was being displayed in Preview on my Mac. The original raw image is 6000 x 4000 px. Therefore this image is 29% of the total area. But this file is bigger (no idea why).
I did no editing. I'm sure Preview is using some defaults but I did nothing, myself.
If you want to pixel peep - I did - you can download this ~10MB image.
It's hard to get good pics with this fixed length long lens, but the problem seems to be me, not the sharpness of the lens or the camera.
Agree or disagree?
Dec 2, 2020 15:58:50 #

Why don't you attach the actual image file? This is a screen shot and not the same thing.
Dec 2, 2020 15:59:08 #
Bob Locher
Loc: Southwest Oregon
I had much the same experience. Ideally, the mirror lines was sharp, in practice, difficult at best to get a good image hand held. I gave it up. I suspect part of the problem is that hand holding the package short package doesn't lend itself to a solid grip. A physically longer lens allows a two handed grip that helps a lot.
More recently I changed over to an A6500 - available used at quite good prices these days - and found the image stabilization made a huge difference, especially with longer lenses. Then, later, I added the Sony 70 - 350 mm zoom lens, which is also stabilized. The improvement has been huge. The lens is extremely sharp throughout its range, and I am delighted with the combination. Add Topaz Sharpen AI into the mix and Wow! This is a spendy approach but it delivered.
More recently I changed over to an A6500 - available used at quite good prices these days - and found the image stabilization made a huge difference, especially with longer lenses. Then, later, I added the Sony 70 - 350 mm zoom lens, which is also stabilized. The improvement has been huge. The lens is extremely sharp throughout its range, and I am delighted with the combination. Add Topaz Sharpen AI into the mix and Wow! This is a spendy approach but it delivered.
Dec 2, 2020 16:03:45 #
a6k
Loc: Detroit & Sanibel
CHG_CANON wrote:
Why don't you attach the actual image file? This is a screen shot and not the same thing.
The original is a 24 MB ".arw". In doing this I'm saving are than half the site's bandwidth, ensuring everyone can view it and showing the 1:1 accurately. If you still want the original I'd be happy to PM it.
From my point of view, this makes the case for all the people all the time instead of some of the people some of the time.
Dec 2, 2020 16:05:55 #
a6k
Loc: Detroit & Sanibel
Bob Locher wrote:
I had much the same experience. Ideally, the mirro... (show quote)
Bob, thanks. My other recent post was about that 70-350 lens. Very helpful comment. A zoom is handier but the advantage of 500 mm vs 350 mm is pretty noticeable. So many choices, so little time.
Dec 2, 2020 16:08:33 #
a6k
Loc: Detroit & Sanibel
Bob Locher wrote:
I had much the same experience. Ideally, the mirro... (show quote)
btw, the length of my mirror lens, with necessary adapter, is a little longer than the 70-50 except perhaps when fully extended. Both are fairly short. I need one hand for the camera and one hand for the lens so a two handed grip on the lens would require a helper. Maybe a monopod? I have a good one.
Dec 2, 2020 16:17:36 #
a6k wrote:
The original is a 24 MB ".arw". In doing this I'm saving are than half the site's bandwidth, ensuring everyone can view it and showing the 1:1 accurately. If you still want the original I'd be happy to PM it.
From my point of view, this makes the case for all the people all the time instead of some of the people some of the time.
From my point of view, this makes the case for all the people all the time instead of some of the people some of the time.
You start a discussion based on something only you can see locally? What are you looking to accomplish with such an approach? You're only wasting your time, and of course, the time of everyone who takes a passing interest. I hate to knock you off your pedestal, but you are not saving half the site's bandwidth as that's not how the site nor the internet works ...
You are correct that a 24MB attachment is not worthwhile as it can't successfully be attached. The site's posted attachment file size limit is 20MB. A minor bit of effort on your part could create a file below the 20MB size limit. A minor bit more than the effort expended so far.
But, is a constructive discussion what you're really after in this post?
Dec 2, 2020 16:38:01 #
a6k
Loc: Detroit & Sanibel
CHG said..
You start a discussion based on something only you can see locally? What are you looking to accomplish with such an approach? You're only wasting your time, and of course, the time of everyone who takes a passing interest. I hate to knock you off your pedestal, but you are not saving half the site's bandwidth as that's not how the site nor the internet works ...
You are correct that a 24MB attachment is not worthwhile as it can't successfully be attached. The site's posted attachment file size limit is 20MB. A minor bit of effort on your part, of course, could create a file below the 20MB size limit. A minor bit more than the effort expended so far.
But, is a constructive discussion what you're really after in this post?
Ouch, CHG, that left a mark.
But let me avoid taking it personally and respond with some hopefully helpful considerations.
I don't mean to be on a pedestal at any time and certainly not when admitting that the gear is much better than I am.
You know as well as I do that the .ARW can't be modified to make it smaller so I'd have to send a JPG, compressed TIF or HEIC. Since I'm old enough to remember when storage and bandwidth were precious, I'm in the habit of being a little sparing of them. I can't be sure how the site works in detail but I'm pretty sure that a file that is twice as big will take about twice as much transmission resource and about twice as much storage and ditto every time a reader downloads his own copy.
I really did mean to contribute to the general knowledge and at least one other response supports my view of that. I certainly don't mean to waste your time. You didn't say what "original" you'd be interested in but I'm open to any suggestion that makes sense. I can even PM you a link to the original on OneDrive if you want me to put one there for you. I'm easy.
That said, I really don't know what additional information anyone will get from that. In my view, the screenshot shows pretty well that the image is more than acceptably sharp and the colors, etc. are good. I'm not into keeping secrets, so let's keep it civil and I'll be happy to help out. If anyone thinks the image is not very good it's unlikely the original would change his mind.
The file you see here is a Adobe RGB JPG exported by Sony Edit with no modification on my part and at the best quality level offered by that app. I hope this is what you were looking for. Now I've used about 25 MB in total.

Dec 2, 2020 17:13:05 #
a6k wrote:
CHG said.. br I You start a discussion based on s... (show quote)
I wanted to see the actual details to judge for myself whether you're wasting your time with the lens overall. Thank you for taking the effort to provide a version that provides a 1:1 pixel level view.
I've shot this entire calendar year primarily with a Sony a7II and several Canon FD lenses that are manual-only. Looking at the details of this attachment and your other comment above, consider the following options:
1. Shoot from a tripod so you're not supporting the weight of the camera / lens, and instead, can focus your attention completely on focus and shutter release.
2. Use aperture or shutter priority with AUTO ISO and +0.7 (or more / less) of Exposure Compensation. Shot in RAW. Fiddling around with exposure for a moving subject before you even get to focus is just a lot of balls to be juggling. Let the camera handle the exposure within your guidelines so you can focus your attention completely on focus and shutter release.
3. Use the EVF and the 10x zoom to 'see' the details and practice quickly and precisely focusing the lens via the max EVF zoom.
4. Use the 'free' digital frames and manually move the plane of focus subtly back n forth across the intended subject, when possible, while letting the camera fire in high-speed continuous bursts as you track the subject and adjust the focus.
5. If possible / applicable, pre-focus on the location of the pending subject. If a bird or an insect can be expected to land someplace, pre-focus the lens on that someplace in anticipation.
6. Update your focus peeking parameters to the maximum sharpening setting for the shimmer of color that highlights the plane of focus in the EVF. As much as the 10x zoom benefits a very precise focus, a moving subject may require using the shimmering color and a lot of bursts to maybe get one good one as the focus plane passes over the subject. The max sharpening makes the shimmer more pronounced in the EVF without impacting the RAW file. If you can confirm the focus at 10x, then use the shimmer to tell you where the focus has shifted when you drop out of the 10x zoom.
7. Use the slowest shutter and lowest ISO possible to maximize the RAW for processing. Depending on the light and the subject movement, you might get as slow as 1/500, where maybe 1/800sec is a better starting point. Use Shutter Priority to manage the shutterspeed and EC to slightly ETTR via the ISO and let the camera manage the ISO via AUTO-ISO. The camera will dynamically meter the available light for whatever aperture you set manually on the lens.
8. Test the lens at various apertures to see if there are better results to be had stepped down from f/8.
9. Set the IBIS to the 500mm focal length and have active, even on the tripod, where you'll need a loose ball-head to track moving subjects, again while your attention is focused on tracking the subject, focusing the lens, and bursting the shutter.
10. Practice and review your images, identifying areas to repeat and / or improve, based on the results. It was probably the 3rd session and beyond that I started to pull together all the necessary shooting technique and finger feel for the camera controls, usually 4+ hours per session (about 1000 raw), so about 16-hours were needed to get a feel for the process where everything felt natural and intuitive ish.
You probably have zero possibility for birds in flight tracking. But, with all the ideas above, tracking birds on water is very doable as well as foraging behavior.
Dec 2, 2020 17:56:54 #
Bob Locher
Loc: Southwest Oregon
Actually, I meant holding one hand on the camera and the other on the lens. But with the shortness of the mirror lens, I found I had less stability as I do with the physically longer lens.
Cheers
Cheers
Dec 2, 2020 19:56:00 #
a6k
Loc: Detroit & Sanibel
CHG, you obviously intend to be helpful and I've seen that you do that a lot on UHH. But a lot of this misses the mark. I wish the answers were easy. Thank you for making the effort. I aspire to being helpful, too. This thread of mine has limited potential to help others, but reflex/mirror lenses as a subject to sometimes appear. I have been more help to others with advice on Mac's but that just because I can.
I wanted to see the actual details to judge for myself whether you're wasting your time with the lens overall. Thank you for taking the effort to provide a version that provides a 1:1 pixel level view.
OK, but I was asking what readers thought of the ability of the lens to produce a sharp picture. I already have demonstrated that the lens/camera is better than I am under "field" conditions.
A. I've shot this entire calendar year primarily with a Sony a7II and several Canon FD lenses that are manual-only. Looking at the details of this attachment and your other comment above, consider the following options:
1. Shoot from a tripod so you're not supporting the weight of the camera / lens, and instead, can focus your attention completely on focus and shutter release.
A. Great idea but for reasons that would clutter the post, not feasible. I often take advantage of places to brace my hands, though.
2. Use aperture or shutter priority with AUTO ISO and +0.7 (or more / less) of Exposure Compensation. Shot in RAW. Fiddling around with exposure for a moving subject before you even get to focus is just a lot of balls to be juggling. Let the camera handle the exposure within your guidelines so you can focus your attention completely on focus and shutter release.
A. I've found that ISO 400 on that particular camera is a sweet spot and while I'm aware of auto-ISO, within reasonable limits I'd rather just compensate for some under exposure in post. Your idea here is contradicted by your own item 7 below. A little under exposure is easier to fix than subject motion blur, camera shake or both.
3. Use the EVF and the 10x zoom to 'see' the details and practice quickly and precisely focusing the lens via the max EVF zoom.
A. I always use the EVF but for reasons that are not obvious, there is no focus helper zoom with this lens. And as must be obvious to all who understand about reflex lenses, the lens itself does not zoom. My other lenses do provide focus magnification, btw.
4. Use the 'free' digital frames and manually move the plane of focus subtly back n forth across the intended subject, when possible, while letting the camera fire in high-speed continuous bursts as you track the subject and adjust the focus.
A. Too busy. Good luck with that if you are able. With this lens in AF and a stationary target it's easy. But the lens is really awful for focus changes so I often just use the manual adapter instead and rely on the EVF.
5. If possible / applicable, pre-focus on the location of the pending subject. If a bird or an insect can be expected to land someplace, pre-focus the lens on that someplace in anticipation.
A. See #4. This is a great idea but has not worked well for me in practice and it's been quite a few years.
6. Update your focus peeking parameters to the maximum sharpening setting for the shimmer of color that highlights the plane of focus in the EVF. As much as the 10x zoom benefits a very precise focus, a moving subject may require using the shimmering color and a lot of bursts to maybe get one good one as the focus plane passes over the subject. The max sharpening makes the shimmer more pronounced in the EVF without impacting the RAW file. If you can confirm the focus at 10x, then use the shimmer to tell you where the focus has shifted when you drop out of the 10x zoom.
A. I always use focus peaking, DMF when available, even when I have good AF. It's great also for predicting DOF. The focus magnification, as I noted above, doesn't work on this lens. I don't know why. Focus Peaking doesn't offer a sharpening setting but I'm going to tweak my EVF settings to see if I can boost sharpening that I see in it. I was using "no effect" in the EVF for creative style so I'll have to go back to "Standard" to do this. It might help but I think the problem is my camera handling, not this. When shooting birds, there is usually not a lot of time to fuss with the focus as there was in the shot that I posted.
7. Use the slowest shutter and lowest ISO possible to maximize the RAW for processing. Depending on the light and the subject movement, you might get as slow as 1/500, where maybe 1/800sec is a better starting point. Use Shutter Priority to manage the shutterspeed and EC to slightly ETTR via the ISO and let the camera manage the ISO via AUTO-ISO. The camera will dynamically meter the available light for whatever aperture you set manually on the lens.
A. This is off the mark for this lens. Even if I set it for shutter priority it will still be F8.0 only because it is a reflex lens. I can shoot aperture priority, of course. I can also shoot totally manual, with or without auto-ISO. This kind of lens is more limiting than a normal lens. It's a 500mm lens, physically, 750mm "equivalent" so slow shutter speeds are not a good approach. As noted before, sunny 16, ISO 400 and shutter at 1/1600 is the sweet spot.
8. Test the lens at various apertures to see if there are better results to be had stepped down from f/8.
A. The lens is F8.0 only because it is a reflex or "mirror" lens.
9. Set the IBIS to the 500mm focal length and have active, even on the tripod, where you'll need a loose ball-head to track moving subjects, again while your attention is focused on tracking the subject, focusing the lens, and bursting the shutter.
A. I had the IBIS (Sony Steady Shot) set to "auto" and the camera knows it is a 500 mm lens. But for my next try it will be set to 500, just to see if it helps. Doubtful.
10. Practice and review your images, identifying areas to repeat and / or improve, based on the results. It was probably the 3rd session and beyond that I started to pull together all the necessary shooting technique and finger feel for the camera controls, usually 4+ hours per session (about 1000 raw), so about 16-hours were needed to get a feel for the process where everything felt natural and intuitive ish.
A. I don't know exactly what you meant by "review" but I have post-shot review turned off because it interferes with multiple shots. I do review as soon as possible afterwards, sometimes only a minute or two later.
You probably have zero possibility for birds in flight tracking. But, with all the ideas above, tracking birds on water is very doable as well as foraging behavior.
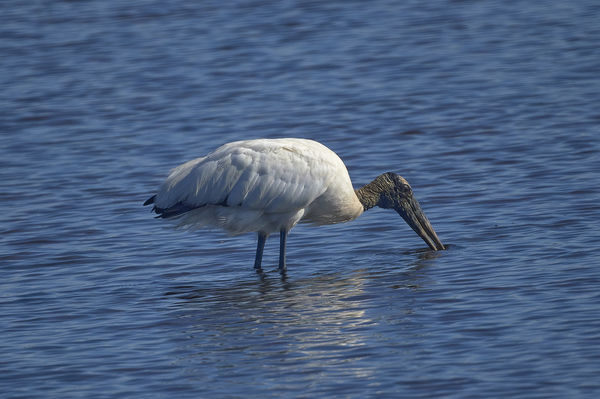
A. I have had less luck tracking them in flight with this camera compared to my RX10m4 but it is possible because of focus peaking. Finding them in the sky with such a narrow angle of view can be frustrating. This shot of a Wood Stork was a challenge because it was in constant motion, both the head and the legs. It stirs the bottom and then tries to capture some food by sticking its head into the water. Timing is tricky. Maybe I should have used video.
I wanted to see the actual details to judge for myself whether you're wasting your time with the lens overall. Thank you for taking the effort to provide a version that provides a 1:1 pixel level view.
OK, but I was asking what readers thought of the ability of the lens to produce a sharp picture. I already have demonstrated that the lens/camera is better than I am under "field" conditions.
A. I've shot this entire calendar year primarily with a Sony a7II and several Canon FD lenses that are manual-only. Looking at the details of this attachment and your other comment above, consider the following options:
1. Shoot from a tripod so you're not supporting the weight of the camera / lens, and instead, can focus your attention completely on focus and shutter release.
A. Great idea but for reasons that would clutter the post, not feasible. I often take advantage of places to brace my hands, though.
2. Use aperture or shutter priority with AUTO ISO and +0.7 (or more / less) of Exposure Compensation. Shot in RAW. Fiddling around with exposure for a moving subject before you even get to focus is just a lot of balls to be juggling. Let the camera handle the exposure within your guidelines so you can focus your attention completely on focus and shutter release.
A. I've found that ISO 400 on that particular camera is a sweet spot and while I'm aware of auto-ISO, within reasonable limits I'd rather just compensate for some under exposure in post. Your idea here is contradicted by your own item 7 below. A little under exposure is easier to fix than subject motion blur, camera shake or both.
3. Use the EVF and the 10x zoom to 'see' the details and practice quickly and precisely focusing the lens via the max EVF zoom.
A. I always use the EVF but for reasons that are not obvious, there is no focus helper zoom with this lens. And as must be obvious to all who understand about reflex lenses, the lens itself does not zoom. My other lenses do provide focus magnification, btw.
4. Use the 'free' digital frames and manually move the plane of focus subtly back n forth across the intended subject, when possible, while letting the camera fire in high-speed continuous bursts as you track the subject and adjust the focus.
A. Too busy. Good luck with that if you are able. With this lens in AF and a stationary target it's easy. But the lens is really awful for focus changes so I often just use the manual adapter instead and rely on the EVF.
5. If possible / applicable, pre-focus on the location of the pending subject. If a bird or an insect can be expected to land someplace, pre-focus the lens on that someplace in anticipation.
A. See #4. This is a great idea but has not worked well for me in practice and it's been quite a few years.
6. Update your focus peeking parameters to the maximum sharpening setting for the shimmer of color that highlights the plane of focus in the EVF. As much as the 10x zoom benefits a very precise focus, a moving subject may require using the shimmering color and a lot of bursts to maybe get one good one as the focus plane passes over the subject. The max sharpening makes the shimmer more pronounced in the EVF without impacting the RAW file. If you can confirm the focus at 10x, then use the shimmer to tell you where the focus has shifted when you drop out of the 10x zoom.
A. I always use focus peaking, DMF when available, even when I have good AF. It's great also for predicting DOF. The focus magnification, as I noted above, doesn't work on this lens. I don't know why. Focus Peaking doesn't offer a sharpening setting but I'm going to tweak my EVF settings to see if I can boost sharpening that I see in it. I was using "no effect" in the EVF for creative style so I'll have to go back to "Standard" to do this. It might help but I think the problem is my camera handling, not this. When shooting birds, there is usually not a lot of time to fuss with the focus as there was in the shot that I posted.
7. Use the slowest shutter and lowest ISO possible to maximize the RAW for processing. Depending on the light and the subject movement, you might get as slow as 1/500, where maybe 1/800sec is a better starting point. Use Shutter Priority to manage the shutterspeed and EC to slightly ETTR via the ISO and let the camera manage the ISO via AUTO-ISO. The camera will dynamically meter the available light for whatever aperture you set manually on the lens.
A. This is off the mark for this lens. Even if I set it for shutter priority it will still be F8.0 only because it is a reflex lens. I can shoot aperture priority, of course. I can also shoot totally manual, with or without auto-ISO. This kind of lens is more limiting than a normal lens. It's a 500mm lens, physically, 750mm "equivalent" so slow shutter speeds are not a good approach. As noted before, sunny 16, ISO 400 and shutter at 1/1600 is the sweet spot.
8. Test the lens at various apertures to see if there are better results to be had stepped down from f/8.
A. The lens is F8.0 only because it is a reflex or "mirror" lens.
9. Set the IBIS to the 500mm focal length and have active, even on the tripod, where you'll need a loose ball-head to track moving subjects, again while your attention is focused on tracking the subject, focusing the lens, and bursting the shutter.
A. I had the IBIS (Sony Steady Shot) set to "auto" and the camera knows it is a 500 mm lens. But for my next try it will be set to 500, just to see if it helps. Doubtful.
10. Practice and review your images, identifying areas to repeat and / or improve, based on the results. It was probably the 3rd session and beyond that I started to pull together all the necessary shooting technique and finger feel for the camera controls, usually 4+ hours per session (about 1000 raw), so about 16-hours were needed to get a feel for the process where everything felt natural and intuitive ish.
A. I don't know exactly what you meant by "review" but I have post-shot review turned off because it interferes with multiple shots. I do review as soon as possible afterwards, sometimes only a minute or two later.
You probably have zero possibility for birds in flight tracking. But, with all the ideas above, tracking birds on water is very doable as well as foraging behavior.
A. I have had less luck tracking them in flight with this camera compared to my RX10m4 but it is possible because of focus peaking. Finding them in the sky with such a narrow angle of view can be frustrating. This shot of a Wood Stork was a challenge because it was in constant motion, both the head and the legs. It stirs the bottom and then tries to capture some food by sticking its head into the water. Timing is tricky. Maybe I should have used video.
Dec 2, 2020 20:16:57 #
Ltgk20
Loc: Salisbury, NC
I used the 500mm mirror on my a99ii many times and always with excellent sharpness results. I was able to handhold at relatively slow shutter speeds (as slow as 1/500 consistently), but I realize everyone is somewhat different with respect to handholding capabilities. I suspect the a99ii provided a more substantial tool given its larger size, heavier weight and center viewfinder. I will offer one suggestion that isn't about sharpness, but can help the lens's performance: The stock lens hood is very short and the lens can suffer from a loss of contrast if any light skims across the front element. I purchased an alternate lens hood which screwed on after removing the stock one and got better results.
Dec 2, 2020 21:25:13 #
It's hard to have an in-line back n forth, but I'll try using RESP - response.
CHG, you obviously intend to be helpful and I've seen that you do that a lot on UHH. But a lot of this misses the mark. I wish the answers were easy. Thank you for making the effort. I aspire to being helpful, too. This thread of mine has limited potential to help others, but reflex/mirror lenses as a subject to sometimes appear. I have been more help to others with advice on Mac's but that just because I can.
I wanted to see the actual details to judge for myself whether you're wasting your time with the lens overall. Thank you for taking the effort to provide a version that provides a 1:1 pixel level view.
OK, but I was asking what readers thought of the ability of the lens to produce a sharp picture. I already have demonstrated that the lens/camera is better than I am under "field" conditions.
A. I've shot this entire calendar year primarily with a Sony a7II and several Canon FD lenses that are manual-only. Looking at the details of this attachment and your other comment above, consider the following options:
1. Shoot from a tripod so you're not supporting the weight of the camera / lens, and instead, can focus your attention completely on focus and shutter release.
A. Great idea but for reasons that would clutter the post, not feasible. I often take advantage of places to brace my hands, though.
2. Use aperture or shutter priority with AUTO ISO and +0.7 (or more / less) of Exposure Compensation. Shot in RAW. Fiddling around with exposure for a moving subject before you even get to focus is just a lot of balls to be juggling. Let the camera handle the exposure within your guidelines so you can focus your attention completely on focus and shutter release.
A. I've found that ISO 400 on that particular camera is a sweet spot and while I'm aware of auto-ISO, within reasonable limits I'd rather just compensate for some under exposure in post. Your idea here is contradicted by your own item 7 below. A little under exposure is easier to fix than subject motion blur, camera shake or both.
RESP If you desire and sense the possibility of success, reconsider if a tripod can be brought into the equation. This Wood Stork would prompt me to seek to maximize the possible results from this 500mm configuration. My experience with foraging American ibis is they can be frozen at 1/640sec, hence my suggestion to consider your shutterspeed, where 1/800 and 1/1000 also work.
3. Use the EVF and the 10x zoom to 'see' the details and practice quickly and precisely focusing the lens via the max EVF zoom.
A. I always use the EVF but for reasons that are not obvious, there is no focus helper zoom with this lens. And as must be obvious to all who understand about reflex lenses, the lens itself does not zoom. My other lenses do provide focus magnification, btw.
RESP My Canon FD lenses from the 1980s don't have a control ring either. Instead, I've assigned the Focus Magnifier to a C# custom function button on the Sony body. It takes a few presses to zoom to 10x in the EVF, but that's how I use the EVF with these manual focus lenses. I pre-position an off-center AF point for my composition, so then when pressing the C# button, the EVF display zooms to that AF point that hopefully is over / near where I want the lens focused, such as the eye for this Wood Stork.
4. Use the 'free' digital frames and manually move the plane of focus subtly back n forth across the intended subject, when possible, while letting the camera fire in high-speed continuous bursts as you track the subject and adjust the focus.
A. Too busy. Good luck with that if you are able. With this lens in AF and a stationary target it's easy. But the lens is really awful for focus changes so I often just use the manual adapter instead and rely on the EVF.
RESP I bring a perspective of creating images. I don't measure success by graphs or minimum shutter counts. Rather, I seek to capture at least 1 excellent result when the processing is finished, preferably more, but I don't shed tears over the images deleted to isolate the best. Hence, all my suggestions are focused on maximizing the possibility of achieving a few frames that are sharply focused, well composed, well exposed for culling and editing later.
5. If possible / applicable, pre-focus on the location of the pending subject. If a bird or an insect can be expected to land someplace, pre-focus the lens on that someplace in anticipation.
A. See #4. This is a great idea but has not worked well for me in practice and it's been quite a few years.
RESP This idea depends on the situation, sometimes easier to suggest than to employ in practice. I guess I too have had more success with this idea while hand-holding with shorter lenses.
6. Update your focus peeking parameters to the maximum sharpening setting for the shimmer of color that highlights the plane of focus in the EVF. As much as the 10x zoom benefits a very precise focus, a moving subject may require using the shimmering color and a lot of bursts to maybe get one good one as the focus plane passes over the subject. The max sharpening makes the shimmer more pronounced in the EVF without impacting the RAW file. If you can confirm the focus at 10x, then use the shimmer to tell you where the focus has shifted when you drop out of the 10x zoom.
A. I always use focus peaking, DMF when available, even when I have good AF. It's great also for predicting DOF. The focus magnification, as I noted above, doesn't work on this lens. I don't know why. Focus Peaking doesn't offer a sharpening setting but I'm going to tweak my EVF settings to see if I can boost sharpening that I see in it. I was using "no effect" in the EVF for creative style so I'll have to go back to "Standard" to do this. It might help but I think the problem is my camera handling, not this. When shooting birds, there is usually not a lot of time to fuss with the focus as there was in the shot that I posted.
RESP Although I downloaded the A6500 manual, the document is rather sparse. I'm kind of assuming all the Sony models are the same in the menus and features. Check the Creative Style settings for maximum / high sharpening setting.
7. Use the slowest shutter and lowest ISO possible to maximize the RAW for processing. Depending on the light and the subject movement, you might get as slow as 1/500, where maybe 1/800sec is a better starting point. Use Shutter Priority to manage the shutterspeed and EC to slightly ETTR via the ISO and let the camera manage the ISO via AUTO-ISO. The camera will dynamically meter the available light for whatever aperture you set manually on the lens.
A. This is off the mark for this lens. Even if I set it for shutter priority it will still be F8.0 only because it is a reflex lens. I can shoot aperture priority, of course. I can also shoot totally manual, with or without auto-ISO. This kind of lens is more limiting than a normal lens. It's a 500mm lens, physically, 750mm "equivalent" so slow shutter speeds are not a good approach. As noted before, sunny 16, ISO 400 and shutter at 1/1600 is the sweet spot.
RESP So this is the first time I've seen "fixed aperture" and it literally meant fixed aperture. From a tripod (maybe a monopod) with the IBIS assist, the shutterspeed should be based on the subject, not the lens. For my Sony, if I need to move off of ISO-100, it doesn't matter much whether I'm at ISO-0125 through ISO-1600. For my LR6 software, letting the camera 'up' the brightness with +EC is a better result than brightening in LR6. I always seek the slowest shutter for the composition to hold the ISO as low as possible.
8. Test the lens at various apertures to see if there are better results to be had stepped down from f/8.
A. The lens is F8.0 only because it is a reflex or "mirror" lens.
RESP OK, truly a fixed aperture with no control ring.
9. Set the IBIS to the 500mm focal length and have active, even on the tripod, where you'll need a loose ball-head to track moving subjects, again while your attention is focused on tracking the subject, focusing the lens, and bursting the shutter.
A. I had the IBIS (Sony Steady Shot) set to "auto" and the camera knows it is a 500 mm lens. But for my next try it will be set to 500, just to see if it helps. Doubtful.
RESP I've never had camera shake / blur problems with my Sony. My camera is set to release the shutter without a lens, and the Sony can't detect the Canon FD lenses anyway. My longest combo is 420mm for 300mm with a 1.4x
10. Practice and review your images, identifying areas to repeat and / or improve, based on the results. It was probably the 3rd session and beyond that I started to pull together all the necessary shooting technique and finger feel for the camera controls, usually 4+ hours per session (about 1000 raw), so about 16-hours were needed to get a feel for the process where everything felt natural and intuitive ish.
A. I don't know exactly what you meant by "review" but I have post-shot review turned off because it interferes with multiple shots. I do review as soon as possible afterwards, sometimes only a minute or two later.
RESP Shooting in bursts, just check exposure or focus every so often, as needed. By 'review' I mean looking at your images and your EXIF at full screen at home while culling. Looking at the 1:1 pixel level details and considering for every relevant image: what is good / bad / right / wrong about this image?
You probably have zero possibility for birds in flight tracking. But, with all the ideas above, tracking birds on water is very doable as well as foraging behavior.
A. I have had less luck tracking them in flight with this camera compared to my RX10m4 but it is possible because of focus peaking. Finding them in the sky with such a narrow angle of view can be frustrating. This shot of a Wood Stork was a challenge because it was in constant motion, both the head and the legs. It stirs the bottom and then tries to capture some food by sticking its head into the water. Timing is tricky. Maybe I should have used video.
RESP The colors for the Wood Stork and water are wonderful. I can see how f/8 is limiting, especially with the bird facing slightly away. I'd like to see an attempt with the focus directly on the head / eye to see how this lens performs for this composition, especially given the sharp focus on the feathers on the rear of the body that seems to be the middle of the frame.
Dec 2, 2020 21:42:11 #
If something about the RF 500 AF on the LAEA3 is locking out the 10X MF magnifier then I suggest you get a $30 dumb adapter. You will need to manually set the FL into the IBIS but at least you’ll have that critical focusing aid.
It puzzles me why the 500 on the LAEA3 blocks the MF magnifier. I’d be searching the menus for some conflict that I’d hope to eliminate. But a dumb adapter will solve it for $30, so WTH.
All my several different Sonys provide the MF magnifier with dumb adapters. Which brings up a thought. Try setting the camera for “Shoot Without Lens”, as needed with a dumby even though you use an LAEA3. Maybe that will enable the MF magnifier. No weird idea should be dismissed when dealing with digital devices. Code typically has a few odd snags in it :-(
Dec 3, 2020 07:59:46 #
a6k wrote:
Bob, thanks. My other recent post was about that 70-350 lens. Very helpful comment. A zoom is handier but the advantage of 500 mm vs 350 mm is pretty noticeable. So many choices, so little time.
a6k, are you familiar with Sony's "ClearImage" feature which allows you to digitally double the focal length of any lens you attach to your camera? So that can extend your 70-350 (which I commented on in your post yesterday) up to 140-700mm. Pretty cool if you need to go beyond 350 but you don't want to use the larger, heavier 500.
If you want to reply, then register here. Registration is free and your account is created instantly, so you can post right away.