GIMP: Quick and Easy Tutorials
Oct 13, 2012 19:40:50 #
gmcase wrote:
Does Gimp have content aware yet? That has been a primary reason I have stayed with Photoshop to date.
You'll be surprised to learn that GIMP had 5 years before Photoshop.
Oct 14, 2012 06:42:50 #
Oct 14, 2012 06:58:15 #
The Fuzzy Tool:
The Fuzzy Select (AKA Magic Wand) tool is designed to select areas of the image based on color similarity.
The Magic Wand is good for selecting objects with sharp edges.
It works best when selecting a solid-colored (or nearly solid-colored) background area.
Note that as the selected area expands outward from the center, it not only spread to pixels that touch each other: it is capable of jumping over small gaps, depending on the Threshold option number which you select.
To increase/decrease Threshold, after the first button-press, drag the pointer downward(or to the right) or upward (or to the left). The farther you drag the mouse, the larger the selected region.
You can reduce the selection by dragging upwards or to the left.
The Fuzzy Tool starts selecting when you click at a spot in the image, and floods outwards, selecting colors the same as, or similar to, the starting color.
We'll use the tool in the next lesson
The Fuzzy Tool
Check out Close Up Photography section of our forum.
Oct 14, 2012 07:42:17 #
paulbrimmeier
Loc: w/PA
I just downloaded it yesterday and couldn't figure
anything out, so I got rid of it, may try it with some
instructions now..Thanks
anything out, so I got rid of it, may try it with some
instructions now..Thanks
Oct 14, 2012 09:06:46 #
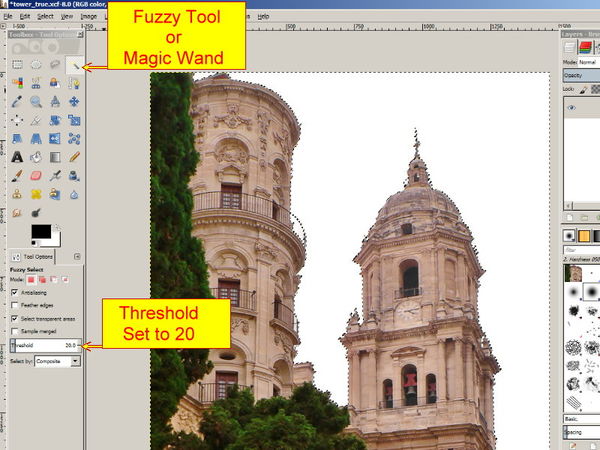
The Fuzzy Tool in Practice.
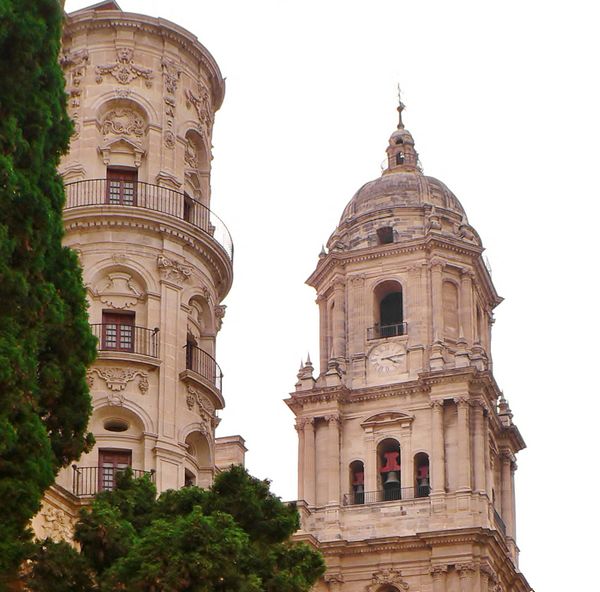
1. Load the attached photos of the towers and the sky into GIMP. Be sure the towers are on top.
2. Select the Fuzzy Tool and set the Threshold to 20.
The higher the Threshold number the more colors you will capture.
When you are working on your own photos you may need to change the number to capture only the colors that you need.
3. Click in the center of the white sky.
Most of the white areas have been surrounded by a dotted line, also known as marching ants.
4. You'll notice that some white areas have been cut off from the Fuzzy tool because another color has created a barrier. Check the top left of the photo and you'll see a small triangular area to be added. You'll also notice that the two balconies on the tower on the left have also escaped. Finally, check for areas on the tower on the right: the rooftop shelter, and areas between building decorations.
5. To add areas to your Fuzzy tool, hold down the Shift Key and click on the area to capture. You'll see a + sign appear, and marching ants will surround the captured area.
If some parts of the same area have not been captured click again until you have everything. Zoom in close to be sure of capturing all the white. Get it all, it's important.
6. To subtract areas, hold down the Ctrl key and click until you have only the areas you need. You'll see a - sign appear.
7. For your information, but don't do this yet. To delete the selected areas, go to the Edit Menu, click to show the options and select 'Cut'. That will get rid of your selected colors.
8. You are going to be more adventurous and place the towers on top of another photo, in this case a sky.
9. With all your areas selected and surrounded by marching ants, go to the 'Select' Menu and click to show the options. Click on 'Invert'. Now choose the 'Edit' Menu and click on 'Cut'. The towers will disappear.
10. Close the towers photo, click the X at top right of the program. Click 'Do not save' when asked.
11. If you loaded both photos you should see the sky photo. If you did not load the sky photo do it now. You are not in trouble.
12. With the sky photo in front of you, go to the 'Edit' Menu and select 'Paste'. (Ctrl+V if you are familiar with this function.)
13. There are your towers on the sky. If you missed any white areas you'll see them clearly. The bad news is you either live with it or start again. Click on the towers if the marching ants have vanished. Click delete and the faulty towers will disappear. Whoa! If you have white areas check the Note at the end of this text.
14. If all is well, use the 'Move Tool' to drag the towers around and place them to your satisfaction.
15. Now you have two layers. Look to the right to the layers-Brushes floating toolbox. You'll see two layers, one called 'Paste', click on it if it is not highlighted in blue.
Hold your mouse on the Paste layer and right click. Select 'Anchor Layer'. Your two layers are now one.
16. Crop around the towers to create your new image. There you go! A photo to be proud of.
Note: Here's where I give you a hint: if you have white areas after all the above has been done, how about covering up the white areas with the Heal tool or the Clone tool?
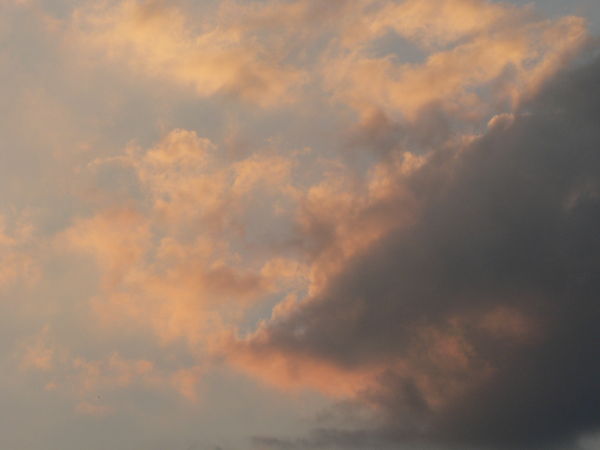
Towers for Fuzzy Tool
Sky for Fuzzy Tool Work
Oct 14, 2012 12:13:45 #
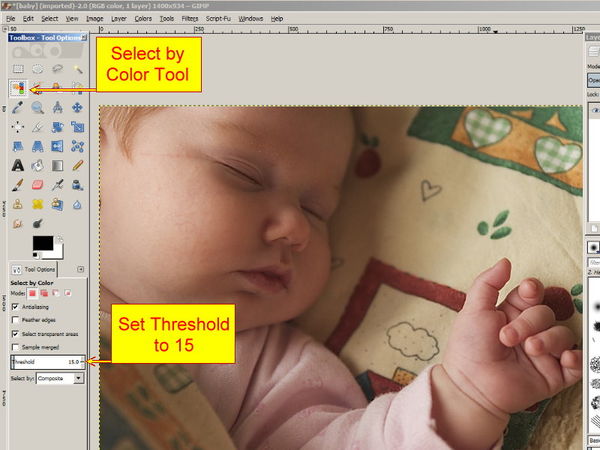
Select By Color Tool:
The Select by Color tool is designed to select areas of an image based on color similarity. It works a lot like the Fuzzy Select tool (Magic Wand).
The main difference between them is that the Magic Wand selects contiguous regions (similar colors) with all colors connected to the starting point, but containing no large color barriers. Think of the objects, made up of other colors, that prevented the Magic Wand from spreading everywhere in the Fuzzy Tool lessons.
The Select by Color tool selects all pixels that are sufficiently similar in color to the pixel you click on, regardless of where they are located.
As with fuzzy tool, the selection starts as soon as you click and the reference is the first clicked color. If you click and drag across the image, you can change the threshold the same way as with the fuzzy tool.
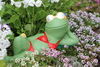
1. Load the baby picture from previous a lesson. Set Threshold to 15.
2. Click on the tiny green leaf, on the blanket, above the baby's hand. All greens that exactly match that shade of green will shown with marching ants.
3. Hold down the Shift key to add more shades of green. Look for the + sign.
4. Hold down the Ctrl key to remove an unwanted shade of green. Look for the - sign.
5. Increase the Threshold number to capture more colors/shades.
6. Lower the Threshold number to capture less colors/shades.
7. To remove all marching ants go to the 'Select' menu and click on 'None'.
Note: Select/None removes all marching ants when using almost any tool.
The Select by Color tool is designed to select areas of an image based on color similarity. It works a lot like the Fuzzy Select tool (Magic Wand).
The main difference between them is that the Magic Wand selects contiguous regions (similar colors) with all colors connected to the starting point, but containing no large color barriers. Think of the objects, made up of other colors, that prevented the Magic Wand from spreading everywhere in the Fuzzy Tool lessons.
The Select by Color tool selects all pixels that are sufficiently similar in color to the pixel you click on, regardless of where they are located.
As with fuzzy tool, the selection starts as soon as you click and the reference is the first clicked color. If you click and drag across the image, you can change the threshold the same way as with the fuzzy tool.
1. Load the baby picture from previous a lesson. Set Threshold to 15.
2. Click on the tiny green leaf, on the blanket, above the baby's hand. All greens that exactly match that shade of green will shown with marching ants.
3. Hold down the Shift key to add more shades of green. Look for the + sign.
4. Hold down the Ctrl key to remove an unwanted shade of green. Look for the - sign.
5. Increase the Threshold number to capture more colors/shades.
6. Lower the Threshold number to capture less colors/shades.
7. To remove all marching ants go to the 'Select' menu and click on 'None'.
Note: Select/None removes all marching ants when using almost any tool.
Select by Color Tool Setup
Oct 14, 2012 13:34:35 #
Select by Color Tool (continued):
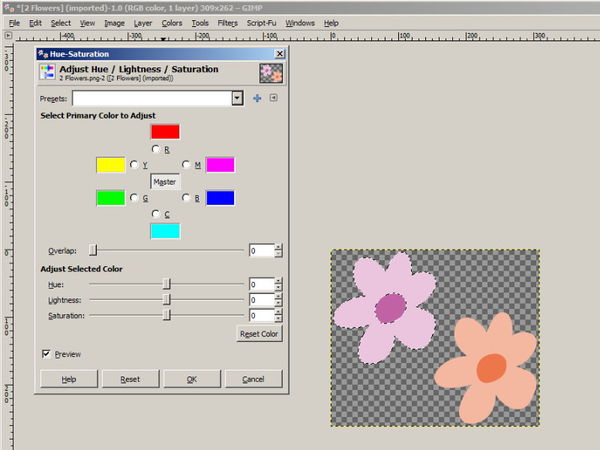
For ease of demonstration, I have made a selection on a graphic. In this example, We want to change change the color of the top flower.
1. Click on the Select by Color tool. Click on the outer petal. It is now selected and enclosed by the marching ants.
2. We are going to cange the color. Click the Colors menu and click on Hue-Saturation.
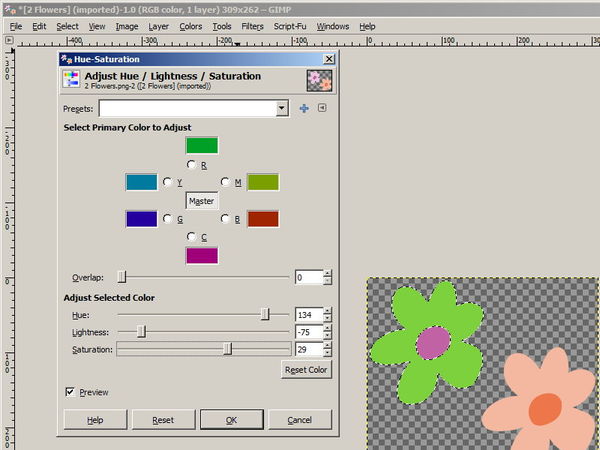
3. In the Hue-Saturation box, you have three sliders that you can use to adjust the Hue, Lightness and Saturation of the selected area. Adjust the Hue, Lightness and Saturation sliders as shown below.
4. The final step is remove the selection, Select menu and click None.
Job done.
For ease of demonstration, I have made a selection on a graphic. In this example, We want to change change the color of the top flower.
1. Click on the Select by Color tool. Click on the outer petal. It is now selected and enclosed by the marching ants.
2. We are going to cange the color. Click the Colors menu and click on Hue-Saturation.
3. In the Hue-Saturation box, you have three sliders that you can use to adjust the Hue, Lightness and Saturation of the selected area. Adjust the Hue, Lightness and Saturation sliders as shown below.
4. The final step is remove the selection, Select menu and click None.
Job done.
Select by Color Tool #2
Select by Color Tool #3
Check out Landscape Photography section of our forum.
Oct 14, 2012 13:38:19 #

Shaky you and your great grandson are unbelievable. This is so helpful. I had downloaded and deleted Gimp numerous times because I just couldn't understand what tool did what. Now it is crystal clear.
Oct 14, 2012 15:10:08 #
Select by Color Tool: Work Photo
Here's a work photo: Change the color of the flowers.
You will need to repeat the procedure two or three times, maybe. Depends on your Threshold number. (Thats a hint.)
Here's a work photo: Change the color of the flowers.
You will need to repeat the procedure two or three times, maybe. Depends on your Threshold number. (Thats a hint.)
Select by Color Tool #4

Oct 14, 2012 15:14:10 #
tramsey wrote:
Shaky you and your great grandson are unbelievable. This is so helpful. I had downloaded and deleted Gimp numerous times because I just couldn't understand what tool did what. Now it is crystal clear.
Thanks again, Tramsey!
Oct 14, 2012 17:04:11 #

Question, once a photo has been processed in GIMP, can it be saved as a JPEG....if so, how?
Check out Traditional Street and Architectural Photography section of our forum.
Oct 14, 2012 19:02:03 #
jradose wrote:
Question, once a photo has been processed in GIMP, can it be saved as a JPEG....if so, how?
File Menu
Click 'Export'
Write name of file and format (picture.jpg) in the top (Name) slot.
Click Export button.
Select degree of quality. Click Export button
Job done.
Oct 15, 2012 05:53:01 #
Oct 15, 2012 08:51:32 #
June wrote:
you are fantastic! thank you.
Thank you, June.
Oct 15, 2012 08:52:44 #
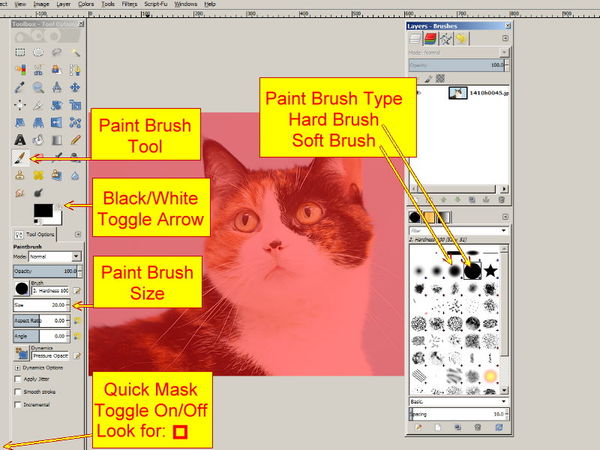
The Quick Mask:
This a clever tool, ideal for cleaning up anything you may cut out from a photo. It is also very popular for creating some pretty strange effects. We'll have a little fun with this tutorial.
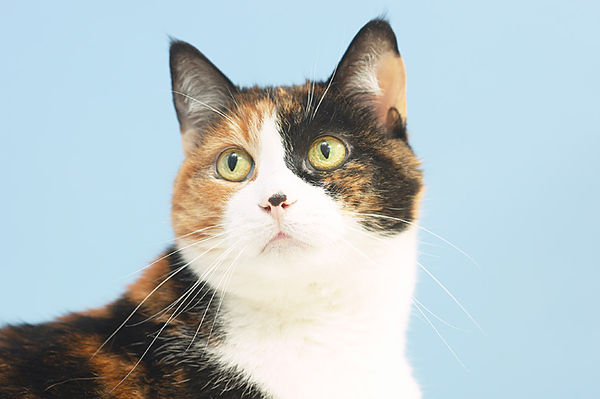
1. Load the cat photo below into GIMP.
2. Click the Paint Brush tool.
3. Hold down the Shift key and press Q. Your cat should have been flooded with a red mask.
4. Go to the Black/White colors toggle arrow. Toggle a couple of times to get the hang of it and set the top color to white.
5. Select your brush size, 20 is fine, you may change it at any time to meet your needs.
6. Select a hard brush from the brush panel.
This a clever tool, ideal for cleaning up anything you may cut out from a photo. It is also very popular for creating some pretty strange effects. We'll have a little fun with this tutorial.
1. Load the cat photo below into GIMP.
2. Click the Paint Brush tool.
3. Hold down the Shift key and press Q. Your cat should have been flooded with a red mask.
4. Go to the Black/White colors toggle arrow. Toggle a couple of times to get the hang of it and set the top color to white.
5. Select your brush size, 20 is fine, you may change it at any time to meet your needs.
6. Select a hard brush from the brush panel.
The Quick Mask
Work Cat
If you want to reply, then register here. Registration is free and your account is created instantly, so you can post right away.
Check out People Photography section of our forum.