Exposure bracketing
Jul 16, 2020 13:04:34 #

cameraf4 wrote:
Not since I used Slide Film. With Slide Film, exposure was arguably the most critical part of taking pictures because Slide Film had an impossibly narrow latitude. If you were off by more than half-a-stop, forgettaboutit. That slide was ruined.
Shoot RAW. Don't bracket. Just point the metering cells at what is important to you and shoot RAW. You are going to do PP work, anyway.
Shoot RAW. Don't bracket. Just point the metering cells at what is important to you and shoot RAW. You are going to do PP work, anyway.
And make sure the tonal value of what is important is taken into consideration. If you have a Newfoundland and a Samoyede in the same picture, both are "important" - and you will get widely different readings reading each dog - so you'll need to interpret the reading and adjust accordingly. With digital, in this case, the reading off the Sam +2 stops or so will be fine, with a little post processing to reveal the detail in the Newfie.
With slide film, which was a real pain in high contrast settings, I'd use an 18% grey card and cross my fingers, or use an incident meter, and cross my fingers anyway.
I am not a fan of bracketing - unless I am doing it to create an HDR merge. I rarely take more than 2 or 3 shots for HDR anyway.
Jul 16, 2020 13:15:21 #
I don't bracket often, but when I do, it depends very much on the specific scene I'm trying to capture. For example, high bright the brightest parts and how dark the darkest parts within the composition are. I have no set formula concerning how far apart the exposures are from each other. Typically, the difference is at least a full stop, often as much as three or four stops. For anything less than a stop, bracketing isn't really needed; burning and dodging in post-processing can take care of those issues.
Jul 16, 2020 13:29:25 #
Strodav
Loc: Houston, Tx
Fotoartist wrote:
If you shoot raw you can afford to bracket wider exposures, in other words, at least +1 because you can recover more from the original exposure.
Yep, that's why I usually bracket +/- 2 stops in HDR situations. It was much different with film where exposure was critical. With modern digital cameras and PP software, bracketing anything less than +/-1 makes virtually no sense when shooting raw.
Jul 16, 2020 18:19:11 #
I use Photomatix Pro HDR. Most of the time, I will do 3 exposures each 2-stops apart. For extreme contrast, I have even done 7 exposures each 3-stops apart. Photomatix has this advice on bracketing.
Photomatix advice
How many exposures should I take?
The total number of exposures that you need to shoot depends on the specific scene. Each scene is different in terms of its contrast or its dynamic range, that is, the exposure difference between the darkest areas (shadows) and the brightest areas (highlights) within the scene.
In every scene, you must shoot enough exposures to capture the entire dynamic range of the scene, which includes everything from the darkest areas in shadow to the areas in bright light.
The total number of exposures required also depends on the Exposure Value (EV) spacing between each exposure, as detailed in the next section. If you shoot your bracketed set of exposures in 1 EV steps (e.g., -1, 0, +1 EV), you will need more exposures to capture the entire dynamic range of a scene than if you shoot them in 2 EV steps (e.g., -2, 0, +2 EV). We recommend shooting in 2 EV steps (+/-2 EV) whenever possible.
Most high contrast scenes fall into one of the following two categories. A scene is considered high contrast when its dynamic range is too high for a camera’s sensor to capture in one photo.
Average high contrast: Common outdoor scenes with less than ideal light. To properly capture these scenes, 3 shots at 2EV spacing (i.e. -2, 0 +2), or 5 shots at 1EV spacing, are normally sufficient.
Very high contrast: This could be an interior of a room with a bright view through the window, or an outdoor scene with the sun in the frame. In this type of situation, you will need at least 5 exposures at 2EV spacing, or 9 at 1EV spacing, and sometimes even more. Refer to the section on capturing a very high contrast scene to determine the number of exposures.
Jul 16, 2020 20:29:54 #
CO wrote:
I use Photomatix Pro HDR. Most of the time, I will... (show quote)
That is very exacting!
I never adjust my hdr settings. Always maxed out. My only decision is to use it or not use it.
Jul 17, 2020 05:06:21 #
bbradford
Loc: Wake Forest NC
CO wrote:
I use Photomatix Pro HDR. Most of the time, I will... (show quote)
Wow. You spent a lot of time on your excellent answer. Thank you very much
Jul 17, 2020 05:51:16 #
billnikon
Loc: Pennsylvania/Ohio/Florida/Maui/Oregon/Vermont
bbradford wrote:
What would you use for steps on exposure bracketing. Would you use 1/3 , 1/2, 3/4, or 1 full step?. How many pics would you use? 3, 4, 5 ? Thanks all
5 exposures, one correct, two under and two over. If I did use bracketing, I would us .7 stops apart.
Jul 17, 2020 07:08:48 #
My A6500 provides a Highlight metering mode that adjusts the exposure as high as possible without blowing out any of the brightest areas. This mode exposes to the right.
It works pretty well, though sometimes the captured image appears dark. Shooting RAW as I almost always do, I can usually adjust to get a good image but in extreme cases I need to bracket - but only to bring up the exposure. So when I bracket, I do so with the exposure boosted nearly to the bracket step of 2. Just for a bit of extra margin I raise it by only 1.7.
It works pretty well, though sometimes the captured image appears dark. Shooting RAW as I almost always do, I can usually adjust to get a good image but in extreme cases I need to bracket - but only to bring up the exposure. So when I bracket, I do so with the exposure boosted nearly to the bracket step of 2. Just for a bit of extra margin I raise it by only 1.7.
Jul 17, 2020 07:26:59 #
bbradford wrote:
What would you use for steps on exposure bracketing. Would you use 1/3 , 1/2, 3/4, or 1 full step?. How many pics would you use? 3, 4, 5 ? Thanks all
When I used a conventional DSLR (EOS 6D) if necessary - and if I had time - I would spot meter the highlights and shadows and then typically use 3 exposures equally spaced between them.
Since I have upgraded (yes I mean that guys :) to mirrorless its really easy as I can display the histogram in real time in the EVF or on the screen. I now wind the exposure compensation dial to the right so no clipping of the shadows for one exposure, another with histogram centred (clipping left and right), and the final with compensation to the left (no clipping in highlights). Given that the histogram is a representation of the JPEG view, and knowing my camera because I tested it, I know that he RAW image will have at least 1/2 stop of detail beyond what the histogram displays.
With histogram in the EVF this takes about 20x longer to describe than it does to do!
If the scene has dynamic content(eg with people, animals moving, wind blowing the trees etc ) I typically set burst mode on the camera, and then set Automatic Exposure bracketing (AEB) to +/- 1.5 to 2 stops (subjective guestimate based on how contrasty the scene is). Then a 1/2s or thereabout press of the shutter gives me 3 exposures so close together that movement is negligible. Also to reduce time between exposures further, set to manual focus for burst mode exposure. This too is an absolute doddle on the EOS R (and other mirrorless I'm sure) because of the display of real-time exposure peaking in the EVF.
I too use Photomatix. It doesn't do loads of things, but what it does do (HDR and exposure stacking) it does exceptionally well.
Worth noting also, that Photomatix will also easily process exposure stacking from a single raw image. I use this quite a bit as I know my particular camera has 1/2 to 1 stop more than the histogram displays. (even if you take raw only, the camera shows the histogram of the embedded jpeg file. Its also a great technique for dynamic content.
Just open in Photoshop or your preferred RAW processor, save 1 image 'as is', save another with increased exposure to remove as much shadow clipping as possible, similarly another with decreased exposure for highlight clipping. Using Photomatix is doesn't matter if the under/over are balalanced as it allows me to enter different values for each image. Works a treat.
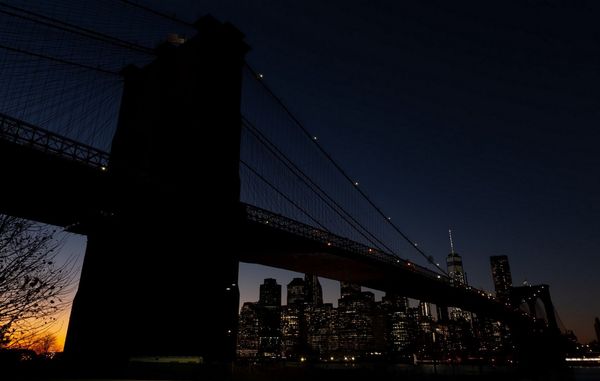
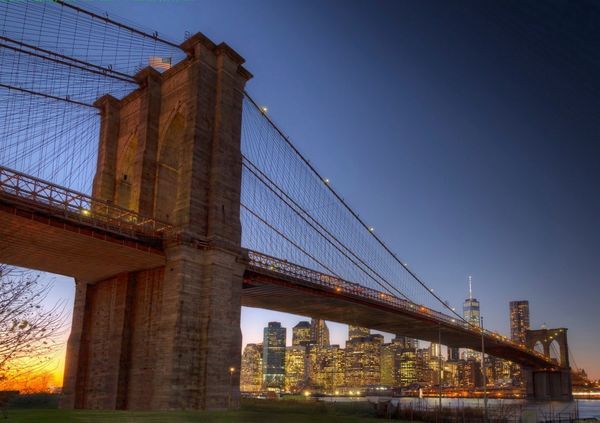
Here's an example of a single RAW converted to +/- 1.5 and a resulting exposure blend. To be fair the bridge wasn't moving much but the US flag and the trees were
 Screen grabs only as originals were huge
images: -1.5; original; +1.5 using adobe camera raw; after Photomatix exposure blend, PS classic, Topaz denoise


Jul 17, 2020 07:39:59 #
bbradford wrote:
What would you use for steps on exposure bracketing. Would you use 1/3 , 1/2, 3/4, or 1 full step?. How many pics would you use? 3, 4, 5 ? Thanks all
When I bracket, which is frequently with digital , I use 2/3 stop 1 up and 1 down, works for me.
Jul 17, 2020 08:02:12 #
rmalarz wrote:
I (1) know my equipment extremely well. (2) Meter carefully and make the correct exposure. That's it.
--Bob
--Bob
You must have a camera with a much higher dynamic range than most, if I understand your reply. I think your saying you can do this with one exposure. Boy that's great. What brand of camera do you have?
I'm shooting with an Olympus Mk III and it is one of the best cameras on the market and if the dynamic range of my shot is more than the camera is capable of capturing I use exposure bracketing to get the right exposure.
Jul 17, 2020 09:20:07 #
Picture Taker
Loc: Michigan Thumb
NOT DEFINING WHAT YOUR REASONING IS FOR BRACKETING I WOULD SAY FOR HDR + AND - 2 STOPS AND FOR GETTING THE EXPOSURE CORRECT I SUGEST YOU JUST PRACTICE AND LEARN TO TAKE GOODV PICTURES. THE CAMERA HAS A HISTOGRAM USE IT. IF I MINISTERED YORUR REQUEST I'M SORRY.
Jul 17, 2020 09:30:37 #
As someone said, depends on subject, I have only used it for total solar eclipses, and at totality, the more shoots and wider range, the better for getting the sun itself and the corona which is much larger than the sun. I am sure it would also help a lot with the moon.
Jul 17, 2020 10:42:06 #

It's not necessarily the dynamic range of the camera, It comes down to knowing that dynamic range. The technique is ETTR/EBTR. With that I can rather precisely place my tonal values and never blow out highlights.
--Bob
--Bob
CaptainPhoto wrote:
You must have a camera with a much higher dynamic range than most, if I understand your reply. I think your saying you can do this with one exposure. Boy that's great. What brand of camera do you have?
I'm shooting with an Olympus Mk III and it is one of the best cameras on the market and if the dynamic range of my shot is more than the camera is capable of capturing I use exposure bracketing to get the right exposure.
I'm shooting with an Olympus Mk III and it is one of the best cameras on the market and if the dynamic range of my shot is more than the camera is capable of capturing I use exposure bracketing to get the right exposure.
Jul 17, 2020 11:02:08 #
Fotoartist wrote:
If you shoot raw you can afford to bracket wider exposures, in other words, at least +1 because you can recover more from the original exposure.
I concur. I shoot a 5 or 7 exposures bracket with 1 step difference - in RAW. There's no cost involved when you take multiple shots other than the post-processing step.
If you want to reply, then register here. Registration is free and your account is created instantly, so you can post right away.