Exposure?????
Apr 12, 2020 12:28:12 #
ben mcintire wrote:
By reducing the highlights the overall exposure has been brought under control so that details appear in shadows and highlights.
In the shot you are showing there is no detail in an area of the cat's face??? Sometimes things just cannot be fixed. Was this shot supposed to show the image fixed?
Apr 12, 2020 12:30:22 #

That's where I start with my processing. However, a good deal of testing was done to determine how each of my cameras produce images from the settings I provide for them. I rarely "chimp" because I know what my camera is going to provide me for an initial image.
Here's why I don't rely on histograms. This is an ideal exposure for me from one of my cameras.
--Bob
Here's why I don't rely on histograms. This is an ideal exposure for me from one of my cameras.
--Bob
BebuLamar wrote:
I think just look at the picture on a well calibrated monitor and decide. It's up to the photographer to decide.
Apr 12, 2020 12:30:37 #
nothing changes until you save it
if you are still uncertain after edit, add # and "save as"
if you are still uncertain after edit, add # and "save as"
Apr 12, 2020 12:38:04 #

Rod Clabaugh wrote:
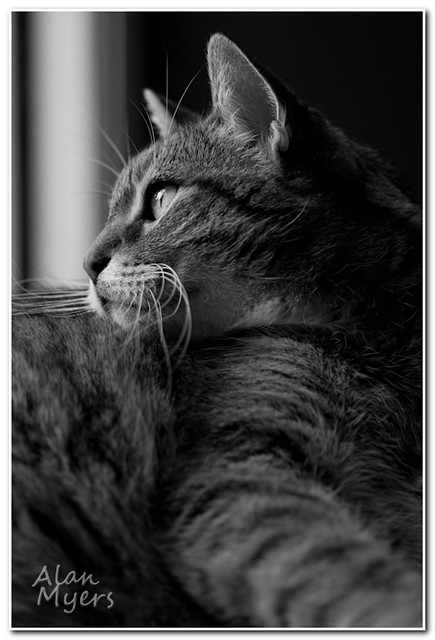
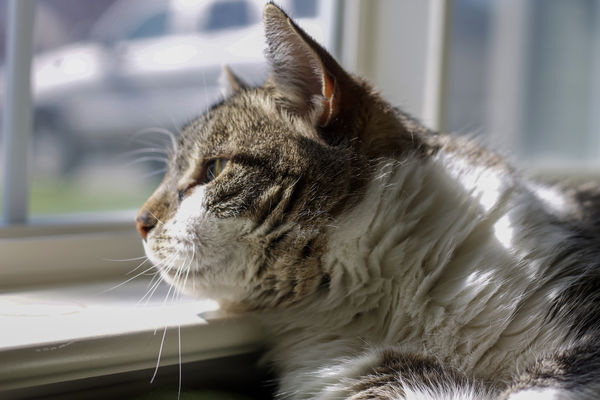
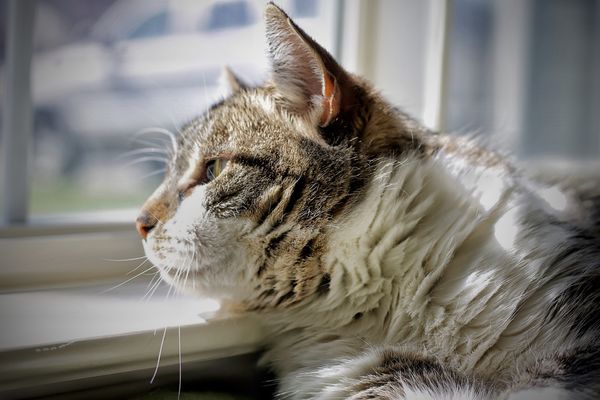
Being somewhat new to photography I have a question. When it comes to taking photos how can you tell if a picture is under or overexposed? Isn’t a little subjective? I find the task of photo editing daunting because I’m not sure if I should change a picture or not. It really handcuffs me sometimes because I don’t want to ruin a photo.
You got a lot of both good and bad advice already. But I would like to add, the subject and location (lighting) -- window light on a bright day on your cat -- for a beginner is nearly impossible to get correct. Hot highlights and room-lite shadows. What do you even meter on? For an experienced photographer a bit tricky but not too challenging. Meaning, you did pretty well considering.


Apr 12, 2020 12:47:23 #

rmalarz wrote:
That's where I start with my processing. However, a good deal of testing was done to determine how each of my cameras produce images from the settings I provide for them. I rarely "chimp" because I know what my camera is going to provide me for an initial image.
Here's why I don't rely on histograms. This is an ideal exposure for me from one of my cameras.
--Bob
Here's why I don't rely on histograms. This is an ideal exposure for me from one of my cameras.
--Bob
I do chimp but I have to mentally compensate for what I see on the camera screen vs my calibrated monitor. I don't care for the histogram as many of my shots I intentionally let the highlight blows out because they are not important and there is a lot more important details in the shadow.
Apr 12, 2020 12:51:50 #
amfoto1
Loc: San Jose, Calif. USA
Rod Clabaugh wrote:
Being somewhat new to photography I have a question. When it comes to taking photos how can you tell if a picture is under or overexposed? Isn’t a little subjective? I find the task of photo editing daunting because I’m not sure if I should change a picture or not. It really handcuffs me sometimes because I don’t want to ruin a photo.
First of all... it's up to you how your images look. There is a lot of subjectivity involved. Do what you like. There isn't a strict standard.
Your image appears slightly over-exposed.... But that may be exactly what you wanted, in order to "capture" the "feel and impressions" of a cat basking on a sunny windowsill.
For example, I deliberately over-exposed the following image A LOT to blow out an ugly background, reduce detail on the strongly sunlit flower and draw attention to the tiny subject:

That's what's known as a "high key" treatment of an image. VERY high key, in the above example.
The opposite is a "low key" look.... where the image is weighted toward the dark tonalities:
A silhouette can be an extreme example of a low key image.
A scene may exceed the dynamic range of your camera... so learn to look for situations where lighting is more favorable or control the light with modifiers. That may mean shooting on an overcast day or in the shade or even indoors. Here I used very favorable ambient "North light" from a window (left) and used fill flash (right) to balance overall illumination.


There are many things you can use to control light: reflectors to bounce light where you need it, flags to block it, diffusion panels to soften it, etc.
It also is possible to "compress" the dynamic range through various methods such as multi-exposures or multi-processed images. Here's a shot where my subject was shaded and the background was brightly lit. With a moving subject there was no way to do multiple exposures. It's also not possible to use a graduated neutral density filter (neither a "real" one on the lens or "virtual" filter in software). So instead I double-processed the image: One version was optimized for the indoor subject and color of the light in the shade, while the other version of the image was tweaked to recover some of the blown out background and color balanced for sunlight. Next I combined these two into a single image. I didn't want a "high dynamic range" image. Those can look other-worldly and interesting for some subjects, but here I was striving for a more natural and realistic look (image saturation is slightly boosted due to the method of printing that was going to be used, in this case). Lefthand image is the indoor/subject version, center is the outdoor/background version, and on the right is the result after I combined the "correct" portions from each of those into a single image:


All the above was a "judgment call" by me. I saw the scene, of course, and had some idea how I wanted to render it in a final image. Our eyes can handle a much wider dynamic range than any camera. The above is probably not "true to life", not exactly as we'd see it. I think the finished image is more how our brains interpret all the information our eyes gather.... "Compressing" the dynamic range, in this case to fit what's possible with the camera and the printing process. Notice that the background in the finished image is slightly lightened... once I put the two images together (using layers & masks in Photoshop), I felt that I'd overdone it a little... and made another judgment call to lighten it slightly.
Two additional, important things to consider....
First, is your computer monitor calibrated? Most computer monitors are overly bright for photo post-processing, causing us to make our image too dark. They also usually don't render all that accurate color, causing us to make incorrect adjustments. What looks fine on an uncalibrated monitor might look awful when it's viewed on a different monitor. You need to be able to trust that your computer monitor is showing your images as accurately as possible, both in terms of exposure and in color rendition. There are devices such as Datacolor Spyder, X-Rite ColorMunki and similar used to test a monitor's brightness and color rendition, then help you adjust brightness and create a color profile that's applied to make it as correct as possible. (Note: Ambient light conditions also have to be considered. The lighting around your monitor workspace has to be consistent, too, or it will cause incorrect adjustments.)
It is possible to calibrate "by eye"... but it's a trial and error method that usually ends up wasting a whole lot of printer ink and paper. Invest in a calibration device. Monitor brightness and color change over time, so re-calibration is needed periodically. For example, when I first got my current computer monitor, I found that I had to turn the brightness way down to "20" (not sure if this is a percentage or what).... Now after some years using it, that setting is correct for photo editing at "50". The monitor has changed brightness over the years and gradually needed it's brightness set higher to maintain the same actual level of brightness. If I weren't regularly testing it with my Spyder, I wouldn't know that or be able to set it accurately.
And, another thing, no computer monitor has the same dynamic range as a print. Monitors simply cannot display pure black or pure white. Often if I make a print from an image I discover a lot of shadow AND highlight detail I didn't know was there, because viewing it on screen will never display the full range. This is because a computer monitor is a transmissive display... it's a screen that's lit from behind. A print, on the other hand, is reflective. Light falls onto it and is reflected back to our eyes. The dynamic range is different in a print than it is on-screen. As a result, you might want to adjust images differently depending upon how they'll be used.... If for online display, it may need one rendition. If intended for printing, something different will probably be needed. Much image editing software can have "ICC profiles" loaded to be able to "soft proof" image with an on-screen display that tries to emulate how it will print... but those are never 100% accurate. It can only come with experience, learning to anticipate how things will look in print, versus how they look on screen.
Finally, I really like your cat photo (and tried to stick with that "theme" in my response). I like the slight over-exposure in your image. One thing that bothers me a little about it is that the cat's eye is slightly out of focus. It doesn't spoil the overall feel and effect of the image, but I think would have improved it if the cat's eye had been sharper. A slightly smaller lens aperture or a different point of focus could have changed that. For example, below is a test shot I did with my 135mm f/2 lens when I first got it, to see how shallow depth of field it could render at close distances (with the help of my very patient cat)...

Above image is also a pretty good example of back lighting and some "rim" lighting. (The only light source was a window behind and sligthly to the left of the cat.)
Apr 12, 2020 12:56:52 #
Rod Clabaugh wrote:
Being somewhat new to photography I have a question. When it comes to taking photos how can you tell if a picture is under or overexposed? Isn’t a little subjective? I find the task of photo editing daunting because I’m not sure if I should change a picture or not. It really handcuffs me sometimes because I don’t want to ruin a photo.
As some say, it is subjective.
I do what I like and could care less what others think. Why? Because I do it for a hobby.
But on the other hand in Architecture I have to please my clients both aesthetically and budget, and program wise. Then throw in thousands of pages of codes I am restricted in the pure art of design.
So expose to please yourself and the biggest thing is:
HAVE FUN!!!!!!!!
Apr 12, 2020 14:04:03 #

I made a very quick and simple edit with Photoshop using Adobe Camera Raw filter. Even more could have been done as a RAW file. There is no perfect exposure and jpeg processing blows out highlights and often doesn't retain much shadow detail. Shooting RAW and processing it is really the only real answer at times.
Apr 12, 2020 14:09:37 #

mizzee wrote:
If you use a program such as Lightroom, you can’t ruin the photo because it’s a non-destructive editor. If you want you can go back to the original image and start over or just back up a step or two.
You don’t need to be “non-destructive”.
The first thing I do is to make a copy, which I never change - then I make a checkpoint” copy every fifteen minutes - these are habits I developed during my career as a software developer.
Apr 12, 2020 14:17:21 #
To answer your other question. Just make a copy of your photo before processing it and only work on that copy then if you screw it up you can always go back to the original
Apr 12, 2020 14:19:48 #

It is slightly over-exposed. Learn to use the histogram and shoot RAW, and learn post-processing. When I first started taking pictures, I used auto-exposure bracketing, 3 images about a stop apart. It's kinda like having some extra insurance that you'll have a good shot to choose from.
Apr 12, 2020 14:43:25 #
Rod Clabaugh wrote:
Being somewhat new to photography I have a question. When it comes to taking photos how can you tell if a picture is under or overexposed? Isn’t a little subjective? I find the task of photo editing daunting because I’m not sure if I should change a picture or not. It really handcuffs me sometimes because I don’t want to ruin a photo.
Rod,
If you have bracketing on your camera, try using it to help you learn how the exposure affects the resulting image. Say do 5 images at 0, +/-1 and +/-2 to start. Then maybe 0.7 and 0.5 increment. Look at the histogram for each image. You should improve your exposure setting quickly this way.
Doc Barry
Apr 12, 2020 14:47:13 #
could someone tell him how to make a copy so that he could play with them as much as he wants and not ruin the original
Apr 12, 2020 15:02:23 #

You can consult the histogram to analyze any digital image to see spikes and drops in the graph to see if exposure is insufficient or overabundant- under or overexposed. You can also simply do a visual assessment; overexposure will block up or negate detail in the highlights and can also wash out the shadows. Underexposure, typically, will lack detail in the shadows. Oftentimes, however, even if you have arrived at normal exposure but due to harsh contrasty lighting, the range of recordable detail will exceed the dynamic range of your camera. So...youe cat image has adequate middle tones but the highlights are vacant due to the direct sunlight. A cloudy or overcast day or skylight from a wide with NORTHERN exposure would have yielded better lighting. Besides exposure, you have to consider the quality of the light and how it strikes the subject.
There are other SHOOTING methods such a fill-in flash where you expose for the highlight and add lig to the shadows with a subtle volume of light from a Speedlight or under a similar technique using a simple reflector to redirect some of the sunlight to proved shadow detail.
I certain automatic exposure modes, your camera makes a generalized or integrated reading- you may want to investigate the techniques of spot-reading so you can decide whether to shoot for the highlights, shadows or middle tones. Bracketing exposures is also a good way to ensure a better correctable file, especially in difficult or spotty lighting conditions.
Editing! More often than not there is more information or data in a file that is apparent in an uncorrected file.
By reading one of the SOTC pontifications online, one would think that editing, correcting and all manner of post=processg is illegal, immoral, unethical and unhealthy. In the old-time conventional darkroom, even among experienced master photographers, tweaking images to restore or preserve detail. compensate for exposure or lighting issues or errors, and address a wide range of aesthetics is a time-honored process. The same philosophy applies to digital photography so set up a Photoshop, Lightroom, or other software and have at it.
It is best to start off with a well-exposed, composed and in-range file but even a perfect shot can usually be perfected or enhanced in post-processing. And...if you don't lie the results to your post-processed image, you can scrap it and start all over again- the original file is not lost.
Another thought. I started my professional photographic career in the darkroom. When I had to spend hours toiling away just correcting the work of careless and lazy photographers- bad exposure included- I learned how to be a better shooter. In post-processing, you will learn all about editing and your shooting will improve as well- guaranteed! The boss fired the lazy photographer- it took too much time to produce their work and I was kept on!
Apr 12, 2020 15:05:17 #
dyximan wrote:
could someone tell him how to make a copy so that he could play with them as much as he wants and not ruin the original
Where did the OP indicate he doesn’t know how to use the O/S to make a copy??
Where did the OP indicate he doesn’t know how to “SAVE AS” in the middle of an editing session?
If you want to reply, then register here. Registration is free and your account is created instantly, so you can post right away.