Finishing Up Exposure and How It Works - A Beginner's Guide - Part 3
Mar 29, 2020 09:10:44 #

Thanks. That seems to align with what I see in the DOF calculator where the for and aft are more balanced at shorter focus distances.
Timmers wrote:
It does not match the calculation nor does it in r... (show quote)
Mar 29, 2020 09:16:37 #

Notorious T.O.D. wrote:
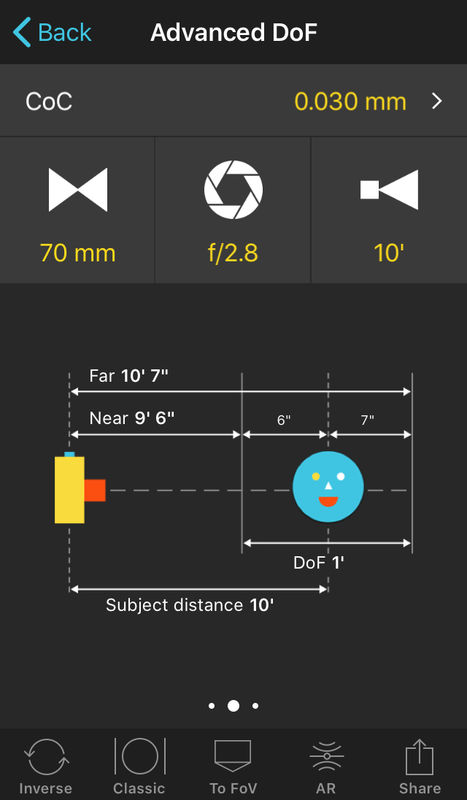
Nice series Bob!
One question comes to mind when you speak to DOF though. The 1/3-2/3 rule doesn’t seem to match up to the DOF calculations I get from my DOF calculator. I have attached an example from the DOF calculator in PhotoPills. Perhaps you can further explain...what am I missing?
One question comes to mind when you speak to DOF though. The 1/3-2/3 rule doesn’t seem to match up to the DOF calculations I get from my DOF calculator. I have attached an example from the DOF calculator in PhotoPills. Perhaps you can further explain...what am I missing?
This is really off topic.
The 1/3-2/3 (1:2) assumption is a myth. It applies only when the focus distance is 1/3 of the hyperfocal distance. Once you reach the hyperfocal distance it is 1:infinity. Focus nearby and it gets closer to 1:1.
Mar 29, 2020 09:39:56 #
Not sure how it is off topic when Bob mentions it as part of his presentation. I guess one could claim it is the fringe as related to exposure maybe...
selmslie wrote:
This is really off topic.
The 1/3-2/3 (1:2) assumption is a myth. It applies only when the focus distance is 1/3 of the hyperfocal distance. Once you reach the hyperfocal distance it is 1:infinity. Focus nearby and it gets closer to 1:1.
The 1/3-2/3 (1:2) assumption is a myth. It applies only when the focus distance is 1/3 of the hyperfocal distance. Once you reach the hyperfocal distance it is 1:infinity. Focus nearby and it gets closer to 1:1.
Mar 29, 2020 09:40:22 #
Thanks so much for your outstanding effort. I am sure many here learned a lot from it. Have a great day Bob.
Mar 29, 2020 09:55:24 #

Thanks Bob! I read thru the 3 parts and found there is no mention on how to determine exposure. For example when I came upon a scene how do I know what exposure should I give it? Using the meter? If so which mode? Is there cases when one has to deviate from the meter?
Mar 29, 2020 10:13:24 #
Notorious T.O.D. wrote:
Not sure how it is off topic when Bob mentions it as part of his presentation. I guess one could claim it is the fringe as related to exposure maybe...
I see what you are referring to.
Bob stated that, "The total DOF is distributed such that the nearest object which appears to be in focus is 1/3 of the total DOF in front of the subject and the farthest object which appears to be in focus is 2/3 of the total DOF behind the subject. This is an optical characteristic of a lens. Though the DOF may be different for different focal length lenses, or distances to subject, the distribution is always the same, 1/3 in front and 2/3 behind."
That statement is demonstrably wrong. Anyone with a DOF calculator can disprove it, as you have.
What's more, DOF has nothing to do with exposure. Too bad he mentioned it.
Mar 29, 2020 10:37:12 #
Timmers
Loc: San Antonio Texas.
BebuLamar wrote:
Thanks Bob! I read thru the 3 parts and found there is no mention on how to determine exposure. For example when I came upon a scene how do I know what exposure should I give it? Using the meter? If so which mode? Is there cases when one has to deviate from the meter?
The manner of determining exposure is the Rule of 16, or the up dated BDE (Basic Daylight Exposure) from Brooks Institute.
When do light meters AND the Rule of 16/BDE fail? Ansel Adams covers this in his historic (old) book that covers Natural Light Photography. When plant life is absorbing (eating!) daylight in what we all learned in school as photosynthesis there is a marked reduction in the reflected light from the surface of plant life (trees!). This subject is well covered in Ansel's presentation.
Mar 29, 2020 10:39:51 #
BebuLamar wrote:
Thanks Bob! I read thru the 3 parts and found there is no mention on how to determine exposure. For example when I came upon a scene how do I know what exposure should I give it? Using the meter? If so which mode? Is there cases when one has to deviate from the meter?
Yes, there are cases where we can and should deviate from the meter. Sometimes we don't need a meter at all.
I will put together a more complete explanation in a separate thread.
Mar 29, 2020 10:41:18 #
Timmers wrote:
The manner of determining exposure is the Rule of ... (show quote)
For me how one determines exposure is THE important part of exposure. Once the exposure is determined which ISO, shutter speed, aperture to use is easy. I think any discussion of exposure the determining of exposure is of utmost important.
Mar 29, 2020 10:59:54 #
Mar 29, 2020 11:01:34 #

Thanks, all, for the kind comments and expressions of appreciation.
As for the DOF comments, yes, there are calculators that will give a more accurate DOF than expressed. As Timmers pointed out in one of his replies, The 1/3:2/3 ratio is a very simple rule of thumb. It was mentioned only as a "courtesy" to let folks know of an additional "side" factor that enters into exposure. It's similar to saying water boils at 212 degrees F. It's a "rule of thumb". That boiling varies depending on a number of factors.
Considering this was intended for those just beginning to explore photography, the intent was to keep things somewhat simple. However, as pointed out in the third installment, this is a system that requires management and that involves some side effects that are unavoidable.
--Bob
Mar 29, 2020 11:03:13 #
Mar 29, 2020 11:09:44 #
T.O.D., The intent of this series was to provide a simple intro to exposure. I tried to keep things on a very basic. the 1/3:2/3 rule is a very basic rule of thumb. Once one starts a more in-depth exploration of all of the nuances involved in the various aspects of making a photograph, they will become aware of numerous variations to some "hard and fast" rules.
I appreciate your contribution, as it may entice some to explore the more in-depth aspect of DOF.
--Bob
I appreciate your contribution, as it may entice some to explore the more in-depth aspect of DOF.
--Bob
Notorious T.O.D. wrote:
Nice series Bob!
One question comes to mind when you speak to DOF though. The 1/3-2/3 rule doesn’t seem to match up to the DOF calculations I get from my DOF calculator. I have attached an example from the DOF calculator in PhotoPills. Perhaps you can further explain...what am I missing?
One question comes to mind when you speak to DOF though. The 1/3-2/3 rule doesn’t seem to match up to the DOF calculations I get from my DOF calculator. I have attached an example from the DOF calculator in PhotoPills. Perhaps you can further explain...what am I missing?
Mar 29, 2020 11:11:45 #
Bill, we all suspect you're well beyond the level of beginner. This series was intended for those just beginning their adventure in photography.
--Bob
--Bob
billnikon wrote:
YAWN.
Mar 29, 2020 11:17:09 #
You're quite welcome. This series was intended to be a very basic introduction. Yes, there are some references to advanced aspects, but only to let folks know there are additional factors to be considered.
Since you mentioned it, I'll write up a short article covering exposure and metering. Stay tuned.
--Bob
Since you mentioned it, I'll write up a short article covering exposure and metering. Stay tuned.
--Bob
BebuLamar wrote:
Thanks Bob! I read thru the 3 parts and found there is no mention on how to determine exposure. For example when I came upon a scene how do I know what exposure should I give it? Using the meter? If so which mode? Is there cases when one has to deviate from the meter?
If you want to reply, then register here. Registration is free and your account is created instantly, so you can post right away.