Black dog in a snow bank
Dec 3, 2019 19:47:33 #
jamesl wrote:
--------------
Take two shots, one adjusted for the dog the other adjusted for the snow and blend or mask the two together.
Take two shots, one adjusted for the dog the other adjusted for the snow and blend or mask the two together.
Thank you for the obvious solution but since I haven't got past DPP for photo processing, blending or masking is far beyond my capabilities.
Dec 3, 2019 20:35:09 #
Seems like a job for an HDR series.
Some cameras (even phone cameras) have some on-board HDR processing if Post-Processing is not an option.
Some cameras (even phone cameras) have some on-board HDR processing if Post-Processing is not an option.
Dec 3, 2019 21:52:26 #
billnikon wrote:
I always metered my hand and stopped down one to t... (show quote)
An incident meter is indispensable. Just make sure that you keep the ball in the same light that is falling on your subject.
At one time, meters made by Minolta were considered the best in the business. Used Flash Meter IV's and V's are available for much less than the cost of a new meter. Just Google the name of the meter used and several will come up. Thsse meters are hardy. If cared for, one should have many more button clicks in it.
Dec 3, 2019 22:00:50 #
raymondh wrote:
What's the better way to go: Plus EV to get the snow right & fix the dog in post or vice versa?
Occasionally in cases like this I will look for something in the scene that is close to neutral gray and would expose on that, then lock exposure, recompose and shoot. I always shoot RAW so the PP tweaking is not extreme and I have never had excessive noise but do get snow and dog detail.
I should add that the usual pix I take with this type of problem usually includes light blue sky, bright white clouds and snow on the grey, granite mountain peaks, light to dark yellow aspens on the right and black timber on the left, around a dark blue lake. My camera "shutters" at the thought of getting it right and is thankful I can adjust the pic in PP and not blame him--- but the corrections are pretty quick, simple and easy.
The other solutions being offered on this thread for your scenario and perfectly OK and do the job but this is just an alternative that has worked for me from time to time.
Dec 4, 2019 07:12:34 #

Linda From Maine wrote:
Very well said, Gene! I bet you teach photography 
I particularly like your explanation that "correct" exposure is whatever gets you the result you desire. Have you found that this helps folks not obsess over specific numbers?
I particularly like your explanation that "correct" exposure is whatever gets you the result you desire. Have you found that this helps folks not obsess over specific numbers?
Thanks!
When working with newbies or students, yes, the notion of correctness is easy to impart. The old curmudgeons have a much harder time understanding the concept - particularly those that don't do any post processing. The problem is, post processing is the norm, and unprocessed images stick out like a sore thumb.
Dec 4, 2019 07:20:14 #
selmslie wrote:
You are on the right track except for the use of t... (show quote)
That has not been my experience. The image I posted had both sliders maxed, and the exposure in Lr was as I took it. I did add a little white point compensation and black to enhance the contrast a bit. And I did hold back a little on the brightness of the eagle's head by doing a very light local adjustment in Lr, but what I described is a practical application. I am not against theory, but sometimes practicality trumps theory. Besides, different raw converters behave differently. In Capture One, the sliders are contained in a section called HDR, and expanding tonal range involves maxing out those sliders and adjusting the black and white point in the Levels view. Taken further, DXO has other fine tuning adjustments that can be used in conjunction with the shadow and highlight sliders - and all provide curves adjustment for even more fine tuning.
In any case, Scotty, I don't see a problem with either the highlights or the shadows in the image I posted, all theoretical considerations aside.
Dec 4, 2019 09:35:49 #

Gene51 wrote:
That has not been my experience. ...
In any case, Scotty, I don't see a problem with either the highlights or the shadows in the image I posted, all theoretical considerations aside.
In any case, Scotty, I don't see a problem with either the highlights or the shadows in the image I posted, all theoretical considerations aside.
It depends on the subject matter. Here is a better example from my own experience.
This image was taken at Sunny 16 - ISO 400 1/800 @ f/11 = LV 14.67. RawDigger (first screen shot) shows that the raw highlights are not blown.
In the second screen shot the image on the left has no adjustment made to the exposure, highlights or anything else.
I don't have one taken with one step of additional exposure (LV 13.67) so for the image on the right I pushed the Exposure slider to the right to add one stop. Then I compensated for that by moving the Highlight slider to 68 to bring the feathers down to about the same value as the image on the left.
As you can see, the result is that the blue sky for the first image is at a luminosity close to middle gray (about 127) but much brighter in the second image (142). The net effect is that the contrast between the highlights and the mid-tones are reduced in the second image. The other consequence is that the shaded feathers under the bird are brighter in the second image.
The OP might be looking for contrast within the snow. Sunny 16 (LV 14.67) or LV 15 is likely to provide that with very little need for highlight recovery.


Dec 4, 2019 15:44:21 #
The old rule of thumb to keep slides from blowing out in the highlights was to read the snow and close down 2 stops for some detail in the snow or 1.5 stops for brighter snow. If you have ever shot slides you know that 1/2 stops make a difference. With negative film they do not make a lot of difference.
Dec 4, 2019 19:23:15 #
selmslie wrote:
It depends on the subject matter. Here is a bette... (show quote)
Great shot!
I don't shoot color slides anymore.
Dec 4, 2019 19:28:20 #
Rayart wrote:
The old rule of thumb to keep slides from blowing out in the highlights was to read the snow and close down 2 stops for some detail in the snow or 1.5 stops for brighter snow. If you have ever shot slides you know that 1/2 stops make a difference. With negative film they do not make a lot of difference.
Actually that's backwards. Reading the snow will give you middle gray, diminishing exposure by two stops will make it pretty dark. You would read the snow with a spot meter, and add 1.5 to 2 stops (or more) to bring the middle gray value that the meter attaches to what it is reading to a brighter level. This is the fundamental concept behind the zone system.
Dec 4, 2019 19:57:50 #

Gene51 wrote:
Actually that's backwards. Reading the snow will give you middle gray, diminishing exposure by two stops will make it pretty dark. You would read the snow with a spot meter, and add 1.5 to 2 stops (or more) to bring the middle gray value that the meter attaches to what it is reading to a brighter level. This is the fundamental concept behind the zone system.

Dec 4, 2019 20:29:55 #
Gene51 wrote:
Great shot!
I don't shoot color slides anymore.
I don't shoot color slides anymore.
Thanks.
When you get to my age you appreciate the low hanging fruit. This was at the St. Augustine Alligator Farm a couple of years ago.
It was not a technical challenge, just a matter of picking a time when there were not a lot of kids running along the boardwalk.
Dec 4, 2019 20:37:53 #

Dec 4, 2019 20:43:22 #
Notorious T.O.D. wrote:
Very Nice!!!
Thank you.
It also made a decent B&W conversion. All I did was suppress the blue and cyan and boost the red and yellow in Capture One.

Dec 31, 2019 00:22:02 #
Way too funny... so many "great" ideas... albeit only one came close to an actual solution used by the lion's share of "commercial" shooters that I've had the privilege to work with...
Thank you jamesl; wdross and RGG... Albeit all of these gentleman still are a tad short of what actually works elegantly...
Ok, For the longest time I've assisted commercial architectural shooters...
Without exception all use HDR...
However with a rather sophisticated software application...
btw, I use this all the time... both for studio work and on location (many thanks to my mentors i.e. commercial architectural shooters)
Photomatix Pro... It allows one to achieve true (and stunning) HDR from a single RAW capture...
https://www.hdrsoft.com/
btw, it's not cheap software however the results are priceless...
disclaimer: I don't work for HDRsoft
This thread is a sterling example of Maslow's "law of the instrument" a.k.a. Hammer
There are indeed better tools available folks... trust me, k?
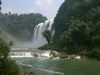
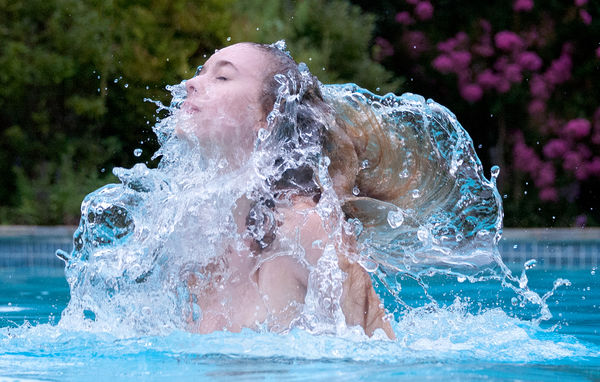
Below is an example of combining two separate renderings (in PS) of a single RAW file via HDRsoft... a.k.a. Photomatix Pro. The original capture far exceed the dynamic range of a Nikon D3... that is if one wanted to hold all the detail in the aquatic component AND actual skin tone luminosity...
Oh, sorry I don't shoot in the snow... way too cold... lol
Enough said: Have an awesome New Year!
.
Thank you jamesl; wdross and RGG... Albeit all of these gentleman still are a tad short of what actually works elegantly...
Ok, For the longest time I've assisted commercial architectural shooters...
Without exception all use HDR...
However with a rather sophisticated software application...
btw, I use this all the time... both for studio work and on location (many thanks to my mentors i.e. commercial architectural shooters)
Photomatix Pro... It allows one to achieve true (and stunning) HDR from a single RAW capture...
https://www.hdrsoft.com/
btw, it's not cheap software however the results are priceless...
disclaimer: I don't work for HDRsoft
This thread is a sterling example of Maslow's "law of the instrument" a.k.a. Hammer
There are indeed better tools available folks... trust me, k?
Below is an example of combining two separate renderings (in PS) of a single RAW file via HDRsoft... a.k.a. Photomatix Pro. The original capture far exceed the dynamic range of a Nikon D3... that is if one wanted to hold all the detail in the aquatic component AND actual skin tone luminosity...
Oh, sorry I don't shoot in the snow... way too cold... lol
Enough said: Have an awesome New Year!
.
If you want to reply, then register here. Registration is free and your account is created instantly, so you can post right away.