Focus masking in Photoshop
Aug 18, 2019 10:18:41 #
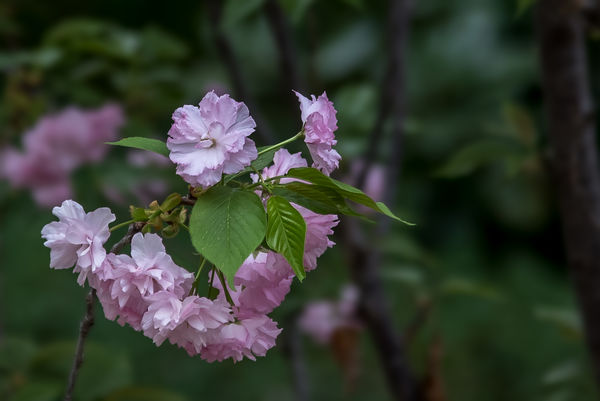
Came across this by accident. Will work better in some instances. You end up having sharper edges than using Quick Selection tool with Select and Mask.
I wanted to created additional blur for the background and darken the background. First duplicate the layer. Then - Select > Focus Area and then moved the slider to the right till you get as much of the foreground flower and leaves as possible without the background. This creates a very sharp edged selection, then back to your layer and apply a mask. Invert mask so now you just have the background. I used Gaussian Blur and blurred the background. Now added a curve layer, clip it to the background layer and darken getting my final results.
I wanted to created additional blur for the background and darken the background. First duplicate the layer. Then - Select > Focus Area and then moved the slider to the right till you get as much of the foreground flower and leaves as possible without the background. This creates a very sharp edged selection, then back to your layer and apply a mask. Invert mask so now you just have the background. I used Gaussian Blur and blurred the background. Now added a curve layer, clip it to the background layer and darken getting my final results.
Aug 18, 2019 10:25:36 #
Looks good but how and where do you Select > Focus Area?
Never mind, I see it in Photoshop CC. I had Photoshop CS6 open.
Thanks.
Never mind, I see it in Photoshop CC. I had Photoshop CS6 open.
Thanks.
Aug 18, 2019 10:33:48 #
Aug 18, 2019 10:34:29 #
Fotoartist wrote:
Looks good but how and where do you Select > Focus Area?
In Photoshop CC maybe other versions too you go to the top bar and look for the Select tab click on it the look down till you see Focus Area... Click it and then you will see the slider. Once you move it to where you want it click OK now back to you layer and click the mask button at the bottom. You can download this picture as an example and open in Photoshop to see how it works.
Aug 18, 2019 10:34:58 #
Aug 18, 2019 10:56:13 #
Jim-Pops wrote:
Came across this by accident. Will work better in ... (show quote)
Wowsa! Yet another great tool I didn't know about. Thanks Jim-Pops
Aug 18, 2019 14:34:00 #
Nice tip. I see you could further refine after doing that if needed using the tools in select and mask.
Aug 19, 2019 12:16:19 #
Jim, I have tried this but it doesn't select open interior portions of the image. It works great provided the subject, or in-focus area, is solid. Am I missing something?
Thanks.
Thanks.
Aug 19, 2019 12:37:45 #
jackm1943 wrote:
Jim, I have tried this but it doesn't select open interior portions of the image. It works great provided the subject, or in-focus area, is solid. Am I missing something?
Thanks.
Thanks.
To me in some instances you are getting big head start on the photo. One you make the mask you can go back and fill in the missing areas on the mask with a brush. Again it's another tool that helps you get to your goal. For me refine edge tool is not all that great and always looking for a better way.
Aug 19, 2019 12:50:27 #
Thanks for adding another weapon to the arsenal! I was unaware of this function, but now I will probably spend the rest of the day trying it out! 

Aug 19, 2019 12:54:12 #
Jim-Pops wrote:
To me in some instances you are getting big head start on the photo. One you make the mask you can go back and fill in the missing areas on the mask with a brush. Again it's another tool that helps you get to your goal. For me refine edge tool is not all that great and always looking for a better way.
OK Jim-Pops, it does give one a "head start" over the other selection tools. Thanks for sharing, I hadn't noticed this particular button before.
JackM
Aug 19, 2019 12:55:35 #
tommystrat wrote:
Thanks for adding another weapon to the arsenal! I was unaware of this function, but now I will probably spend the rest of the day trying it out! 

It might not work all the time but will help in some cases. I like the fact you get sharper edges if desired. You will have to do some clean up on your mask.
Aug 19, 2019 12:58:33 #
jackm1943 wrote:
OK Jim-Pops, it does give one a "head start" over the other selection tools. Thanks for sharing, I hadn't noticed this particular button before.
JackM
JackM
I use the pen tool too. Not an easy tool to get accustom to. I might use 90% of the results using the selective tool then use the pen tool for the clean up.
Aug 19, 2019 13:57:41 #
jackm1943 wrote:
Jim, I have tried this but it doesn't select open interior portions of the image. It works great provided the subject, or in-focus area, is solid. Am I missing something?
Thanks.
Thanks.
You can always click the "add to selection" box with any selection tool and it will preserve what is already selected and let you add more to it. In the tool choices area top left area of the screen when any selection tool is active.
Aug 22, 2019 08:23:28 #
Yes, I have the latest PS CC, This technique will save a lot of time in the workflow! We need to keep up the good work!
If you want to reply, then register here. Registration is free and your account is created instantly, so you can post right away.


