Technique
Jul 5, 2019 13:10:34 #
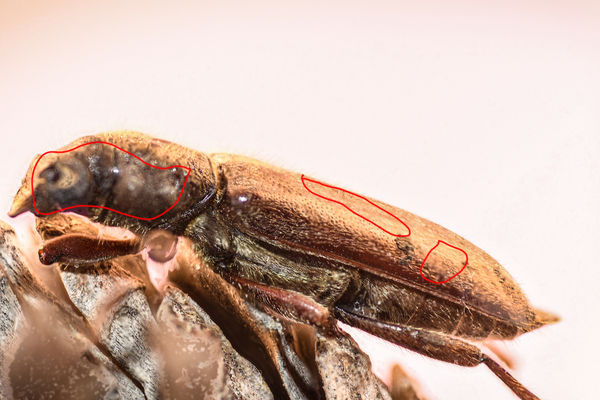
One very beat up bug I recovered from some ants. D 7200, 60mm Micro Nikkor, f5.6 at 1/20, 1:1 ratio, 10 shot stack, focusing rail, remote release, on camera flash, Live View.
There are some areas that are not in focus and some is sharp focus. I think since my rail does not have a scale on it, I may be moving different amounts? If I read the DOF chart right I should have ~1mm DOF?
Any and all help will be appreciated
There are some areas that are not in focus and some is sharp focus. I think since my rail does not have a scale on it, I may be moving different amounts? If I read the DOF chart right I should have ~1mm DOF?
Any and all help will be appreciated

Jul 5, 2019 13:25:31 #
Curmudgeon wrote:
One very beat up bug I recovered from some ants. D 7200, 60mm Micro Nikkor, f5.6 at 1/20, 1:1 ratio, 10 shot stack, focusing rail, remote release, on camera flash, Live View.
Any and all help will be appreciated
Any and all help will be appreciated
i cant help to much since all my stacks are handheld but you should start either at the closest point or the farthest.both ends of your stack are not in focus
Jul 5, 2019 16:01:54 #

It is generally recommended that you have a 50% overlap in the DoF to be certain of good focus everywhere.
Use your focusing rail knob to create even steps, 1 turn, 1/2 turn, etc.
Use your focusing rail knob to create even steps, 1 turn, 1/2 turn, etc.
Jul 5, 2019 16:02:37 #
Jul 5, 2019 21:27:05 #

Always move in the same direction when stacking, and use uniform steps less than the DoF. Almost all focus rails have backlash, even the automated types, and moving in one direction when stacking reduces this effect.
Best,
Best,
Jul 5, 2019 21:57:39 #
Jul 6, 2019 07:31:27 #
An inexpensive way to achieve accurate steps is to mount a dial indicator onto the rail so that you can read movements as small as 0.001 inch or .01mm. Then you know exactly how much travel your camera makes before each exposure. A poor mans stepper motor rail! The advantage is consistency in results and repeatability in the future.
Jul 6, 2019 09:33:21 #

Here's a few tips that I've learned in my continuous journey of focus stacking that I'm happy to share.
1. Mount the camera on a solid surface. I used a tripod at first and found that simply touching and turning the focus rail caused vibration blurs.
2. With the camera mounted flat and solid, use your focus rail to move the subject and not the camera.
3. Lay a fine incremented rule down alongside the focus rail. Glue a needle on the focus rail to serve as a pointer on the rule. Paint the needle with a bright colored fingernail polish to make it easy to see. Not only does this serve as a guide to the distance traveled, it is also used so that you move the same increments each time.
4. If you wish to shoot a smaller number of shots per session, close down the aperture to create a deeper field of view. This works very well for less complex subjects such as flowers, hard surfaced insects and inanimate objects. Fuzzy or hairy subjects show better with numerous shots with a very shallow depth of field.
5. Create a "light tunnel" to provide a soft wrap of light around the subject. I favor translucent plastic drink cups with a piece of white paper towel on them. I cut a section out of the length of the cup so that it easily fits over the specimen and if you are moving the specimen toward or away from the camera the light stays constant over it. Specimens such as insects require very small total distances (usually under 6 millimeters for me) so they always stay under the cup diffuser.
6. Enjoy, enjoy, enjoy! However, as a word of caution, focus stacking will be addictive and there is no known cure.
Jul 6, 2019 12:59:21 #
I love the Nikon 60mm macro lens, extremely sharp. Until you get the hang of it, I would close down the aperture to at least F/9. Incorporate a ruler to keep distance between stacks accurate and you're on your way. P.S. If your using live view, use it to view what's in focus. You can even magnify the live view on the D7200 if you have a hard time seeing. Use to your advantage.
Jul 6, 2019 13:28:24 #
Thanks both of you. Thanks to sippijug (sorry I don't know your name) I am going to have to leave the studio and go back to the shop and redesign my shooting layout. I have been moving the camera. 
Jul 6, 2019 19:15:38 #
Either method works although there is less possibility of creating vibrations if the camera is solid in place. There is no difference in whether one moves or the other regarding the process although there may be a difference in which is easier to control.
I started out with a "4-way" macro rail which I thought was a good idea until I started using it. The problem I encountered was that the camera sat too high on it and I found that it was not as stable as I had hoped. Eventually I used it to stage the specimen and not the camera so in the end it worked out for me.
Eventually I moved to a "screw type" macro rail that sat flat which made a huge difference in my ability to control the fine movements and in its ability to resist any vibrations.
If you want to reply, then register here. Registration is free and your account is created instantly, so you can post right away.