A little bit of help with background replacement...(Please.)
May 7, 2019 06:50:49 #
Attached is an image that I would kindly ask if some UHH member can please give me step by step instructions of an EASY way to remove/change the background. I looked at You Tube video instructions but can't seem to follow them all the way to completion, plus they seem (to me) to be overly complicated..
Thanks..
Thanks..

May 7, 2019 07:01:55 #

The answers will be coming in shortly and the real answer is going to depend upon how accurately you want the selection of the cat and its "Cradle" to be. Some selection programs do a better job than others and you may wind up having to buy one. What program do you have now, I'll assume it's about the one you were watching YouTube videos of.
May 7, 2019 07:09:49 #
Personally I think it is a beautiful image just as it is. Is it important to change the background?
Bob
Bob
May 7, 2019 07:11:31 #
Hmmm.. "Cat's in The Cradle" (ala Stevens song...)
Photoshop. (I have tried several times to do it in layers, but I seem to have a "dead spot" somewhere in my brain trying to follow the instructions.) Perhaps I was trying a set of instructions that were too complicated? Regarding the complexity of the fix, I would rather for it to be seamless, but at this late date in the time of my life journey, maybe I need to lower my expectations..
Thanks for your reply
Howard5252 wrote:
The answers will be coming in shortly and the real answer is going to depend upon how accurately you want the selection of the cat and its "Cradle" to be. Some selection programs do a better job than others and you may wind up having to buy one. What program do you have now, I'll assume it's about the one you were watching YouTube videos of.
May 7, 2019 08:28:13 #

Did you use a selection tool in order to make the background all black? If yes, you've already accomplished the difficult - or at least the tedious - part.
Once you have the cat and bed selected, just copy/paste this selection onto the image you want as new background. That's the simplest way I can think of
In PS Elements that puts the cat/bed on a new layer and I believe is similar for PS. It could be helpful also if you'd post the image you'd like to use as background or explain further what you'd like your end result to be. There may be re-sizing, perspective changes or layer blend modes to adjust for a more refined result.
May 7, 2019 08:47:49 #

This doesn’t answer your question, but I like it the way it is. You might give it a bit more contrast to make it pop.
May 7, 2019 08:54:23 #
If you have Photoshop, the sort of easy way is to use the erase background tool. It is on the left, right click the eraser tool to see the background eraser option. It is tedious and you have to save often and save versions, but you can set the sensitivity of the tool to tell it how much contrast to consider background. If it erases too much change the slider to the left to distinguish more finely. Click contiguous and sample once for the most control. Just click with the cross on the tool outside the subject, but the circle in the subject. It makes what you erase transparent so whatever layer is below is revealed. Control-z to undo mistakes. You can put another pic in the layer below or add a full layer to pick a color. There are other settings in the tool to make it more sensitive.
A quicker way but more technical and difficult is the refine edge tool. You have to use the selection tool to roughly outline the area, choose select and mask from the menu, then pick the refine edge brush to paint the edge. This is much more complex. You can smooth, feather, control contrast, etc. If you choose 'output to selection' you can invert the selection under the selection menu and simply hit the delete button to erase it. Even better but even more complicated is choose 'output to new layer with layer mask.' Here if you made an error you can use a white or black paintbrush to reveal more or hide more.
If you are trying to separate the cat from the bed, you will have difficulty in every method where the cat fur and bed fur are so similar. The program will have trouble sensing the difference. You can use the regular eraser tool and zoom in and laboriously erase dot by dot the unwanted part. Or if you used the mask, zoom in with white or black brush.
May 7, 2019 09:01:26 #
Thanks..
But MORE contrast?
On my screen it looks to have max. contrast..
But MORE contrast?
On my screen it looks to have max. contrast..
jaymatt wrote:
This doesn’t answer your question, but I like it the way it is. You might give it a bit more contrast to make it pop.
May 7, 2019 09:58:04 #

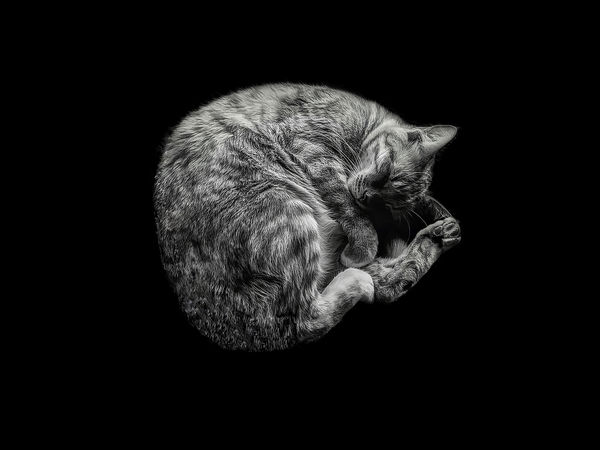
"remove/change the background."
By "background" I'm assuming you meant the basket too. Here is the cat isolated from everything else. No Layers or Masks were used. I VERY CAREFULLY outlined the cat with the Photoshop Lasso tool, clicked on "Inverse" and used a large brush with Black selected to paint out the basket (you could use any color you want). Some small areas needed the Patch tool to reconstruct edges of the fur where it blended with the fur on the basket. It took about 15-20 minutes to do. Hope this is what you wanted.
By "background" I'm assuming you meant the basket too. Here is the cat isolated from everything else. No Layers or Masks were used. I VERY CAREFULLY outlined the cat with the Photoshop Lasso tool, clicked on "Inverse" and used a large brush with Black selected to paint out the basket (you could use any color you want). Some small areas needed the Patch tool to reconstruct edges of the fur where it blended with the fur on the basket. It took about 15-20 minutes to do. Hope this is what you wanted.
May 7, 2019 10:04:32 #

May 7, 2019 10:35:33 #
May 7, 2019 12:16:58 #

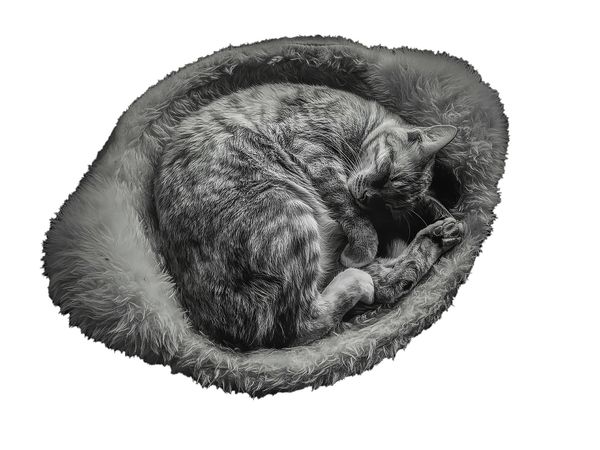
It doesn't always work, but I tried a simple approach in PS CC: Select - Subject. I subsequently replaced the black background with white.
May 7, 2019 12:18:14 #
SonyA580 wrote:
"remove/change the background." br br ... (show quote)
That is a nice job and nice of you to take the time. It made me think that the magic wand selection tool might also help with the initial selection since you can dial in the sensitivity and use +/- to get even closer.
Just to suggest a further refinement that might reveal more of the fine hair of the cat against the background. After you use the lasso tool, click select and mask, choose the refine edge brush, and just carefully paint the edge of the fur. Photoshop will automatically try to distinguish the hair from the background. If you output to a mask you can still use black or white brush to conceal or reveal problem areas. Or if you are not ready to tackle a mask you can output back to the selection. If it has taken too much cat you can go back to select and mask and choose the regular selection brush and add to or subtract from the selection until it is how you like it.
May 7, 2019 12:24:55 #
May 7, 2019 12:27:04 #
DWU2 wrote:
Wow! I shouldn't be surprised, given there are commands related to faces and such, but this is pretty impressive. Soon, we'll only have to think the result It doesn't always work, but I tried a simple approach in PS CC: Select - Subject. I subsequently replaced the black background with white.

If you want to reply, then register here. Registration is free and your account is created instantly, so you can post right away.