canvas like pictures
Dec 4, 2012 20:40:06 #

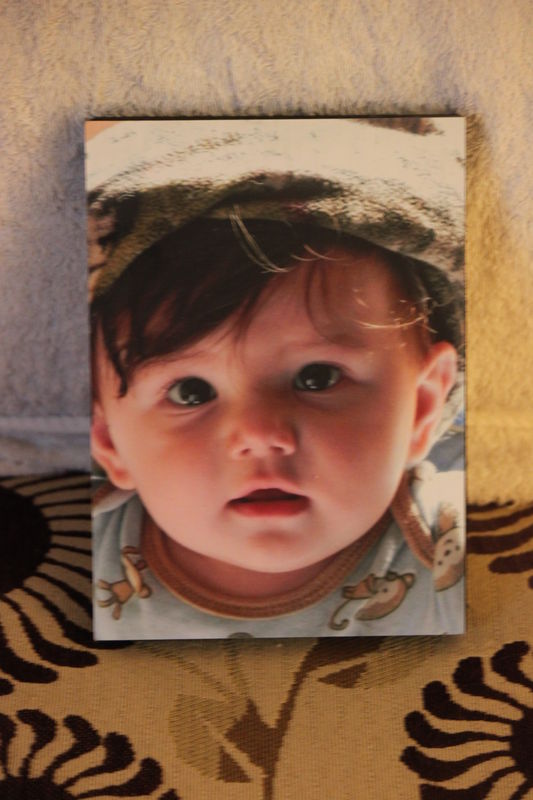
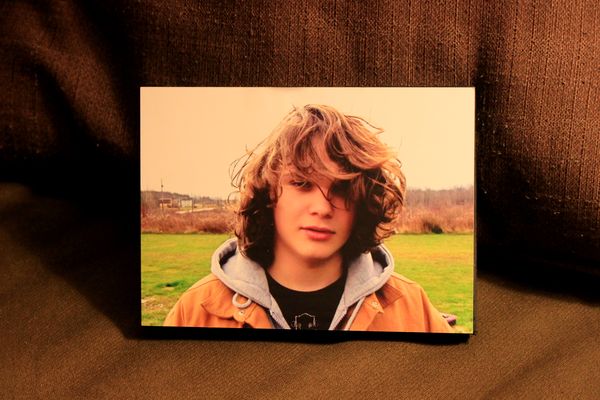
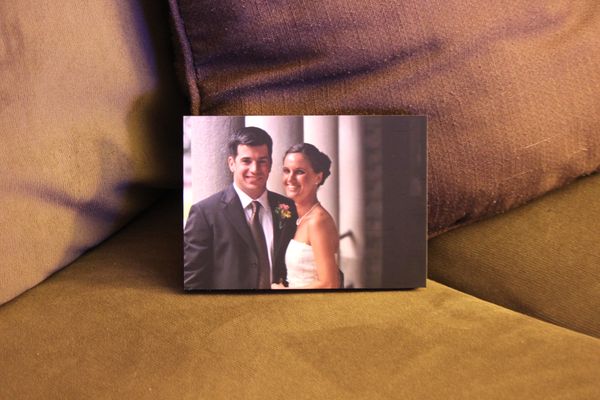
Seen this on pinterest and decided to try it. We're suspose to make our make xmas gifts this year and I thought why not. They turned out so nice that i'm doing a section of my living room wall. It was easy, just cut wood the size of photo you want to use, paint the wood. Let dry. mod podge the wood, lay the pic on top, remove any bubbles,let dry. Mod podge the top, let dry. Make you sure you cover the top with enough mod podge. Sand rough edges on side.You can make your mod podge by using half elmers glue and half water, mix well. Here's one one of the pictures I just finished.
Dec 4, 2012 22:11:53 #

I like it! What size picture did you do? I saw something similar on pinterist using foam insulation and printing a black and white photo on blue print paper.
Dec 4, 2012 23:13:29 #
woman44004 wrote:
Seen this on pinterest and decided to try it. We'r... (show quote)
Very nice. I've never heard of mod podge, though. What's the point?
Dec 4, 2012 23:13:35 #
woman44004 wrote:
Seen this on pinterest and decided to try it. We'r... (show quote)
Sorry about the double post. Using an iPad wirelessly is not like using my plugged-in desktop. :oops:
Dec 5, 2012 01:33:56 #
elise3 wrote:
I like it! What size picture did you do? I saw something similar on pinterist using foam insulation and printing a black and white photo on blue print paper.
This is only a 5 x 7 inch this was the first one I tried.
Dec 5, 2012 01:57:08 #
[quote=jerryc41]
It makes the picture really look like it was done on canvas, it took the shiniest off the picture and really brought the colors out. Here are a couple more pictures
woman44004 wrote:
Seen this on pinterest and decided to try it. We'r... (show quote)
It makes the picture really look like it was done on canvas, it took the shiniest off the picture and really brought the colors out. Here are a couple more pictures
Dec 5, 2012 03:53:25 #

[quote=woman44004]
The "mod podge" or your self mixture also serve as the 'adhesive' or bonding agent to hold the photo to the wood and the top coat provides a waterproof top layer to protect the finished product.
jerryc41 wrote:
quote=woman44004 Seen this on pinterest and decid... (show quote)
The "mod podge" or your self mixture also serve as the 'adhesive' or bonding agent to hold the photo to the wood and the top coat provides a waterproof top layer to protect the finished product.
Dec 5, 2012 06:00:36 #
OK, I'll be the grinch here again. I've been researching this same thing looking for an alternative to EXPENSIVE canvas prints, and have also encountered this method. But...the ONLY similarity between this and a canvas print is that they're both glued to a backer. As far as quality or effect, not even close. Good night, y'all. :)
Dec 5, 2012 07:19:57 #

woman44004 wrote:
Seen this on pinterest and decided to try it. We'r... (show quote)
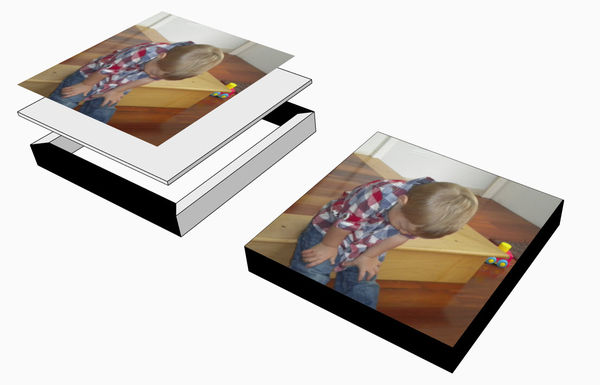
Did this (similar)years ago, except being a Custom cabinet builder we used to use 1x2 stock and make boxes (hence the box frame) you would get more depth with the box frame apposed to 3/4" solid stock, and cheaper... cover top of box with Masonite, route or sand flush with edges of box, Paint sides flat black or as we sometimes did, match the Formica or hardwood used in the kitchens we designed, then dry mount print, trip flush with razor blade, use a marker to color edge of print so it wasn't white. Some we made were more complicated using dovetail & finger joints at corners of boxes when using hard woods such as Oak, Black Walnut....stain or poly sides...If any one is interested, I can post a plan on how we made Box Frames.
Dec 5, 2012 07:58:17 #
Dec 5, 2012 08:20:22 #
OnDSnap wrote:
quote=OnDSnap quote=woman44004 Seen this on pint... (show quote)
Nice diagram. Is that your doing?
Dec 5, 2012 08:36:52 #
Hi Jerry, Yes,...that is how I make my living aside from building, Cad drawings, 2-D & 3-D illustrations/Renderings etc.etc
Dec 5, 2012 09:19:41 #

I have tried this, but with the Tissue paper method. This method gives you more of the texture as you would find on an actual canvas print. It is not for the faint of heart and does take some trail and error to get it just right. They are fun gifts, I did one for my sister in-law when I did their newborn session.
Dec 5, 2012 10:32:03 #
GPoyner wrote:
I have tried this, but with the Tissue paper method. This method gives you more of the texture as you would find on an actual canvas print. It is not for the faint of heart and does take some trail and error to get it just right. They are fun gifts, I did one for my sister in-law when I did their newborn session.
How is this done with tissue paper?
Dec 5, 2012 14:03:45 #
OnDSnap wrote:
Hi Jerry, Yes,...that is how I make my living aside from building, Cad drawings, 2-D & 3-D illustrations/Renderings etc.etc
Very nice illustrations !
If you want to reply, then register here. Registration is free and your account is created instantly, so you can post right away.