Using Rob Shea's LUT files in the New DxO Photolab 7
Nov 22, 2023 02:25:42 #

No instructions for this have been produced that I have been able to find. So, I had to jump in blind. One of the new things added into DxO Photolab 7, which I just updated using the Black Friday pricing, is the ability to use LUTs, and in fact, use custom LUTs (actually the .CUBE files) from Rob Shea that weren't supplied with the original 17.
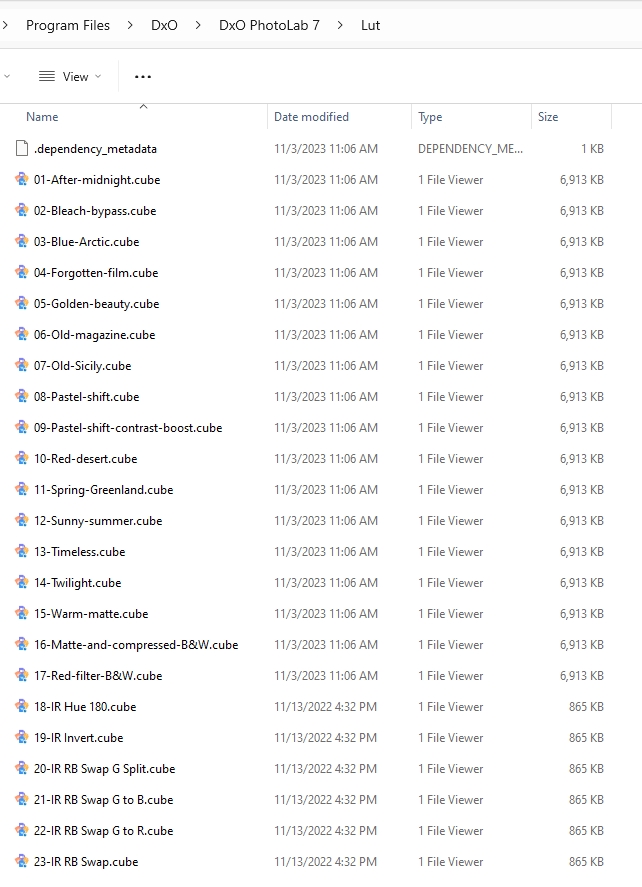
The first image is the list of the 17 DxO supplied LUTs (actually .CUBE files). These reside in a subdirectory cleverly called "Lut". Need to close down DxO and then relaunch it after copying the files.
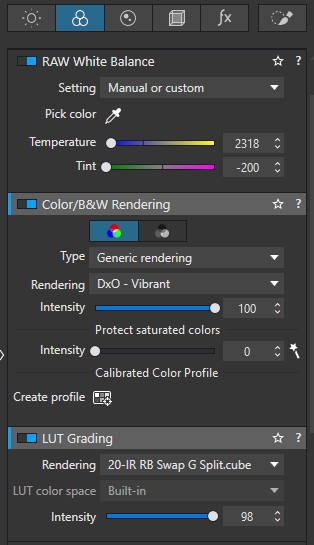
The 2nd image shows where I make use of these in DxO.
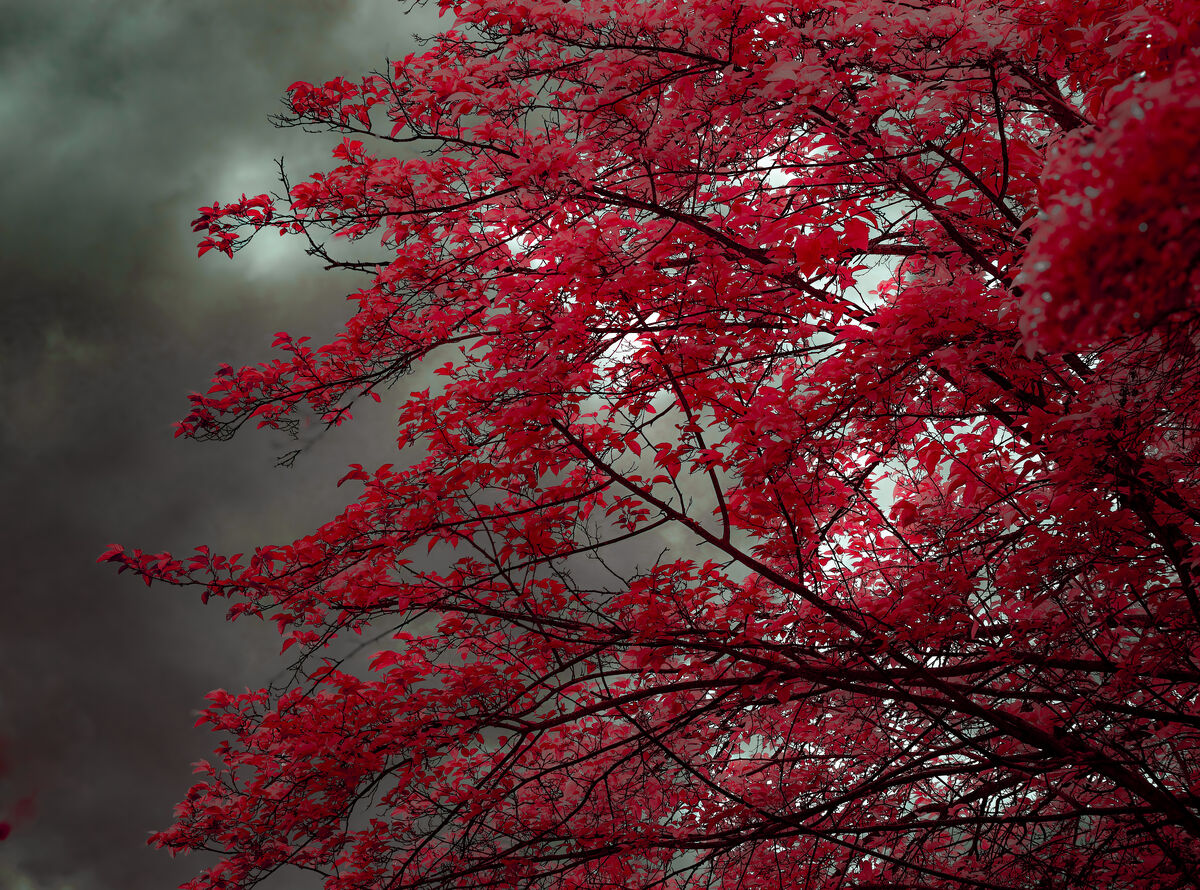
And finally the 3rd image is my first try of an image shot using a 720nm filter. I wasn't sure exactly what I was doing, and first attempted a White Balance on the lighter part of the sky. Surprisingly, it achieved White Balance with the Temp. Slider pegs to the far left.
Next I chose a Rob Shea LUT to swap Red & Blue and to then move 50% of Green to Red and Blue. Then did another White Balance on the lighter part of the sky.
Then I got busy adjusting things in the Sections Color/B&W Rendering and in LUT Grading without a clue as to what I was really doing. And somehow, I produced this result!
Probably need to encourage Rob Shea to give this a try and to produce some IR instructions for using these capabilities in DxO Photolab 7. In particular, I don't yet know how to deal with the large swings needed for the color temperature.
The first image is the list of the 17 DxO supplied LUTs (actually .CUBE files). These reside in a subdirectory cleverly called "Lut". Need to close down DxO and then relaunch it after copying the files.
The 2nd image shows where I make use of these in DxO.
And finally the 3rd image is my first try of an image shot using a 720nm filter. I wasn't sure exactly what I was doing, and first attempted a White Balance on the lighter part of the sky. Surprisingly, it achieved White Balance with the Temp. Slider pegs to the far left.
Next I chose a Rob Shea LUT to swap Red & Blue and to then move 50% of Green to Red and Blue. Then did another White Balance on the lighter part of the sky.
Then I got busy adjusting things in the Sections Color/B&W Rendering and in LUT Grading without a clue as to what I was really doing. And somehow, I produced this result!
Probably need to encourage Rob Shea to give this a try and to produce some IR instructions for using these capabilities in DxO Photolab 7. In particular, I don't yet know how to deal with the large swings needed for the color temperature.
LUTs - 1 to 17 supplied by DxO, 18 - 23 copied in from Rob Shea's IR LUTs
Here is where I adjust White Balance and select a LUT
My first attempt
(Download)
Nov 22, 2023 03:59:29 #

The cook book directions are well documented, Kudos ~!
The image you present, tree and storm clouds, is captivating. If in my mind I remove or look thru the tree the sky is dark left and light is peeking thru on the right an effective background for the tree as opposed to a uniformly dark clouded sky.
------------------------------------
I have just purchased PSE 24. It appears that LUT can be added.
https://www.bouncecolor.com/blogs/tutorials/use-luts-in-photoshop
PSE with Elements plus added [a $12 modification for PSE]
https://www.youtube.com/watch?v=6l4WJS3Vfd8
Free pack of 12 LUT
https://giggster.com/guide/free-luts/
Nov 22, 2023 17:39:29 #
Note: I sent a message last night to Rob Shea, and he did respond and said that looking into DxO Photolab 7 is something he ought to do now that it can use LUTs directly.
Also mentioned dcp profiles he supplied with the Infrared Profile Pack were tested in DxO Photolab 4.
See: https://blog.robsheaphotography.com/infrared-profile-pack/
This in turn points here: https://blog.robsheaphotography.com/infrared-profile-pack/#editors
With this information, I took the .dcp files for the two modified cameras that I have, added them to DxO Photolab 7.
In DxO Photolab 7, under the Color/B&W Rendering section is a place to install DCP profiles. For Adobe, I had already downloading the ones I needed at: C:\Users\%userprofile%\AppData\Roaming\Adobe\CameraRaw\CameraProfiles\
In this section of DxO, you can choose DCP Profile and beneath it is a field called rendering and in there is a button to import a DCP Profile. In my case with two modified cameras, I had to do this 4 times - both a -50 and a -100 option for each camera.
Now that it is working in DxO Photolab, here are my findings. It works well in DxO and gives me great control on color control. But I also find that I can't depend on it to do finishing work. Thus it makes sense to export the DxO result to Lightroom where there are other tools to perfect the end result.
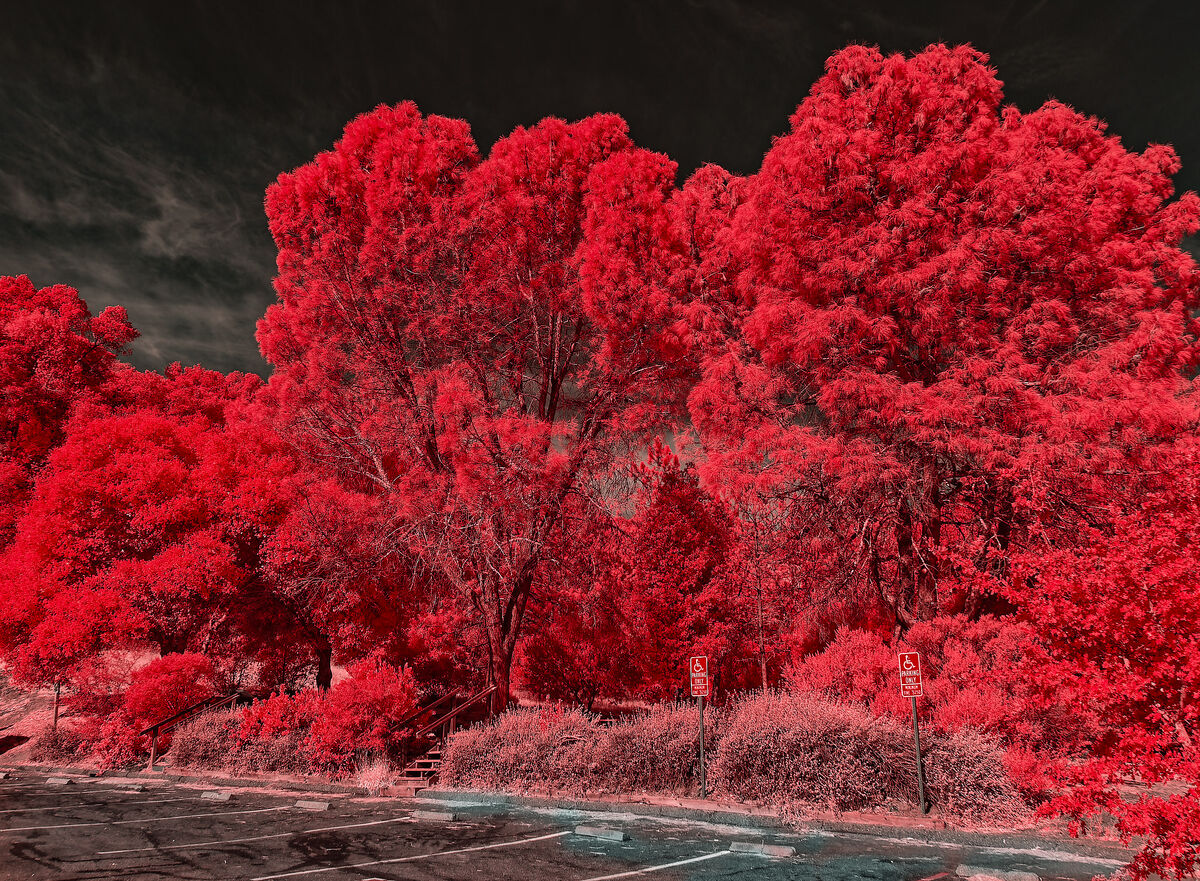
Attached are two images. The first is done only with DxO. Great control over colors. I could have chosen other colors if I wanted to. But the masking tools I like to use in Lightroom aren't there, so further detail stuff is lacking. If you look at the blacktop, you can see I started desaturating the pink coloring of the surface, and then got distracted and forgot to come back and finish the job. I had started using a masking brush for that in Lightroom.
The second image is another case where I only used Lightroom and made use of masking tools to control the final look. The masking tools allow the use of brushes to saturate or less saturation as needed as well as other tools to choose from. DxO can export to Lightroom in order to take advantage of these tools.
Also mentioned dcp profiles he supplied with the Infrared Profile Pack were tested in DxO Photolab 4.
See: https://blog.robsheaphotography.com/infrared-profile-pack/
This in turn points here: https://blog.robsheaphotography.com/infrared-profile-pack/#editors
With this information, I took the .dcp files for the two modified cameras that I have, added them to DxO Photolab 7.
In DxO Photolab 7, under the Color/B&W Rendering section is a place to install DCP profiles. For Adobe, I had already downloading the ones I needed at: C:\Users\%userprofile%\AppData\Roaming\Adobe\CameraRaw\CameraProfiles\
In this section of DxO, you can choose DCP Profile and beneath it is a field called rendering and in there is a button to import a DCP Profile. In my case with two modified cameras, I had to do this 4 times - both a -50 and a -100 option for each camera.
Now that it is working in DxO Photolab, here are my findings. It works well in DxO and gives me great control on color control. But I also find that I can't depend on it to do finishing work. Thus it makes sense to export the DxO result to Lightroom where there are other tools to perfect the end result.
Attached are two images. The first is done only with DxO. Great control over colors. I could have chosen other colors if I wanted to. But the masking tools I like to use in Lightroom aren't there, so further detail stuff is lacking. If you look at the blacktop, you can see I started desaturating the pink coloring of the surface, and then got distracted and forgot to come back and finish the job. I had started using a masking brush for that in Lightroom.
The second image is another case where I only used Lightroom and made use of masking tools to control the final look. The masking tools allow the use of brushes to saturate or less saturation as needed as well as other tools to choose from. DxO can export to Lightroom in order to take advantage of these tools.
590nm filter example done in DxO Photolab 7
(Download)
A previous 590nm example done in Lightroom - Would not be able to duplicate this in DxO

(Download)
Nov 23, 2023 00:52:51 #
After getting used to processing RAW infrared images in DxO Photolab 7, I have come to the conclusion that it does a superior job compared to using Lightroom. Of course, I may way to do additional processing by exporting it to Lightroom to do things DxO can't do such as masking.
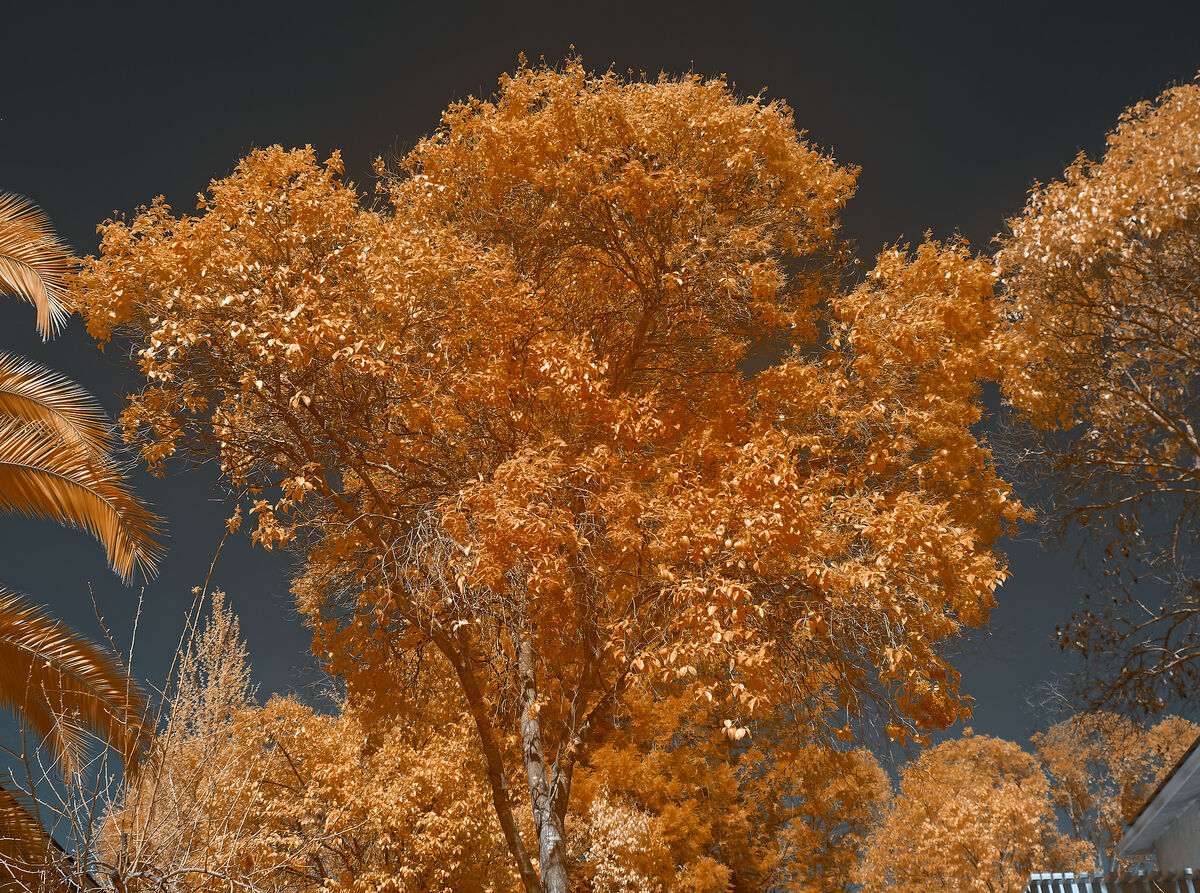
The first image, using a 630nm filter, was processed using Lightroom. The leaves on this tree are very thick and the top surface is quite shiny. The undersides of the leaves are much darker. Also, the leaves are shaped like taco shells where each side curls up a bit. Lightroom struggled to properly handle this problem.
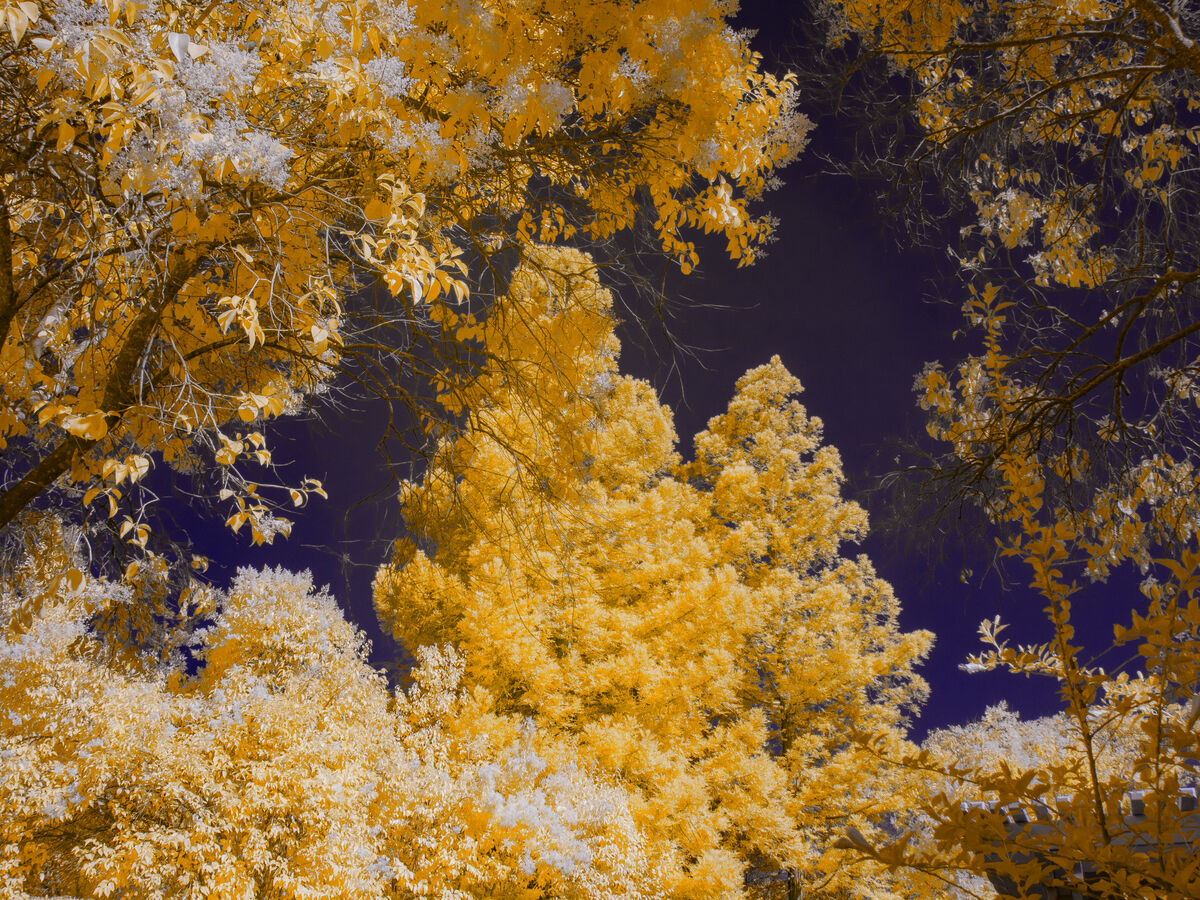
Not so with DxO. It handled the bright portions and dark portions of the leaves without any problem at all. Plus, it managed to keep the sky at a constant level. And the processing was very easy to do on additional images and no fiddling around to get the look I wanted.
My DxO process was this:
1. Select either the -50K or -100K DCP profile.
2. Find a place to do a white balance.
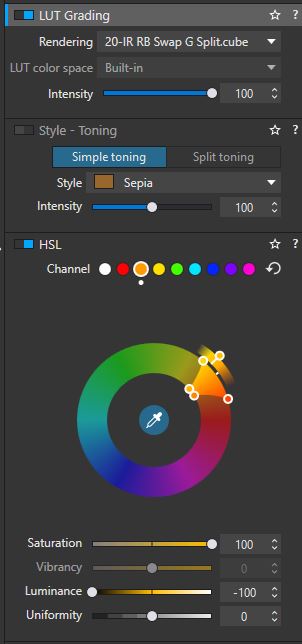
3. Select a suitable LUT Rendering. For these, I used one that swapped Red and Blue and then split the green and added it to both the red and blue channels leading to this color.
4. Next I went to HSL placed the eyedropper on a leaf that offered a good target. Once selected, I adjusted the hue slightly to get the color I wanted, and then played with Saturation and Luminance to get the look I wanted.
In addition, I had access to tools like Deep Prime and it's variants for noise reduction plus all the other good tools that come with DxO Photolab.
The first image, using a 630nm filter, was processed using Lightroom. The leaves on this tree are very thick and the top surface is quite shiny. The undersides of the leaves are much darker. Also, the leaves are shaped like taco shells where each side curls up a bit. Lightroom struggled to properly handle this problem.
Not so with DxO. It handled the bright portions and dark portions of the leaves without any problem at all. Plus, it managed to keep the sky at a constant level. And the processing was very easy to do on additional images and no fiddling around to get the look I wanted.
My DxO process was this:
1. Select either the -50K or -100K DCP profile.
2. Find a place to do a white balance.
3. Select a suitable LUT Rendering. For these, I used one that swapped Red and Blue and then split the green and added it to both the red and blue channels leading to this color.
4. Next I went to HSL placed the eyedropper on a leaf that offered a good target. Once selected, I adjusted the hue slightly to get the color I wanted, and then played with Saturation and Luminance to get the look I wanted.
In addition, I had access to tools like Deep Prime and it's variants for noise reduction plus all the other good tools that come with DxO Photolab.
RAW file processed by Lightroom

(Download)
Same RAW file processed by Lightroom
(Download)
LUT selection and HSL Adjust
Nov 23, 2023 06:04:15 #
Thank you Jim... you demonstrate well that IR is not a simply modify camera and push the button. As you show us it is the door to an art form. Thank you for the How-2 and Where-from details.
Nov 23, 2023 23:57:17 #
In continuing a comparison in processing in Lightroom vs processing in DxO Photolab 7, the comparison isn't even in the same league. I have been comparing image after image, and it isn't even close. DxO Photolab 7 is easier to setup for IR Editing, Easier to use, and most of all, gives superior results.
Consider this one using a 630nm filter.
First image is Lightroom, and I had to really work at it to get this.
Second image is DxO Photolab 7, and I just did my 4 step approach using the same LUT file.
Now I could have matches yellow color in DxO to more closely match the Lightroom Yellow. But I happened like the Photolab 7 Yellow better, but I had full control over the result.
Now there is still use for Lightroom. I can export the DxO image to Lightroom and to use other tools that Lightroom offers. But DxO is certainly processing the results in the initial conversion better.

Dec 4, 2023 12:04:20 #

JimH123 wrote:
No instructions for this have been produced that I... (show quote)
Gorgeous results 🎈🎈🎈🎈🎈
Dec 4, 2023 12:04:58 #
JimH123 wrote:
Note: I sent a message last night to Rob Shea, an... (show quote)
I love the look of that amazing second shot !!!!!
Dec 4, 2023 12:05:45 #
JimH123 wrote:
After getting used to processing RAW infrared imag... (show quote)
Luscious results in terms of color and light on both ♥♥♥♥♥
Dec 4, 2023 12:06:13 #

If you want to reply, then register here. Registration is free and your account is created instantly, so you can post right away.