Post processing help - PS
Nov 7, 2023 21:58:34 #
Rick from NY
Loc: Sarasota FL
Playing with my Z8 at 20fps shooting a buddy playing tennis. (At 20/fps, I’m gonna need some extra CF cards.)
So I have a nice 8 frame sequence culled from a 20 plus burst that I’m processing and I don’t know how to crop all 8 so the player remains the same size and location in each image. Since he was attacking forward and I was following his movement with my camera, he’s never in the same place in the loosely framed shot. I’d like to have the resulting finished images to show him the same size and roughly the same place. Cropping each one separately trying to do it by eye is tedious and not very effective.
Any of you PS wizards know a better way to do this? I assume there has to be a better way.
Nov 7, 2023 22:44:19 #

Better way? Yep, Lightroom. Edit one, including the crop. Replicate those settings across the other images. Then, just reposition the crop 'box' in the 7 other frames. If the idea of the same size is needed, it seems you'd just make some of the boxes larger so the player is smaller as he get nearer? But, when you export the files to the same pixel resolution, the results should be the same visually.
Nov 7, 2023 23:34:52 #
Rick from NY wrote:
Playing with my Z8 at 20fps shooting a buddy playi... (show quote)
Undertook something similar a while ago and from what I recall, all images were opened in PS (following any post work in ACR).
I then selected 1 image and dropped the others onto it one at a time and adjusted their position and scale to match. This is easily done by lowering opacity of each in turn, in addition I placed two guide lines horizontally to assist alignment.
The resulting layers on top of each other were then all cropped, retaining alignment, and then the pixel size of each cropped layer made equal.
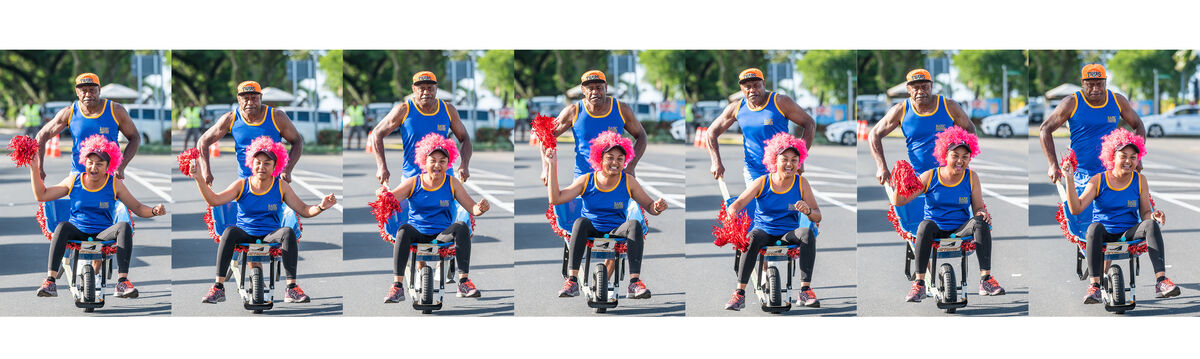
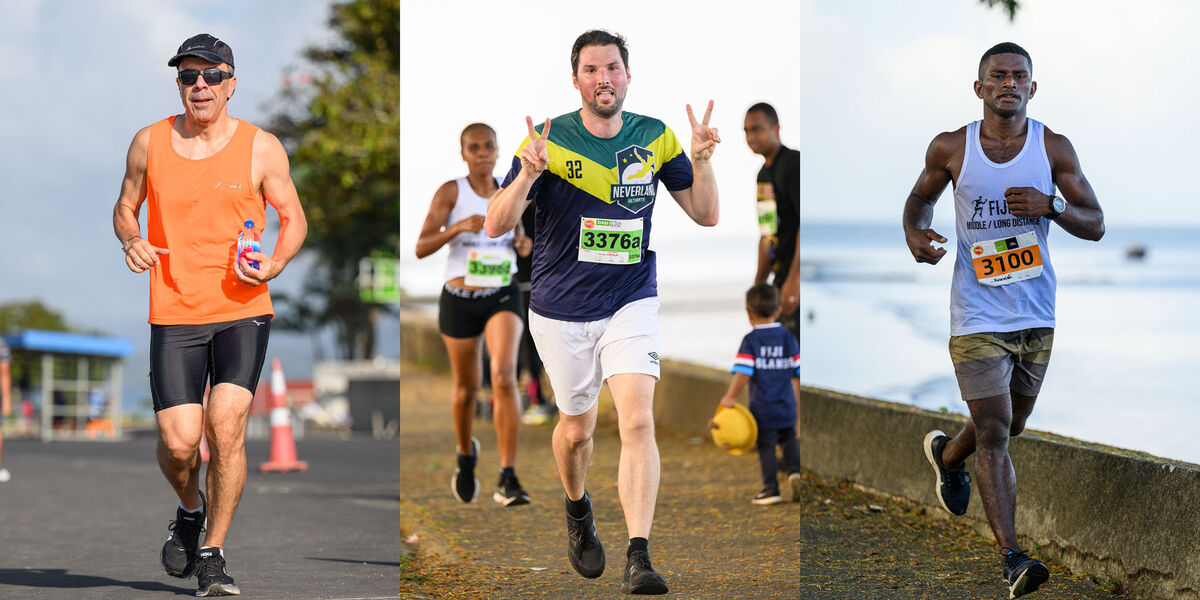
The exercise was undertaken to produce equal sized subject and image files to place together to make this banner.
Nov 8, 2023 04:03:40 #
Having just had another go to refresh my memory here's the quickest way to do it in PS. Not having lots of images of the same person to hand I just chose 3 images with a full height subject in different positions within the frame and different sizes. Object was to get them all the same height in the centre of a 2x3 vert crop.
a) Place your selected jpeg files (these will be uncropped, colour balanced PPd images) in a folder and for ease name them 1 to 8. (This is not essential)
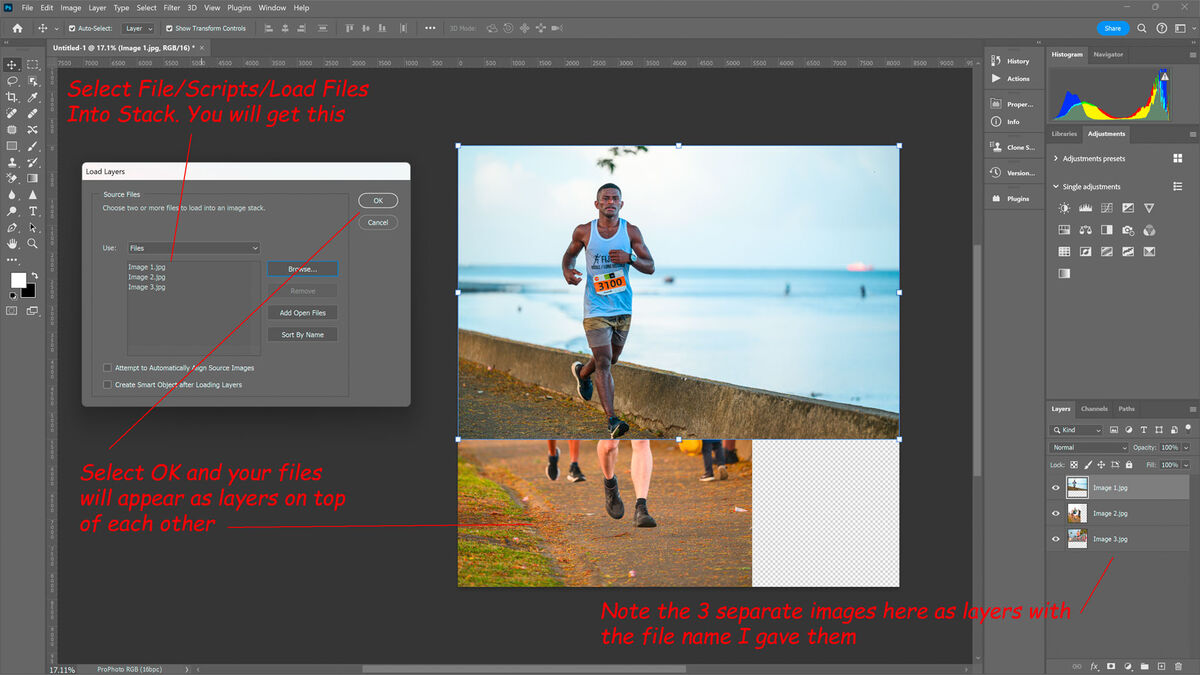
b) In PS go to File/Scripts/Load Files Into Stack. Select the Files you want to use and select OK.
c) These files will then be loaded into PS as layers showing file names and on top of one another.
See Pic 1 for Info.
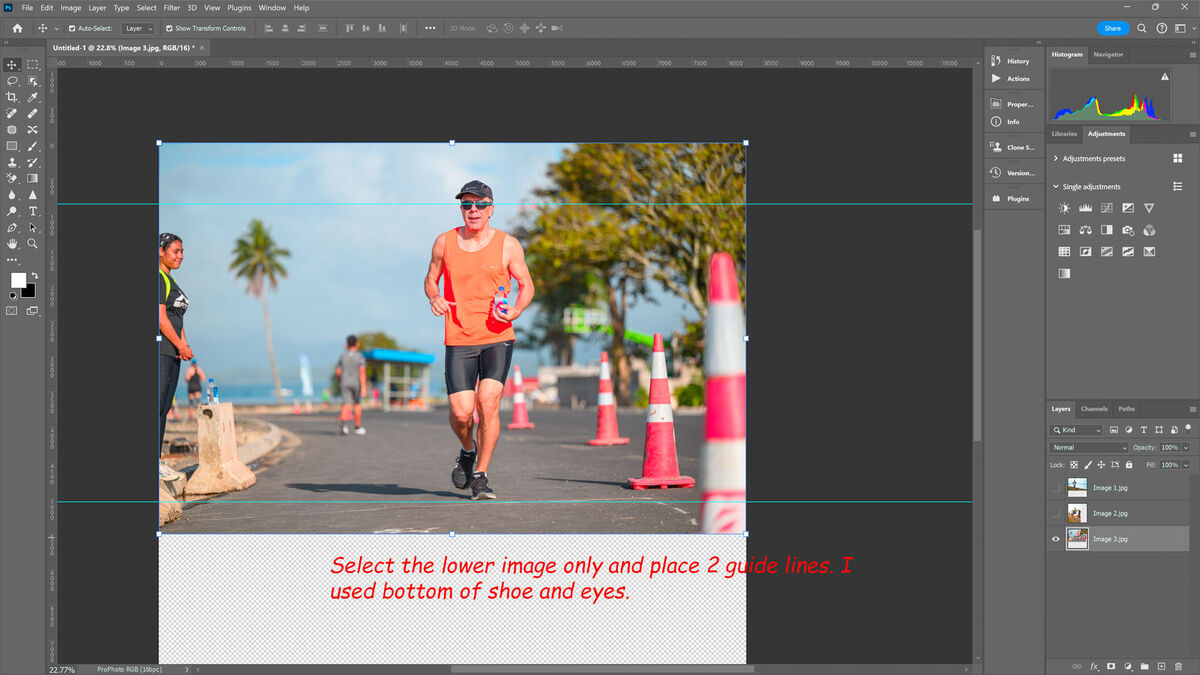
d) Select the lower layer by turning off the ones above it and place guide lines as your datum for getting the others to match.
See Pic 2 for Info.
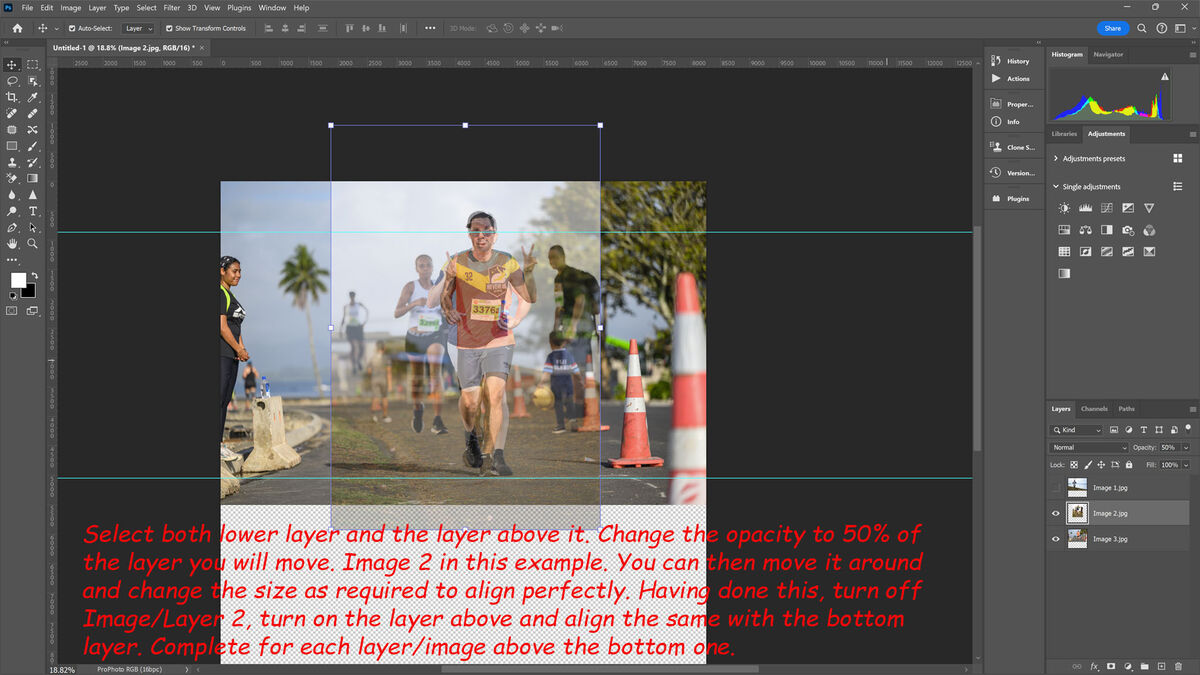
e) Select both lower layer and one above it but reduce this one to 50% opacity. You can then move that layer around and resize as required to obtain good alignment. Repeat for each layer in turn.
See Pic 3 for Info.
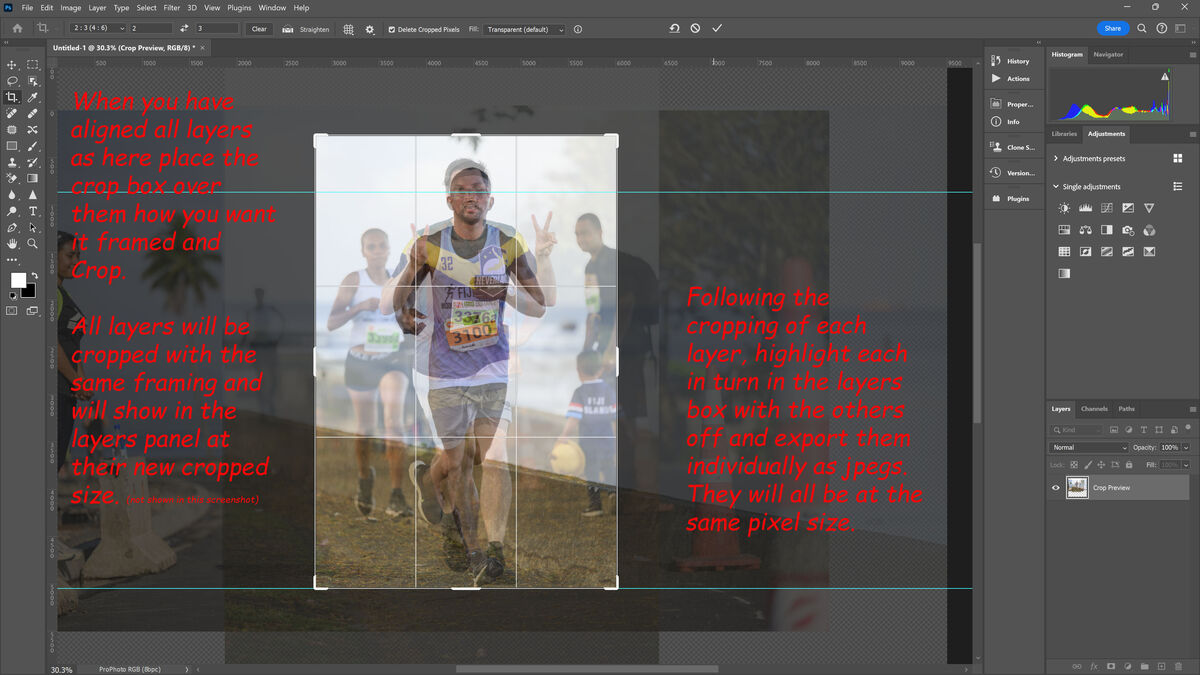
f) When all layers are aligned place the crop tool box where you want to crop them.
See Pic 4 for info.
g) Ensure you return opacity of each layer to 100%. Select each layer in turn with all others off. Export each layer in turn to a known folder. They will all be the same pixel width and height and you can change this to whatever you require.
Pic 5 are the results side by side
a) Place your selected jpeg files (these will be uncropped, colour balanced PPd images) in a folder and for ease name them 1 to 8. (This is not essential)
b) In PS go to File/Scripts/Load Files Into Stack. Select the Files you want to use and select OK.
c) These files will then be loaded into PS as layers showing file names and on top of one another.
See Pic 1 for Info.
d) Select the lower layer by turning off the ones above it and place guide lines as your datum for getting the others to match.
See Pic 2 for Info.
e) Select both lower layer and one above it but reduce this one to 50% opacity. You can then move that layer around and resize as required to obtain good alignment. Repeat for each layer in turn.
See Pic 3 for Info.
f) When all layers are aligned place the crop tool box where you want to crop them.
See Pic 4 for info.
g) Ensure you return opacity of each layer to 100%. Select each layer in turn with all others off. Export each layer in turn to a known folder. They will all be the same pixel width and height and you can change this to whatever you require.
Pic 5 are the results side by side
Nov 8, 2023 09:36:09 #
Rick from NY
Loc: Sarasota FL
Grahame wrote:
Undertook something similar a while ago and from w... (show quote)
That is exactly what I was looking for. I’ll try it out over the weekend. Thanks.
Nov 8, 2023 10:07:29 #
Rick from NY
Loc: Sarasota FL
Grahame wrote:
Having just had another go to refresh my memory he... (show quote)
Gotcha. Much obliged
Nov 8, 2023 13:13:59 #
Nov 8, 2023 13:44:49 #
You have gotten good advice on how to do what you asked for, so I won't add to that.
But I would offer you a slightly different idea ---Your friend knows he charged the net and that is part of the dynamics of the game, I might opt for keeping the 'canvass size the same in all pix but allow his size in the frame to grow as he approaches. You can still alter his size in the frame a bit so he is never too small or too large, but his increasing size is part of adding the dynamics in the action you captured.
Just a suggestion for your consideration, do what you like.
Good Luck
Nov 8, 2023 14:10:04 #
Rick from NY
Loc: Sarasota FL
MJPerini wrote:
You have gotten good advice on how to do what you ... (show quote)
A very good point indeed in such a situation, but i may have misrepresented the "charging" part. more times than not, I am shooting a player who is setting up to hit a ground stroke from closer to the baseline and I am shooting cross court. I begin the burst before the ball arrives and continue it until the ball leaves his racquet. Of course in a one second, 20 frame burst, the ball is visible in the frame for perhaps 8 or 9 shots. I rarely post a sports shot if the ball is not in the frame.
So when I described him "charging", I meant that I was positioned where a player was moving perpendicular to my sightline into the ground stroke so that when the ball has left the racquet the guy is a couple of feet away from when he began his backswing. I should have referred to it as "leaning into the shot" instead of charging. Never the less, in a situation where a player is indeed charging the net and I am positioned so that he is coming right at me to hit a volley, your idea of picking him up early (perhaps without the ball in this situation)at distance and then allow him to "get bigger" in the frame as he nears the net and contacts the volley is very effective. That technique is one of the few times that I do include a pic of a player without the ball in the frame to start off a series.
Thanks for all of the sage advice from everyone.
If you want to reply, then register here. Registration is free and your account is created instantly, so you can post right away.