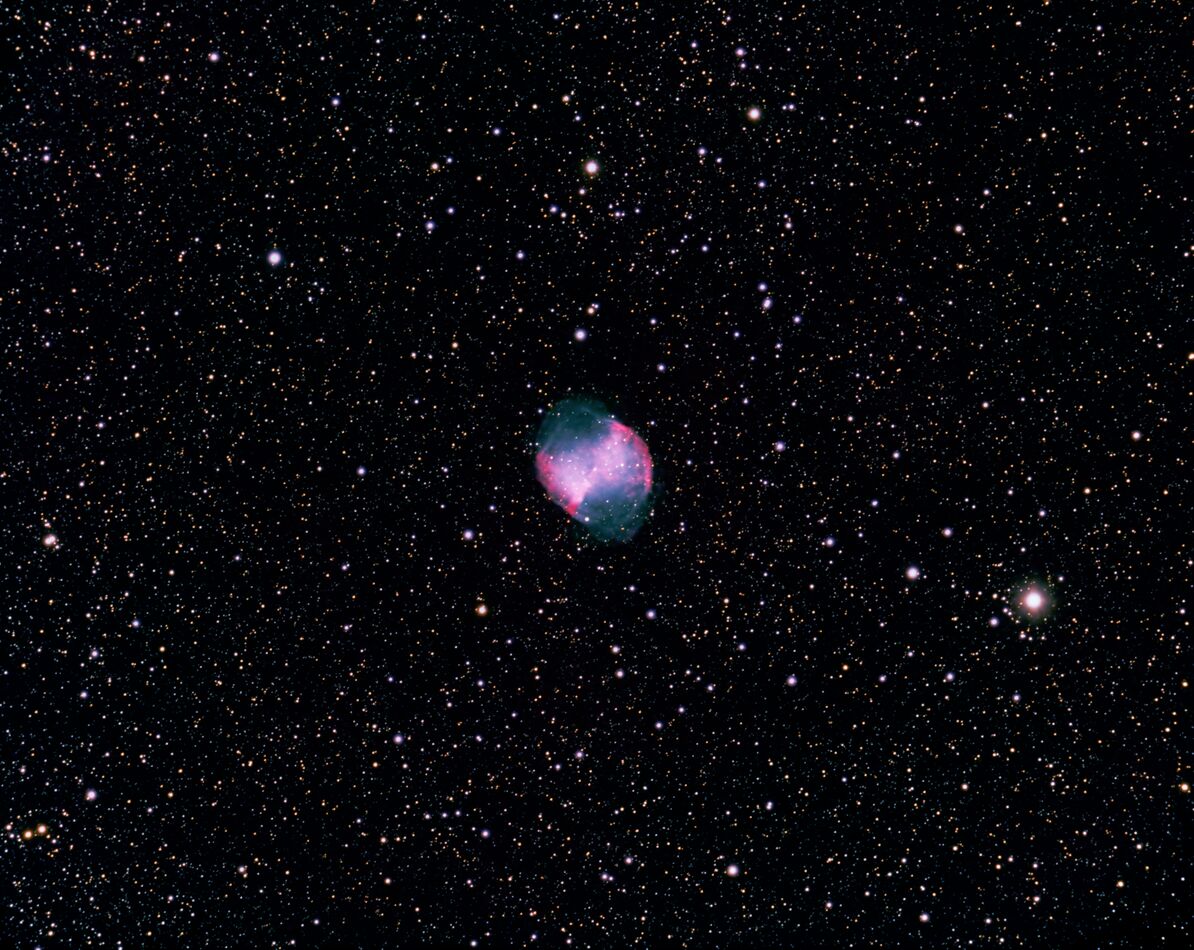
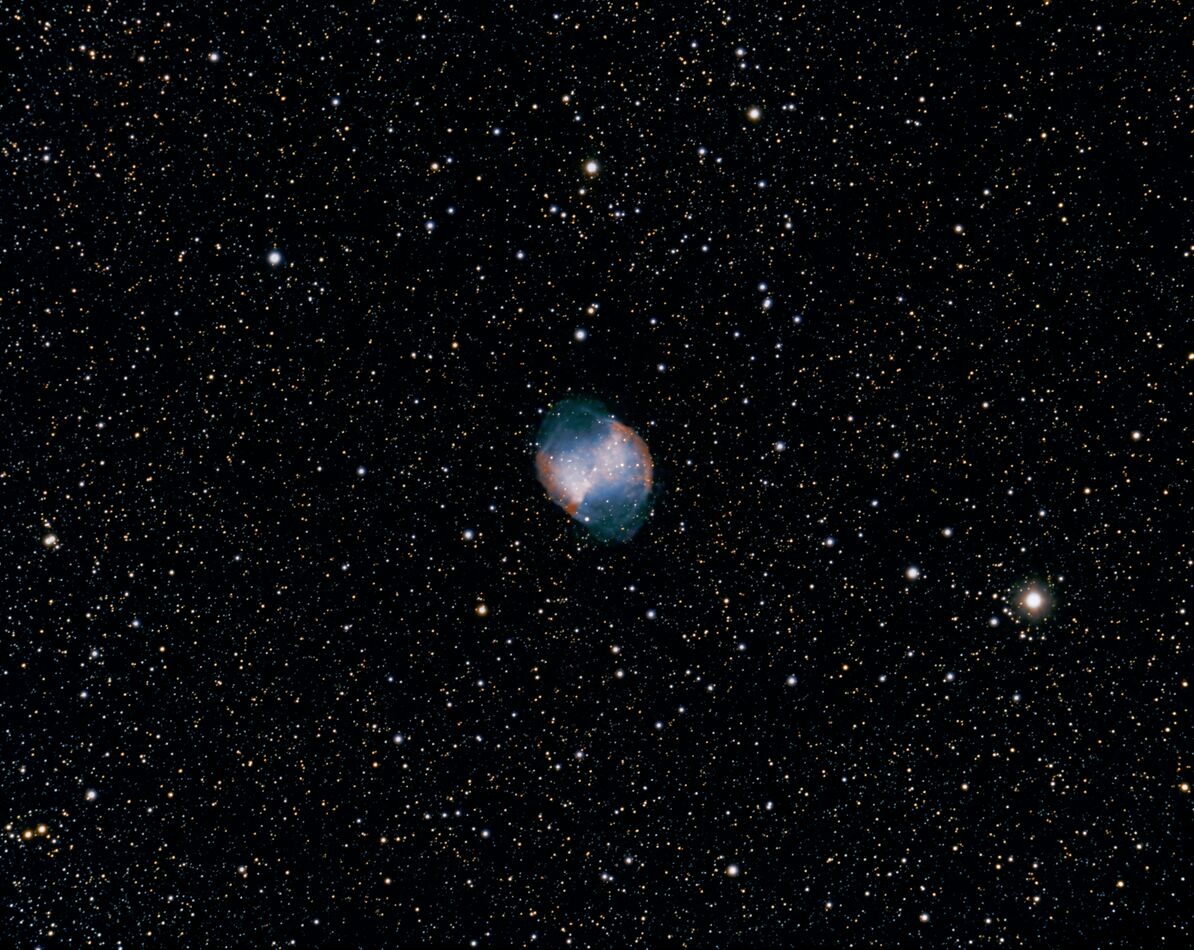
Dumbbell Nebula
Sep 25, 2023 17:05:50 #
My nemesis. 
Last night's victim. 10 years ago I wondered what would happen after I had imaged as many of the wonders available through my portal into the night skies.
Well, 10 years later (now) I still enjoy the challenge. Because in reality a lot has changed. I've changed, my equipment has changed, and of course the weather always has its variables. And the light pollution has gotten much worse here thanks to the ignorant management behind me of Condo prison farm.
So my images are different.
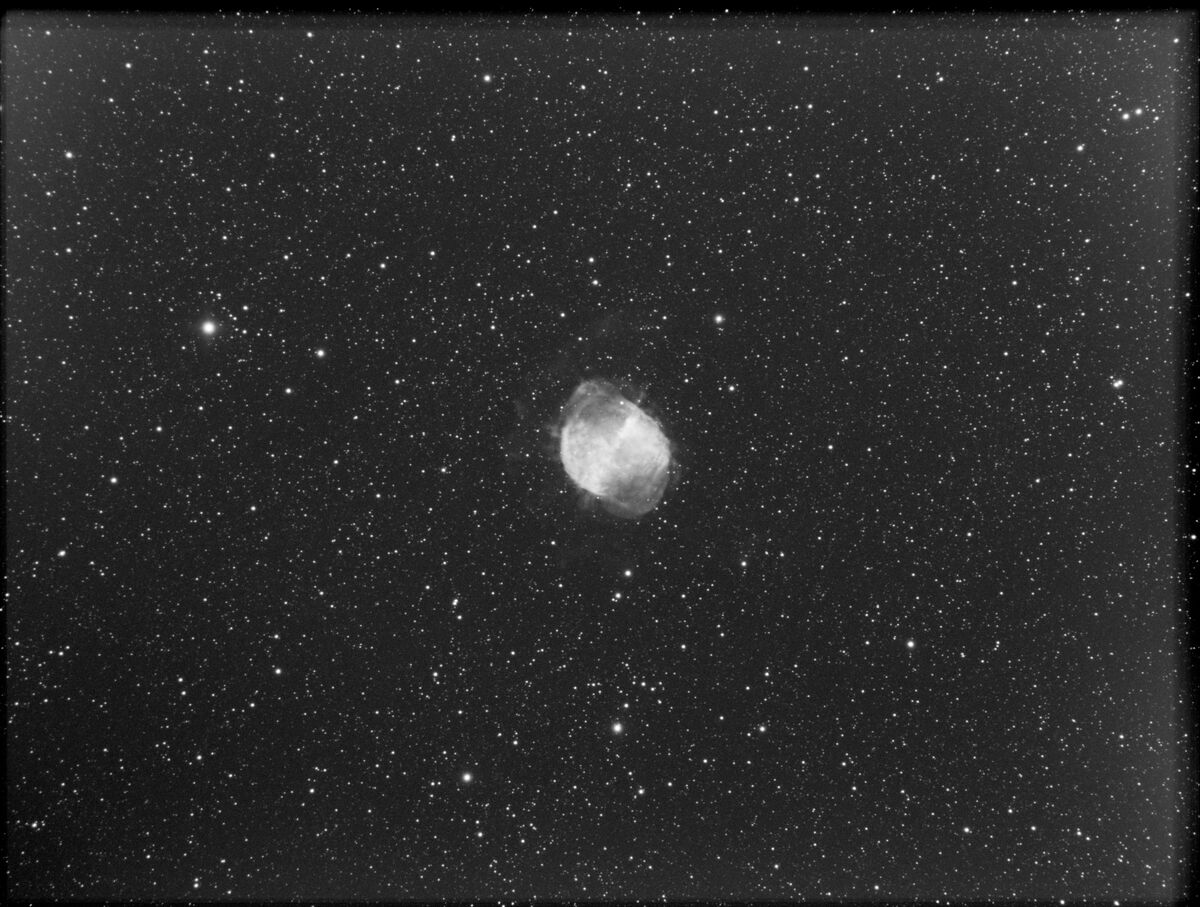
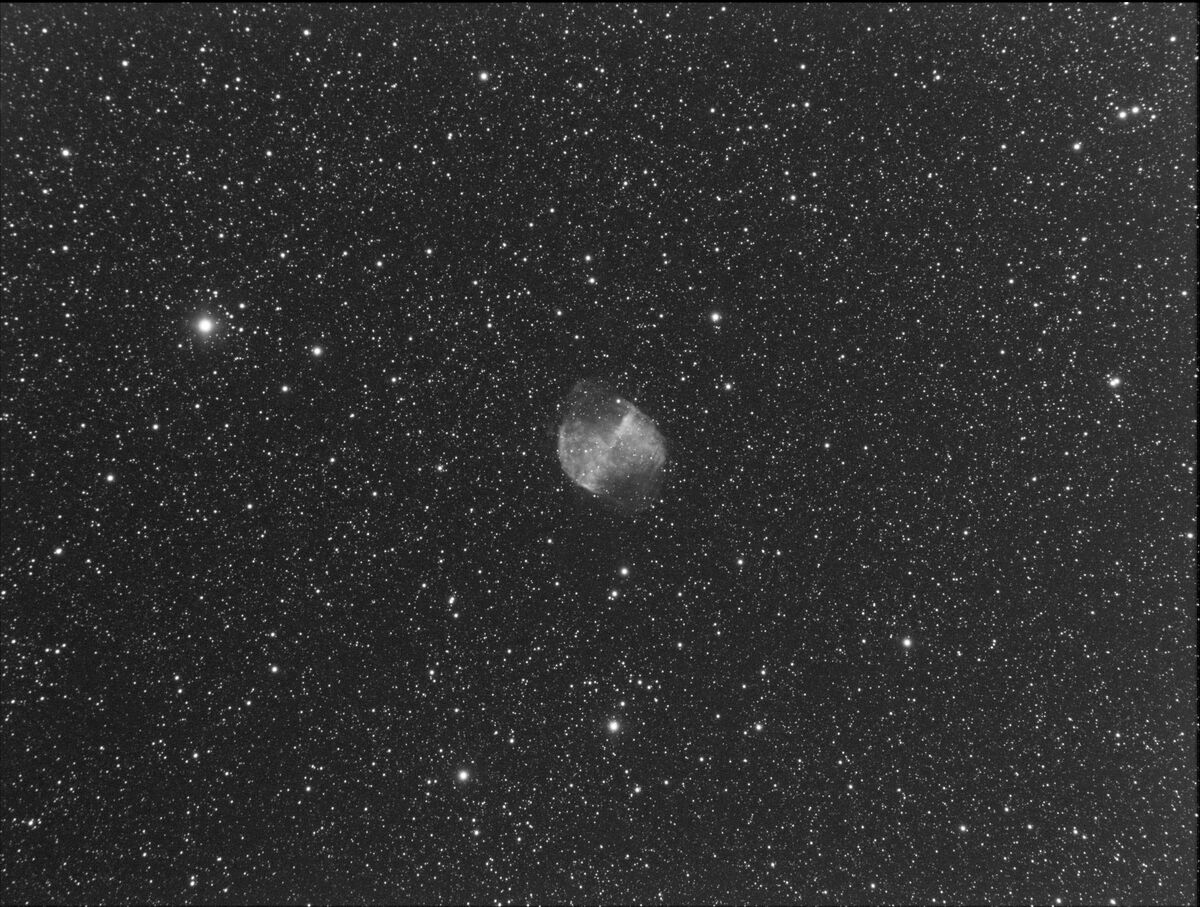
One of my first year favorites, I'm back in Black & White with a much better Monaural camera gathering much finer details than the previous years.
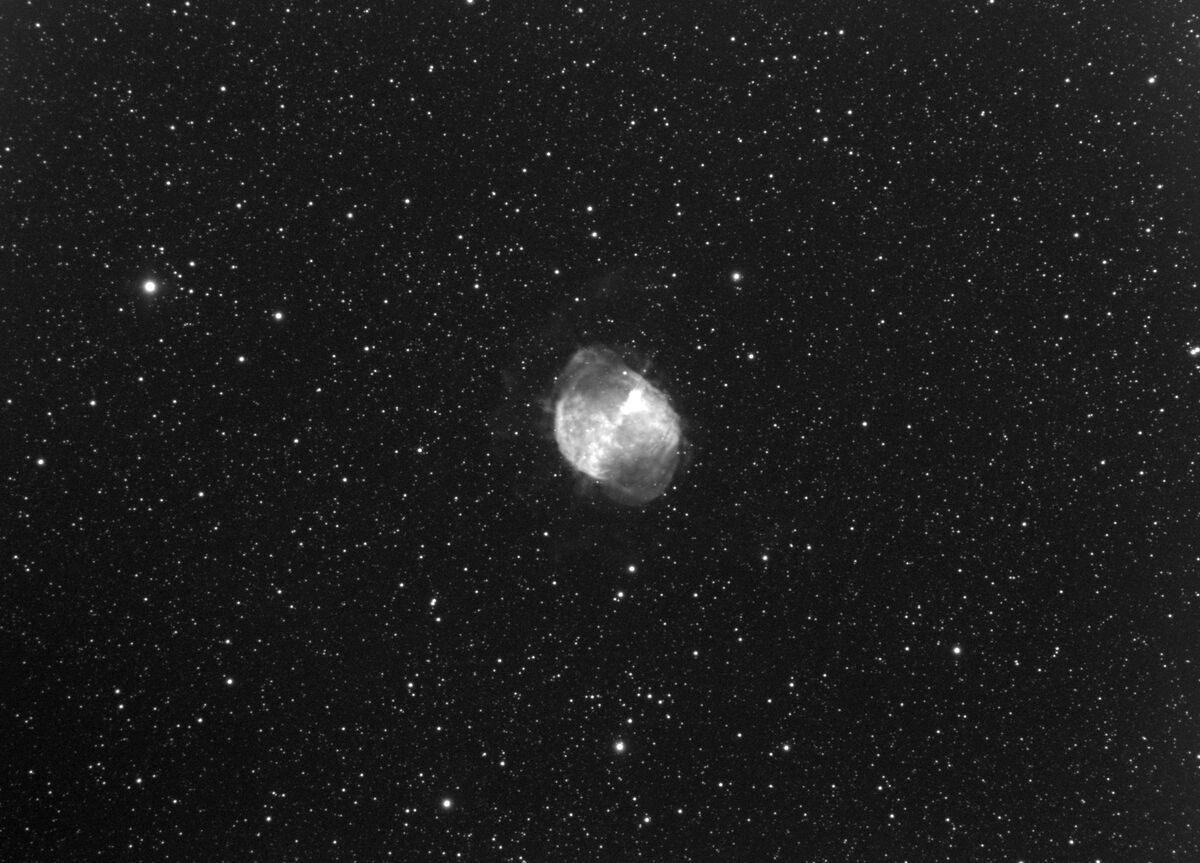
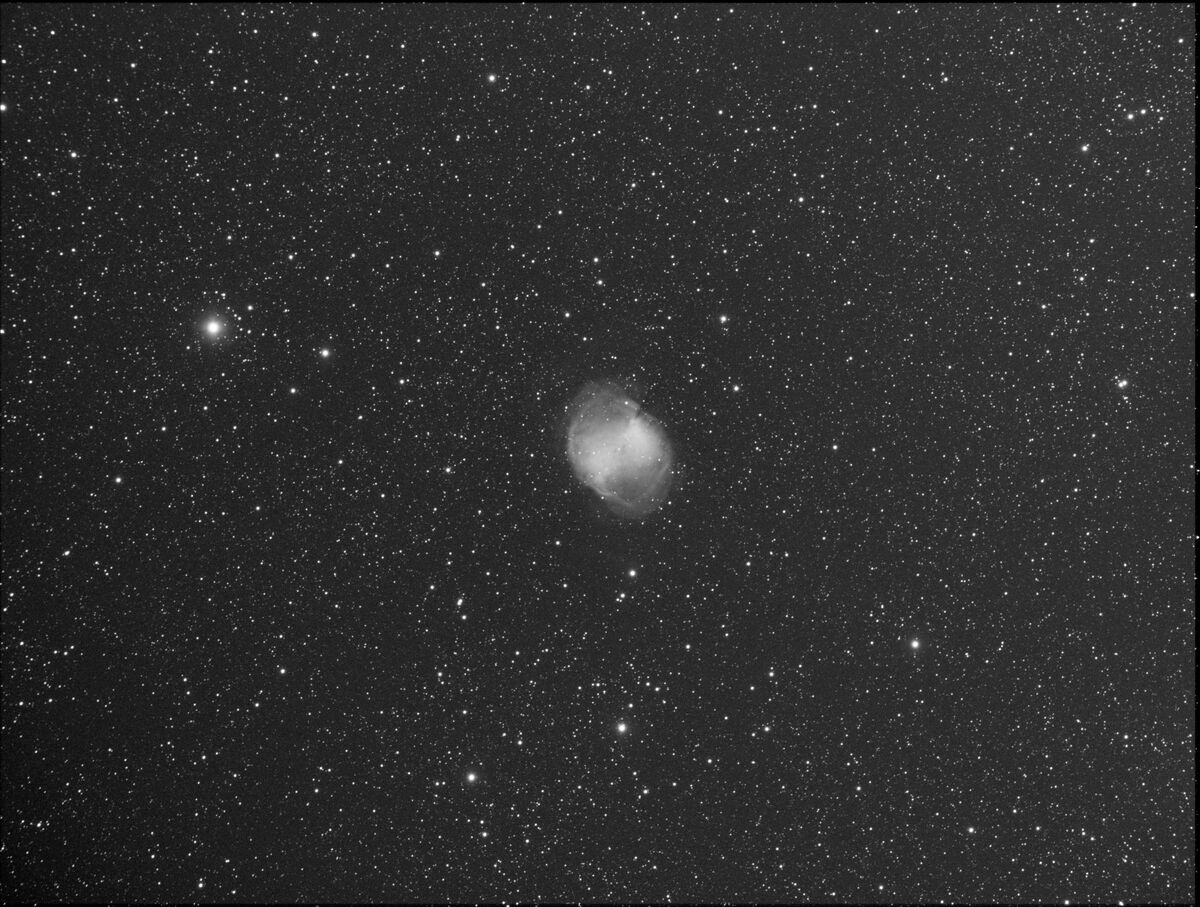
First is right out of ASI's stacking program, and second is after I gently massaged the original from the ASI Program.
I'm still a stickler for minimal processing. I simply adjusted the brightness down and it brought out the suttle details hidden in the glare.
I'm currently shooting my images at 300 seconds (5 minute). If there are no satellites, I use all of the 20 images.
20 X 300s, in HA7nm, SII, and OIII with 20 Darks @ 30s, and 20 Bias @ .001, and flats done with NINA Flats Wizard, linin cloth, at zenith in the early morning lighted sky.
Unfortunately, I cannot upload the tif files. UHH sez they are too big. But you are welcome to download if you would like.
Tonight will be the LRGB, D, and Bias. Same settings. I'll add them tomorrow.
Last night's victim. 10 years ago I wondered what would happen after I had imaged as many of the wonders available through my portal into the night skies.
Well, 10 years later (now) I still enjoy the challenge. Because in reality a lot has changed. I've changed, my equipment has changed, and of course the weather always has its variables. And the light pollution has gotten much worse here thanks to the ignorant management behind me of Condo prison farm.
So my images are different.
One of my first year favorites, I'm back in Black & White with a much better Monaural camera gathering much finer details than the previous years.
First is right out of ASI's stacking program, and second is after I gently massaged the original from the ASI Program.
I'm still a stickler for minimal processing. I simply adjusted the brightness down and it brought out the suttle details hidden in the glare.
I'm currently shooting my images at 300 seconds (5 minute). If there are no satellites, I use all of the 20 images.
20 X 300s, in HA7nm, SII, and OIII with 20 Darks @ 30s, and 20 Bias @ .001, and flats done with NINA Flats Wizard, linin cloth, at zenith in the early morning lighted sky.
Unfortunately, I cannot upload the tif files. UHH sez they are too big. But you are welcome to download if you would like.
Tonight will be the LRGB, D, and Bias. Same settings. I'll add them tomorrow.
Sep 26, 2023 12:32:55 #
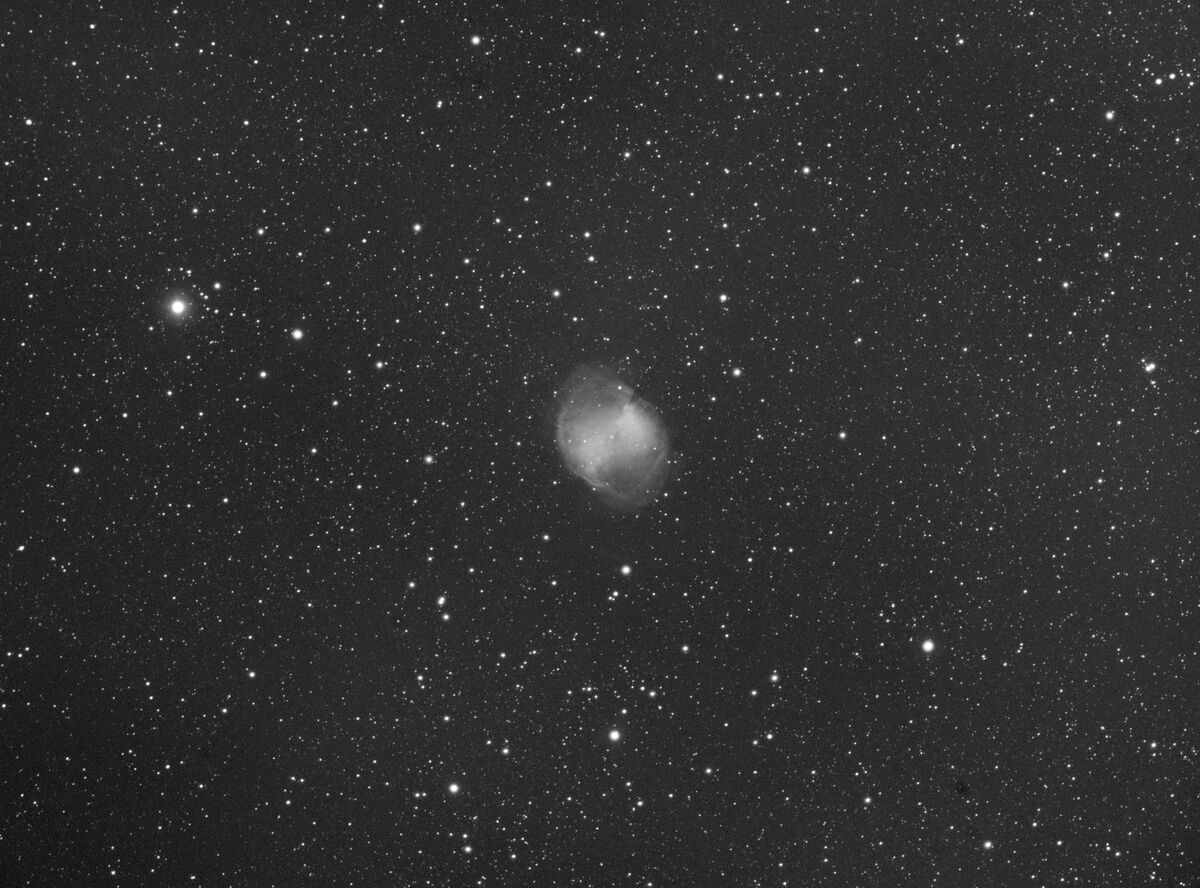
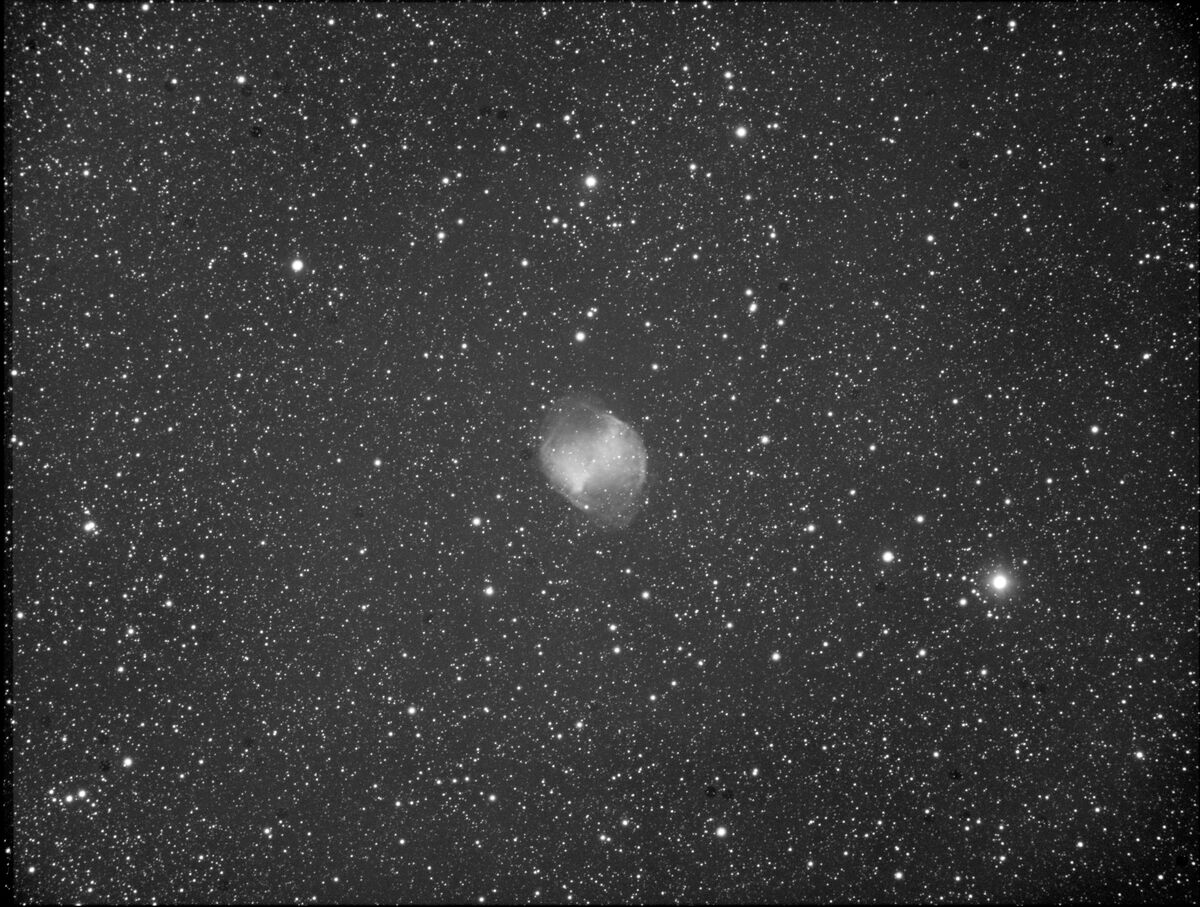
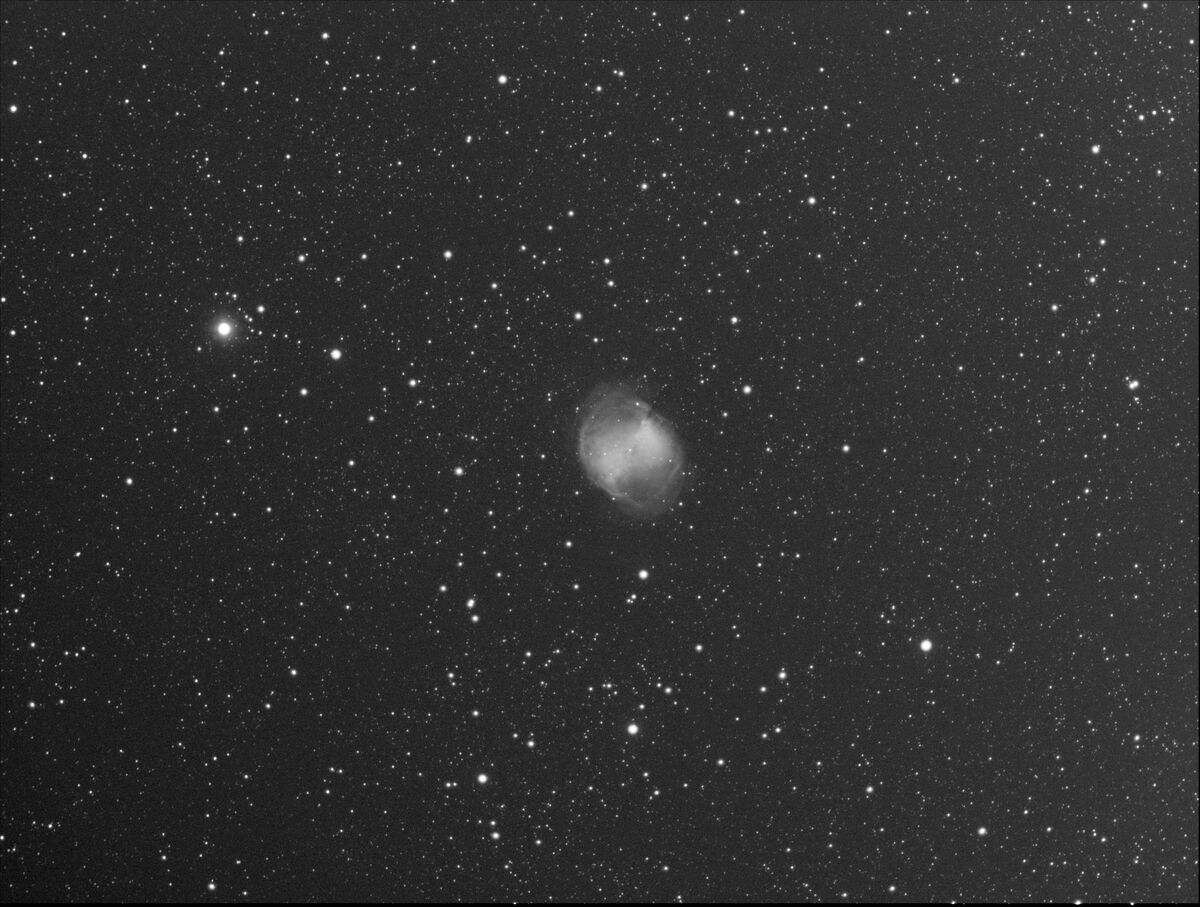
So last night I ran my LRGB. After dropping 3 images, I got this stack, and cropped out the stacking artifacts.
No other Post Processing was done. Due to UHH constraints, this image is in web .jpg format. Sorry.
But you are welcome to download and try your hand at processing.
Here it is.
20ea - 180 seconds (3 minutes)
By doing the 180s exposures I was pleased with the stars showing inside the Nebula. (Front, back, or wherever.)
Sep 30, 2023 14:25:39 #
Ballard
Loc: Grass Valley, California
SonnyE wrote:
So last night I ran my LRGB. After dropping 3 images, I got this stack, and cropped out the stacking artifacts.
No other Post Processing was done. Due to UHH constraints, this image is in web .jpg format. Sorry.
But you are welcome to download and try your hand at processing.
Here it is.
20ea - 180 seconds (3 minutes)
By doing the 180s exposures I was pleased with the stars showing inside the Nebula. (Front, back, or wherever.)
No other Post Processing was done. Due to UHH constraints, this image is in web .jpg format. Sorry.
But you are welcome to download and try your hand at processing.
Here it is.
20ea - 180 seconds (3 minutes)
By doing the 180s exposures I was pleased with the stars showing inside the Nebula. (Front, back, or wherever.)
Nice shots. If you send out the stretched L, R, G and B as separate images I can put them together as a color shot and see how it looks if you want.

Oct 3, 2023 19:31:03 #
Ballard wrote:
Nice shots. If you send out the stretched L, R, G and B as separate images I can put them together as a color shot and see how it looks if you want.
Ballard,
Okey Dokey, got a roundtoit finally. I hope you didn't give up on me.
Been a whirlwind few days.
These are .jpg, done with the (color) Flats, and the (color) Luminance, and generic Bias and Darks of the day. (No odd balls)
After uploading them, I notice the LUM is 180° out, because it was pre-meridian flip to the rest.


Dumbbell Nebula LUM
(Download)
Dumbbell Nebula RED
(Download)
Dumbbell Nebula GRN
(Download)
Dumbbell Nebula BLU
(Download)
Oct 4, 2023 03:20:58 #
Ballard
Loc: Grass Valley, California
SonnyE wrote:
Ballard, br Okey Dokey, got a roundtoit finally. I... (show quote)
Hi SonnyE
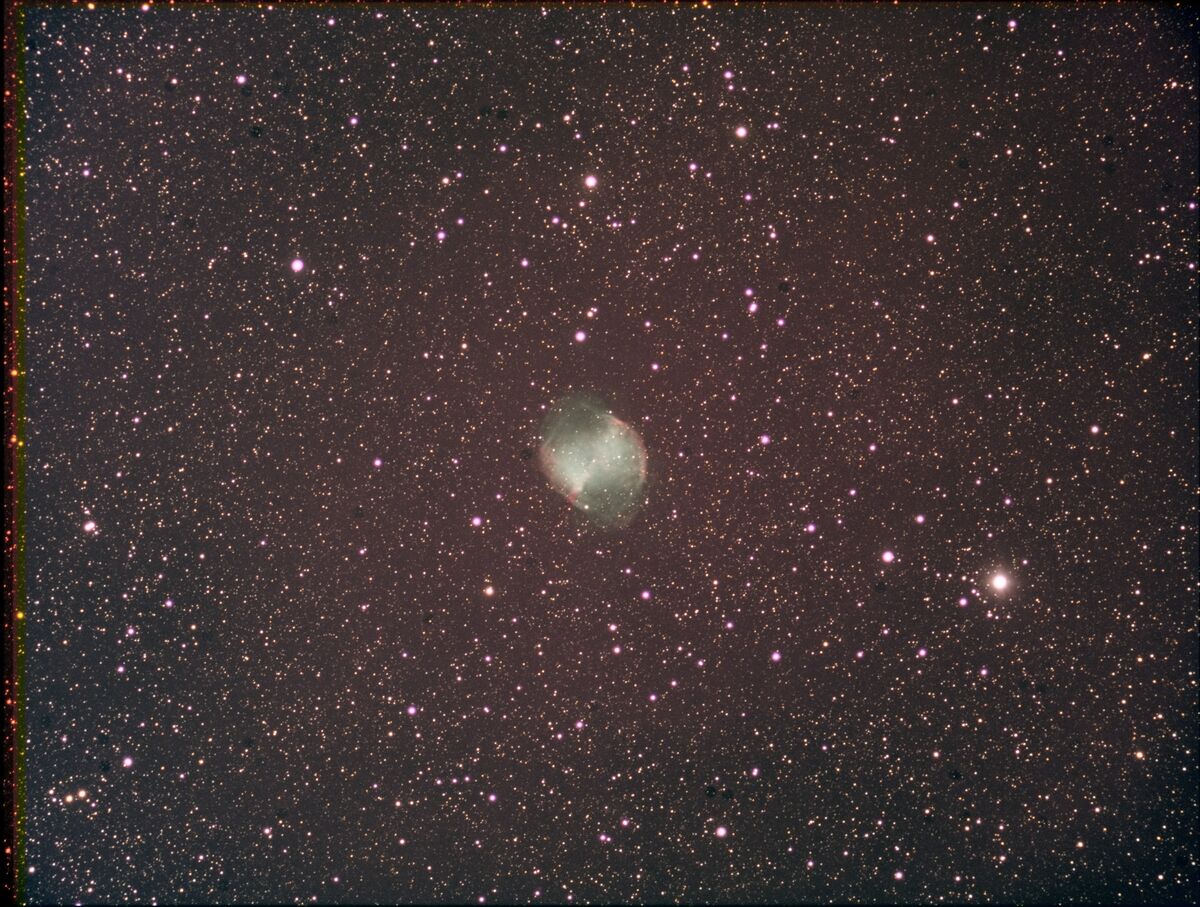
Below are a couple of color images.
The first one shows the raw LRGB combination.
The second one shows the image after doing a background extraction, a bit of sharping, some noise reduction, color/luminance curve correction and a bit of cropping to remove the areas where the images didn't completely overlap. See if you like the end result.
Note: although they the initial images appeared to be black they were actually saved as RGB so I first converted them to 16 bit Grey Scale images to make Pixinsight happy for the LRGB combination. I also found that they didn't line up exactly, so I re-registered the 4 images to align using the luminance image as the reference frame.
Oct 4, 2023 15:41:14 #
Beautiful Ballard!
So... I recon I need to get Pixinsight.
I can understand why they weren't aligned to each other, I had them in the ASI .fits storage format and took the individual R, G, B, and L files, and the R, G, B, and L flats, with the bias and darks, and stacked each color channel to itself with no reference to the other color files.
So what I need to do is save each color channel separately (R. G. B. L.) then stack each one to it's channel. Then color them R,G,B,L. Then stack them to each other to get them aligned? And wa-la.
Will Pixinsight help guide a new user along to accomplish the steps? I guess I need to do the 45 day trial and see if I can use it before I buy into it.
Oct 4, 2023 17:15:42 #
Ballard
Loc: Grass Valley, California
SonnyE wrote:
Beautiful Ballard! br So... I recon I need to get ... (show quote)
Hi SonnyE
Glad you liked it. I didn't notice last night that the image might have a bit too much magenta, so I used a Pixinsight script to reduce the magenta a bit (see Image below). With Narrow band the stars frequently have a strong magenta bias, so there is a script built into Pixinsight to reduce that bias and I used it here even though it isn't narrow band and it seemed to help bit.
Regarding the alignment, if you aligned each color relative to itself then the color would be aligned only to itself. With Pixinsight you can tell it what frame to use as a reference and then stack each filter separately but use the same reference frame for each filter set. I normally pick one of the best luminance frames as the reference frame to use for all the filters (note: the reference frame isn't automatically added to the stack unless you also add it to list of files to stack since you don't want to add a luminance frame per say to a blue stack but you want everything to be aligned across all the filters and create a separate stacked file for each filter type.
Normally at that point I will take each stacked filter and run it though a multiscale linear transform that remove some of the graininess it the image without removing detail, then stretch the image for each filter before putting them together with the LRGB process.
To keep track of things I keep a separate directory for each filter type under the directory for the main image.
(e.g. This PC>M>deep sky>M33>Meade16_ZWO>Blue) ditto for the Green, Ha, Lum Red etc.
The filter directory then has all the light frames for that filter and then a directory under that color for the good frames, Calibrated frames, and Registered frames. I keep the stacked, denoised and stretched image for given filter under their respective filter color.
There are other programs available however Pixinsight has a lot of capabilities and there are lot of youtube videos out there on using it. Some by regular users and some by the Pixinsight team. I heard that there are a number of books out there on using Pixinsight but I haven't looked into those yet. It does have a bit of a learning curve, but if you do get Pixinsight I can always help answer some of your questions or at least know where to go to find out the answers.
Here is an example of one from Pixinsight on doing narrow band imaging (the first of a 3 part series) that I have just started to watch.
https://www.youtube.com/watch?v=WYPVtmhXJYk
Oct 4, 2023 20:02:23 #
I like that even better now. To me it looks even more natural.
I went ahead and joined the ranks today. I might be the newest PixInsight user you know.
I was watching some "PixInsight for Dummies (like me)" this afternoon. But it made me drowsey. So I just woke up from a nap.
It appears quite complicated, but I think that I can eventually start getting some color into my picturds.
One thing is that the ASI files already store in the way PixInsight wants them (recognises them). Bias, Flats, Darks, Lights.
I think I might do my stacking outside of PixInsight. Because apparently PixInsight takes a laboriously long time stacking.
But i finally can dump my 2012 Photoshop Elements 12, I think.
Did I mention I evolve like Gibraltar?
🙄
Oct 4, 2023 20:44:56 #
Ballard
Loc: Grass Valley, California
SonnyE wrote:
I like that even better now. To me it looks even m... (show quote)
Hi SonnyE
I think the color came out a bit better with the a bit of magenta removal also. One thing that you get with Pixinsight stacking is the satellite removal and a control to determine how aggressive it gets on that removal.
Below are some cheat sheet notes I used when I was getting started with Pixinsight.
Integrate Bias frames (Use process ImageIntegration)
Image integration
Combination: Average
Normalization: No normalization
Weights: Don’t Care (all weights=1)
Scale evaluation: Median absolute deviation from the median (MAD)
Uncheck evaluation noise default others
Pixel Rejection 1
Rejection algorithm: Sigma Clipping
Normalization: No normalization
Pixel Rejection 2
Sigma low : 3.0
Sigma high : 3.0
Notes:
(** Warning: Inconsistent Instrument:Telescope:FocalLength (FOCALLEN keyword) value(s) - metadata not generated.
** Warning: Inconsistent Instrument:Telescope:Aperture (APTDIA keyword) value(s) - metadata not generated)
*** Error: Parsing OBJCTRA FITS keyword: Parsing sexagesimal expression: empty string
*** Error: Parsing OBJCTDEC FITS keyword: Parsing sexagesimal expression: empty string
These errors are not fatal, so you can still integrate the frames. However, metadata for geodetic observer coordinates will be lost in the integrated image (which is not really important for Bias frames).
Add RAW files - hit go button (circle on bottom of process box)
Stretch rejection_high and rejection_low to check for any big issuesStretch rejection_high and rejection_low to check for any big issues.
Save- integrated image as master_bias.xisf
Integrate Dark frames (same process and settings and as Bias frames)
Image integration
Combination: Average
Normalization: No normalization
Weights: Don’t Care (all weights=1)
Scale evaluation: Median absolute deviation from the median (MAD)
Uncheck evaluation noise default others
Pixel Rejection 1
Rejection algorithm: Sigma Clipping
Normalization: No normalization
Pixel Rejection 2
Sigma low : 3.0
Sigma high : 3.0
Notes:
Add RAW files -hit go button (circle on bottom of process box)
Stretch rejection_high and rejection_low to check for any big issuesStretch rejection_high and rejection_low to check for any big issues.
Save- integrated image as master_dark.xisf
*** Error: Parsing OBJCTRA FITS keyword: Parsing sexagesimal expression: empty string
*** Error: Parsing OBJCTDEC FITS keyword: Parsing sexagesimal expression: empty string
These errors are not fatal, so you can still integrate the frames. However, metadata for geodetic observer coordinates will be lost in the integrated image (which is not really important for Dark frames).
Calibrate Flats (Use process ImageCalibration)
Output Files
Output Directory: example J:/deep sky/M31 2min 71F/Good/Calibrated/flats
Sample format: 32bit floating point
Master Bias (put check in box)
Set location of master bias
Don’t set calibrate as this is only used with overscan for special CCD’s.
Master Dark (do not check as there is no correlation to darks)
Master Flat (do not check as there is not a master flat to calibrate with)
Notes: Hit the go button (circle on bottom of process box). This fills the output directory with calibrated flats.
Integrate Calibrated flat frames (Use process Image Integration)
Image integration
Combination: Average
Normalization: Multiplicative
Weights: Don’t Care (all weights=1)
Scale evaluation: Median absolute deviation from the median (MAD)
Uncheck evaluation noise default others
Pixel Rejection 1
Rejection algorithm: Sigma Clipping
Normalization: Equalize fluxes
Pixel Rejection 2
Sigma low : 3.0
Sigma high : 3.0
Notes: We use Equalize fluxes in this case.
Add RAW files -hit go button (circle on bottom of process box)
Stretch rejection_high and rejection_low to check for any big issuesStretch rejection_high and rejection_low to check for any big issues.
Save- integrated image as master_flat.xisf
Find best Light frames (Use process SubframeSelector)
Add linear mode files DSLR RAW light frame files or mono .fits to Subframe Selector.
System Parameters
Subframe scale : (2.11 for 500mm lens, 1.106 with 2X teleconverter added, 0.396 for C11, 0.27 for lx200)
ZWO w 500mm -1.55arcsec/pixel
ZWO w 4096mm -.19arcsec/pixel
[Arcseconds Per Pixel] = (206.2648 x [Pixel Size in μm]) / [Focal Length in mm]
Note: FOV 247.65 x165.10 arcminutes for 500mm lens
123.83x82.55 arcminutes with teleconverter added
44.32x29.55 for C11
EOS 5d MarkIV pixel size 5.36 microns (num pixels 6720x4480)
EOS 5D Mark IV Camera resolution:14 bit
SBig 11002 Camera resolution:16 bit
Can use FWHM or weighting to decide on the best frames to use. (Also check on the number of stars to remove those that had clouds go by or high(bad) FWHM.
Typically default star detection parameters
Use the “measure subframes” routine to measure the frames. The click on those to remove in the graph.
Use the “output subframes” routine to copy the accepted frames to directory specified.
Rename best sub as the reference frame to be used later in image registration.
Calibrate Light frames(Use process ImageCalibration)
Output Files
Output Directory: example J:/deep sky/M31 2min 71F/Good/Calibrated/lights
Sample format: 32bit floating point
Noise evaluation: Multiresolution Support
Uncheck CFA for monochromatic frames, leave set for color DSLR-RAW)
Master Bias (put check in box)
Set location of master bias
Don’t set calibrate as this is only used with overscan for special CCD’s.
Master Dark (put check in box)
Set location of master dark
Set Calibrate to calibrate lights with dark data
Optimization threshold: 0
Don’t set Optimize.
Master Flat (put check in box)
Set location of master flat (don’t check calibrate as the flat already has this in it).
Notes: This will subtract master bias from master dark then dark is subtracted from lights.
Hit the go button (circle on bottom of process box). This fills the output directory with calibrated light frames. Calibrate light frames from the accepted frames from subframe sector.
Skip Debayer for monochromatic Images
Debayer light frames(use process Debayer)
Don’t do for monochromatic Images
Bayer/mosaic pattern: RGGB
Demosaicing method : VNG
Evaluate noise is checked
Noise evaluation: Iterative K-Sigma Clipping
Output directory set location to put debayered frames
Added “calibrated files” from calibrated files. Debayer after calibration.
Hit the go button (circle on bottom of process box).
Register light frames (use process StarAlignment)
Reference image : Set reference image to best image found with subframe selector
Registration model: Projective Transformation
Working model : Register/Match Images
Check drizzle to generate drizzle data
Target image
Add all images that where accepted, calibrated and (and for color images debayered).
Output Directory (set to location to save registered images).
Default other settings
Hit the go button (circle on bottom of process box).
Integrate Registered light frames (Use process ImageIntegration)
Image integration
Combination: Average
Normalization: Additive with scaling
Weights: Noise evaluation (PSF signal)
Pixel Rejection 1
Rejection algorithm: Sigma Clipping (used Winsorized Sigma Clipping for >40 images)
Normalization: Scale +zero offset
Pixel Rejection 2
Sigma low : 3.0
Sigma high : 3.0 (lower this to remove satellites at the expense of added noise)
Add registered files and Drizzle files if drizzle was set in registration
-hit go button (circle on bottom of process box)
Stretch rejection high and rejection low to check for any big issues
For HDR use star alignment on the upstretched images. Then use the HDR composite process to combine the images taken with different exposure times.
Noise Reduction with Multiscale Linear Transform (Use Process MultiscaleLinearTransform before stretching
Use Dyadic with 4 layers
Scaling function Liner interpolation
Set layer 1 (3.000,0.33,3)
Set layer 2 (3.000,0.33,3)
Set layer 3 (3.000,0.26,3)
Set layer 4 (3.500,0.20,3)
Oct 5, 2023 13:00:28 #
Trying to find all these setting and initiate them.
Will PixInsight remember all these for the next time it's opened?
Will PixInsight remember all these for the next time it's opened?
Oct 5, 2023 13:18:55 #
Ballard
Loc: Grass Valley, California
SonnyE wrote:
Trying to find all these setting and initiate them.
Will PixInsight remember all these for the next time it's opened?
Will PixInsight remember all these for the next time it's opened?
Hi SonnyE
Some are defaults and others are not and it remembers the values while it is running so if you are running through a series of different filters most of the parameters don't need to be changed. (e.g. for calibration the only parameters you would change are the location to store the calibrated frames, the flat frame master since the flat should be made for each specific filter and maybe the dark if different exposure times were used on some filters. Although I haven't tried it yet you can set up scripts to do all the work for a given set of frames.
Oct 5, 2023 14:18:11 #
So, for example, bias and dark frames might be scripted since they don't really change in my normal shooting?
(IE: I typically use 30 second Darks, and .001 second exposures for bias. And i have a dark filter in the EFW that I use for that in NINA. 20 each. It has worked well.)
Make sense?
I see scripts in AP the same way I used to see macros in word programs.
It does several steps with a single click. Kinda deal.
Or do i need to revise my thinking?
Oct 6, 2023 01:13:54 #
Ballard
Loc: Grass Valley, California
SonnyE wrote:
So, for example, bias and dark frames might be scripted since they don't really change in my normal shooting?
(IE: I typically use 30 second Darks, and .001 second exposures for bias. And i have a dark filter in the EFW that I use for that in NINA. 20 each. It has worked well.)
Make sense?
I see scripts in AP the same way I used to see macros in word programs.
It does several steps with a single click. Kinda deal.
Or do i need to revise my thinking?
(IE: I typically use 30 second Darks, and .001 second exposures for bias. And i have a dark filter in the EFW that I use for that in NINA. 20 each. It has worked well.)
Make sense?
I see scripts in AP the same way I used to see macros in word programs.
It does several steps with a single click. Kinda deal.
Or do i need to revise my thinking?
Hi SonnyE
There are a number of pre-built scripts that are very useful so indeed multiple steps can be put into a script with a single click, they can be sophisticated enough to request input parameters in a window. I have used several of the prebuilt scripts but haven't tried making my own yet.
Oct 6, 2023 11:40:04 #
Ballard wrote:
Hi SonnyE
There are a number of pre-built scripts that are very useful so indeed multiple steps can be put into a script with a single click, they can be sophisticated enough to request input parameters in a window. I have used several of the prebuilt scripts but haven't tried making my own yet.
There are a number of pre-built scripts that are very useful so indeed multiple steps can be put into a script with a single click, they can be sophisticated enough to request input parameters in a window. I have used several of the prebuilt scripts but haven't tried making my own yet.
Yeah, I'm beginning to learn about scripts. Boy, it sure seems like they did as thoroughly a job as they could to cover things few would need. Good Grief!
Yeah, there has to be a lot of things that can work without making any more. I just have to ferret them out and experiment. I need to drag and drop a few triangles.
My collecting is rather simplified. I had to learn to Post Process with time back when I started. So I'd take longer and longer exposures to get a semblance of something I could see. I still use time to refine my images, and I'm using 180 seconds as my setting currently because it gives me the detail I'm looking for in the collection of a particular object. I don't split hairs, I just use my "Kentucky Windage" without further calculating.
If I can see what it is, I just run the batch. (I was using 300 seconds. But dropped back to 180 seconds and gained a lot of detail because the bright stuff wasn't blown out.
Usually narrowband one night, then the LRGB to next, for example.
Same with my sensor temperatures, currently -15° C, and staying there as a constant.
I have templates in NINA I typically work from, so most of it is set-up before I begin and I only fine tune the filters or time. Same with dithering, currently at dither every 5 images, it seems to be a working median for me.
I use Stellarium as my Planetarium Program, pick an object and import it to the template, Save it as (Name) and let the program roll. Call it Lazy Automation. Then I casually monitor the collection, storage, and time to Meridian Flip, which has been working fully automatic for a while now since I got settings that work with my mount.
I don't know if you use YouTube videos to pick-up tricks and tips from, but I offer these I am finding are helping me on this new quest of colorizing my images.
I continue the crusade to learn to use my equipment.
Adam Block - He is a Guru with PixInsight. Rather monotone, he is brilliant with PixInsight. But like most, he moves very fast and you don't see what goes on off screen. But I stop, rewind, and pause to study the buttons being displayed and pushed. I have to "get" what is being shown, then learn by repetition of my own.
PixInsight is going to be impossible for me to learn much of what it is capable of. But I knew nothing when I started out and now know... oh a couple anyway.
But Peter Zelinka is more to my learning skills level. Smaller bytes, slower presentation, and it's more for "Dummies like me."

Oh, what a world, what a world!
Something that throws me is Adam Block refers to screens I do not see on my copy of PixInsight. And I cannot find. My copy is Up to date, but not showing things like the color picker, which would likely be my doorway to progress in colorizing my images.
Maybe if I boldly go where no Dummies dare to tread, the PixInsight forums.

I was always the one to asked the questions others would not. Once I've pulled the instructor down to my level, we could both rise with a greater knowledge.
I was never one who remained silent. Even if others thought me to be an idiot. Sometimes I even got a "Good Question!" in response.
Often I would take an engineers canteen and drink as much knowledge from them as I could. Made them feel good, and quenched my thirst for their knowledge.
Sometimes I'm the devil in disguise.

Thank you for sharing your hard won knowledge with me. It is much appreciated!
Onward through the fog, and clouds....

Oct 6, 2023 20:07:33 #
Ballard
Loc: Grass Valley, California
SonnyE wrote:
Yeah, I'm beginning to learn about scripts. Boy, i... (show quote)
Hi SonnyE
Yep there is a lot to learn when using pixinsight. I still don't know how to use all the functionality yet.
For colorization I try to stretch each color so the at background intensity is the same for each color filter (i.e. the background is pretty close to white. Then use the LRGB to combine the images and usually use the automatic background extractor to remove any background gradients and the use the color curves to adjust the color to what looks correct.
Here is a list some of the functions I use frequently.
subframe selector to eliminate any images that are too far off in either FWHM or number of stars. and find the best one to use later for registration.
Image Calibration to calibrate all the image
Image Registration to align all the images.
Image integration to integrate all the images
Multiscale linear transformation to even out any graininess (Sometimes L also use the Image analysis ExtractWaveletlayers script to get a feel for how to set the values in the Multiscale linear transformation and to see if I need to do it again after running it)
HistorgramTransformation to streach each integrated image.
LRGB to combine the channels.
If there any obvious color cast then SCRN to remove the appropriate color cast.
I also may use the Automatic Background extractor with subtraction (or the Dynamic Background extractor if there are too many stars in the background that shouldn't be included as part of the background to subtract).
Sometimes the Background Neutralization is also usefull here.
The Curves transform is the next one and you want to adjust the colors very slowly sometimes it helps to way over saturate the colors in the preview window while adjusting the colors and luminance and then bring the saturation back down.
Sometimes I use the Unsharpmask tool for sharpening (again using a preview while adjusting the amount of sharpening and the de-ringing adjustments in the tool. Note: you can make and 1 or more small zoomed in version as a preview window by hitting Alt N and use the curser to define what the preview size includes (as opposed to the full view preview built into many of the tools). You can then execute the function on the preview window without actually changing the real image and you can re-adjust and try again without having to undo what you just did in the preview window. The small preview is great for some functions that take longer like the deconvolution, the TVGDenoise, HDRmultiscaleTransformation and others since the small preview will run much faster than on the full image and you get it to look the way you want before changing the whole image.
The maskgeneration tool is also very useful. I will use the rangeselection part of the tool to isolate brighter areas for more sharpening as the bright areas can handle the sharpening without getting grainy. It also helps to play with the smoothness and fuzzy setting in the tool to avoid making areas that look too different that are next to each other.
In the scripts I use several of the utility functions like CorrectMagentaStars, NBRGBCombintion and some of the others. Although Pixinsight doesn't natively come with the EZ Processing suite this is a good one to add, I have used its star reduction many times.
The Starnet2 tool is a really nice one. You can tell it to create a starmask and run it on the image (It can take awhile to run) and it will create an image with just the stars and one of just the object. You can then do some tweaking on the separately on the images and then recombine them with pixel math.
For comets the comet alignment tool can stack the image on just the comet and or just the stars and they can be recombined later with pixel math. (see https://www.uglyhedgehog.com/t-766343-1.html)
If you want to reply, then register here. Registration is free and your account is created instantly, so you can post right away.