FREE unlimited photo upscale using AI
Aug 24, 2023 19:15:12 #

This is my first attempt at creating an upscaling workflow using AI.
I'm using the very same software and models as in previous post in which I created a bunch of "street shots" renderings (see https://www.uglyhedgehog.com/tpr?p=14107741&t=783755), but his time I used an actual photo to guide the AI to create a new one with 4x resolution.
As in that post, the software is 100% FREE, so no paid software is really necessary to perform upscaling of photos.
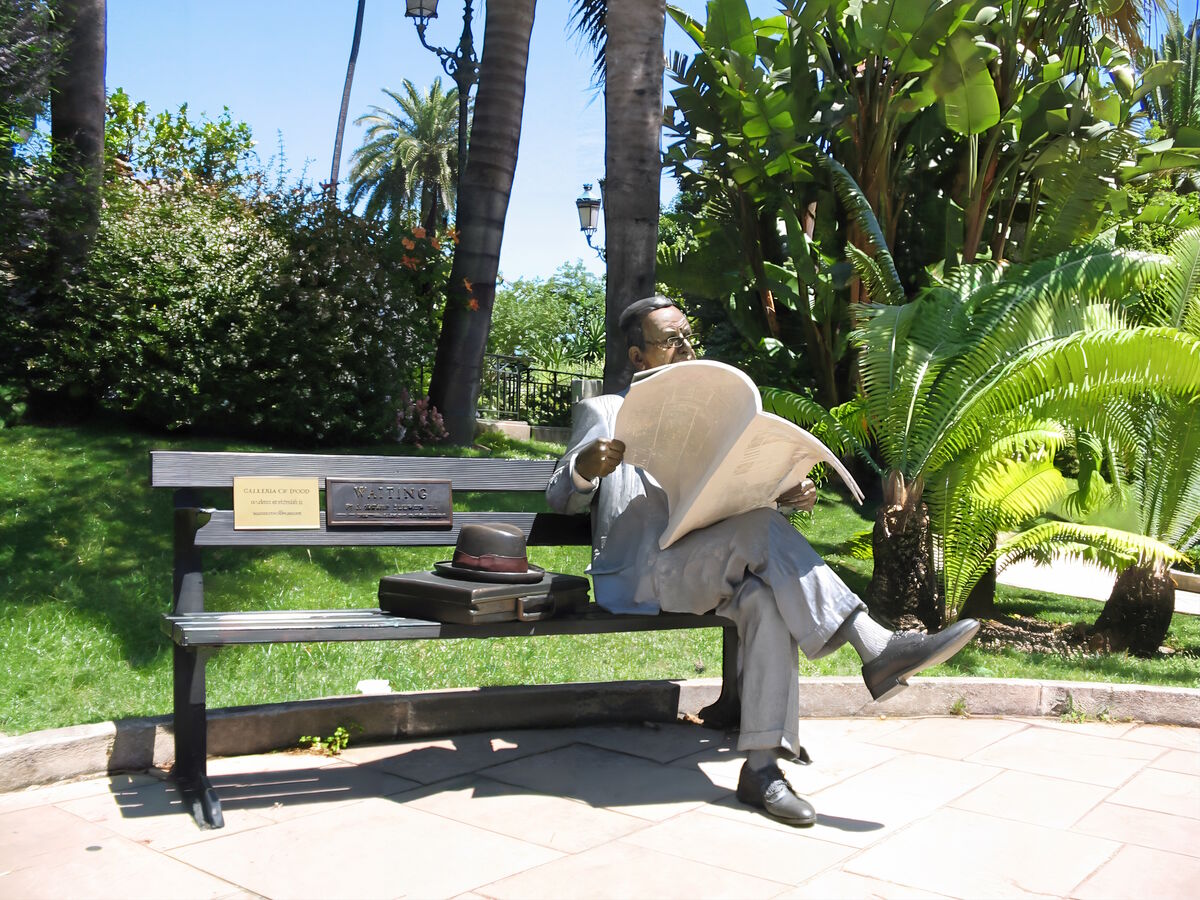
Theory of operation: the software uses SDXL model to create a latent representation of the original image and then it renders a completely new image that looks like the first one. I did a 4x upscale, but it could be 10x or 100x...
Note: The positive and negative prompts are empty, so no alteration is made to the image. I could easily add some prompt to make substantial changes, like putting people, changing the trees, change the scene to a night scene or putting it on the surface of another planet.
There are some defects, but I'm working on improving the process.
This is the explanation of the images:
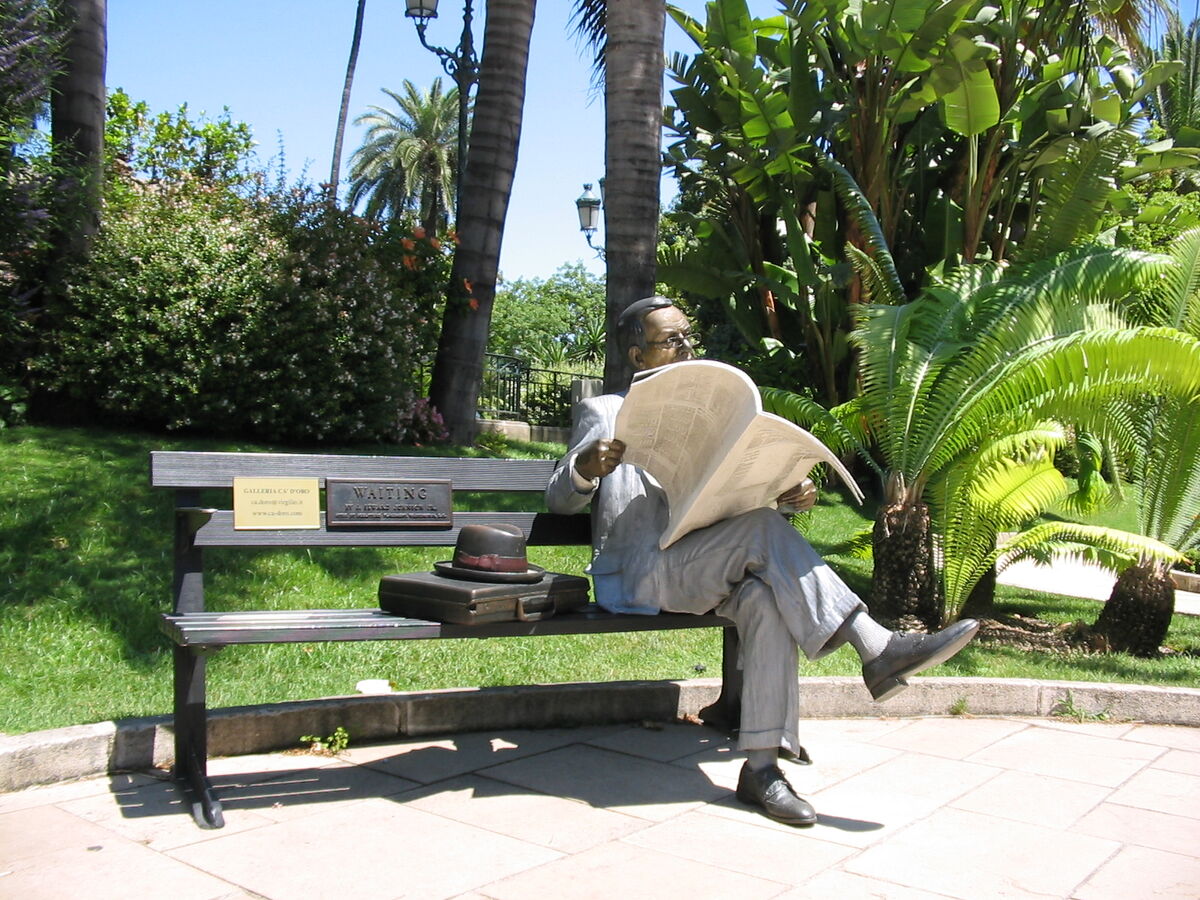
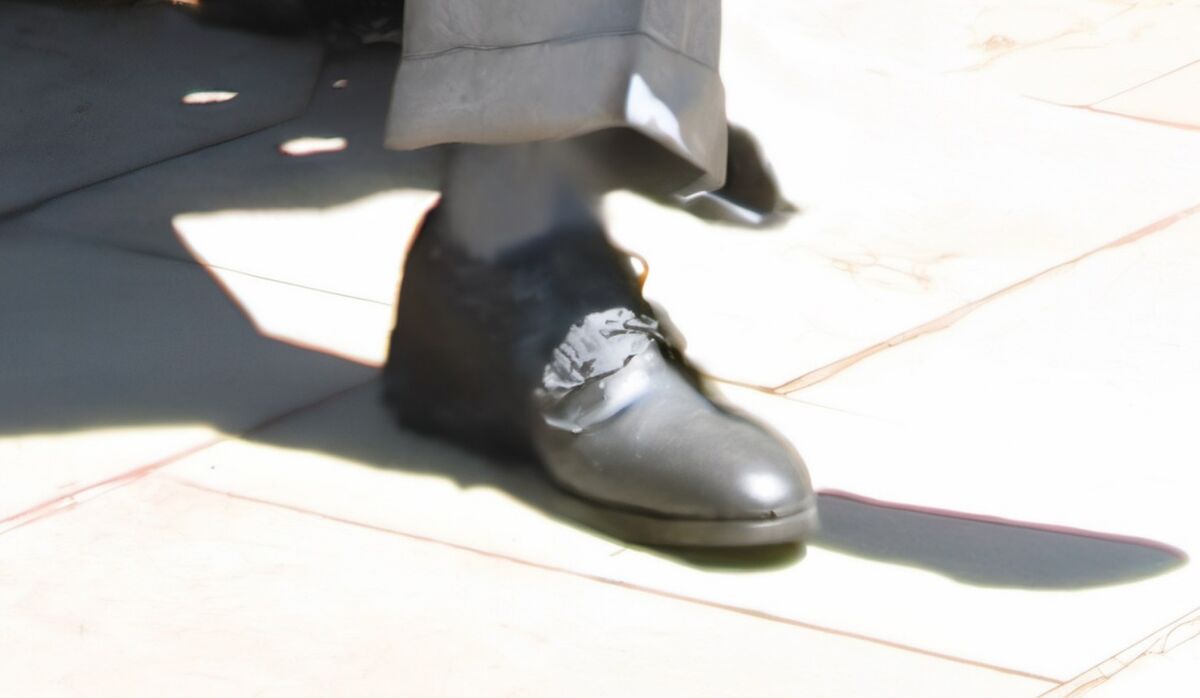
Image 1: the original shot in 2003 with a Canon PowerShot A2 (1600 x 1200 px) in Italy
Image 2: the upscaled version to 6400 x 4800 px (stored as "Original" for you to analyse)
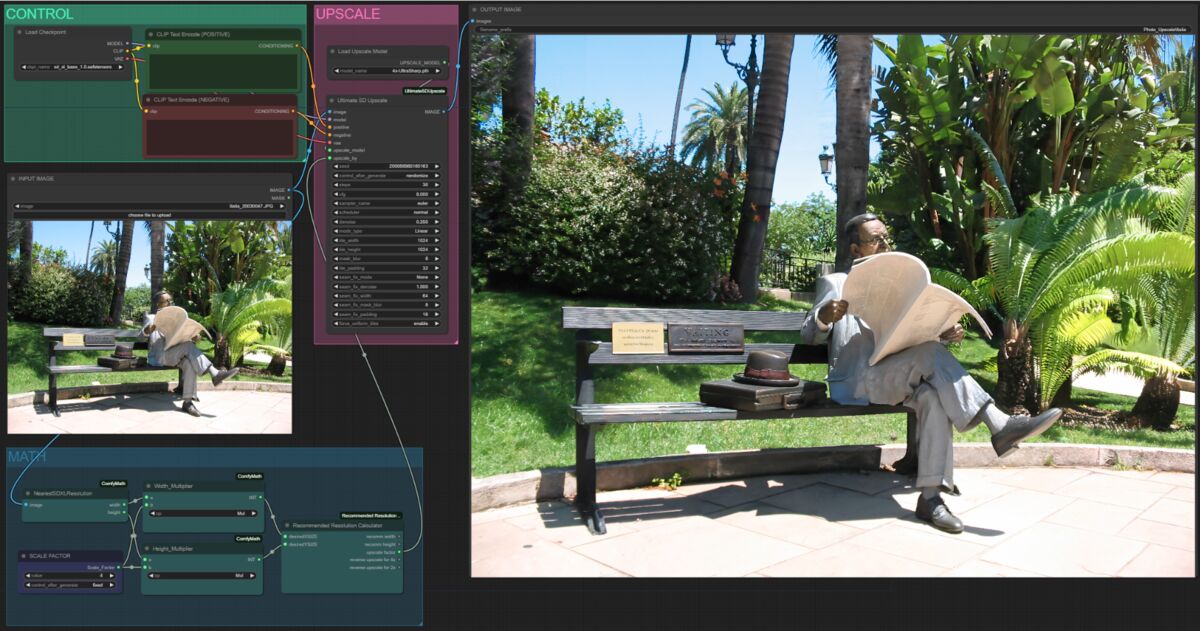
Image 3: the workflow I used
I'll post more images as I make upgrades to the procedure.
I'm using the very same software and models as in previous post in which I created a bunch of "street shots" renderings (see https://www.uglyhedgehog.com/tpr?p=14107741&t=783755), but his time I used an actual photo to guide the AI to create a new one with 4x resolution.
As in that post, the software is 100% FREE, so no paid software is really necessary to perform upscaling of photos.
Theory of operation: the software uses SDXL model to create a latent representation of the original image and then it renders a completely new image that looks like the first one. I did a 4x upscale, but it could be 10x or 100x...
Note: The positive and negative prompts are empty, so no alteration is made to the image. I could easily add some prompt to make substantial changes, like putting people, changing the trees, change the scene to a night scene or putting it on the surface of another planet.
There are some defects, but I'm working on improving the process.
This is the explanation of the images:
Image 1: the original shot in 2003 with a Canon PowerShot A2 (1600 x 1200 px) in Italy
Image 2: the upscaled version to 6400 x 4800 px (stored as "Original" for you to analyse)
Image 3: the workflow I used
I'll post more images as I make upgrades to the procedure.
Aug 25, 2023 01:46:56 #
Aug 25, 2023 04:36:49 #

jlg1000 wrote:
This is my first attempt at creating an upscaling ... (show quote)
====
Somehow I missed the source of where the update scale on software is located.
Can you please repost that information kindly?
Thanks in advance.
Cheers
Goldstar46
George Veazey
Aug 25, 2023 05:53:48 #
goldstar46 wrote:
====
Somehow I missed the source of where the update scale on software is located.
Can you please repost that information kindly?
Thanks in advance.
Cheers
Goldstar46
George Veazey
Somehow I missed the source of where the update scale on software is located.
Can you please repost that information kindly?
Thanks in advance.
Cheers
Goldstar46
George Veazey
Same here
Aug 25, 2023 06:30:54 #
Aug 25, 2023 07:03:41 #

Please post the last photo as a download so we can enlarge and see the steps.
Did you use ComfyUI
We live in a brave new AI world
Did you use ComfyUI
We live in a brave new AI world
Aug 25, 2023 07:03:50 #
goldstar46 wrote:
====
Somehow I missed the source of where the update scale on software is located.
Can you please repost that information kindly?
Thanks in advance.
Cheers
Goldstar46
George Veazey
Somehow I missed the source of where the update scale on software is located.
Can you please repost that information kindly?
Thanks in advance.
Cheers
Goldstar46
George Veazey
Hi!
It's ComfyUI, used for all kind of crazy AI stuff.
Following the link to my other post, I put a link to the download in that other thread.
Also, there is a ton of videos on YouTube.
Aug 25, 2023 07:07:36 #
dpullum wrote:
Please post the last photo as a download so we can enlarge and see the steps.
Did you use ComfyUI
We live in a brave new AI world
Did you use ComfyUI
We live in a brave new AI world
Yes, it is ComfyUI... I'll post a better screenshot once I get to my office.
Aug 25, 2023 09:16:37 #
dpullum wrote:
Please post the last photo as a download so we can enlarge and see the steps.
Did you use ComfyUI
We live in a brave new AI world
Did you use ComfyUI
We live in a brave new AI world
OK, I'm posting here:
1) Original of the input image
2) Original of the screenshot
3) Original of the result (again) to make the post complete
For all who asked, the software and the models are free and open source, which means that there is no ownership. You get the source code and are entitled to modify it in any way. *BUT* you don't get support of any kind... hit a bug? fix it yourself and share the solution back to the community.
ComfyUI can be retrieved here https://github.com/comfyanonymous/ComfyUI and is a front end to Stable Diffusion.
ComfyAI is currently the hottest topic in AI imaging. *Hundreds* of updates, add-ons, new models and YouTube videos are published every *week*. I love it, it's addictive and gives the feel of living on the cutting edge.
The models can be retrieved from many places (Github, Huggingface, CivitAI, etc.) or trained by yourself.


Aug 25, 2023 09:27:09 #

jlg1000 wrote:
OK, I'm posting here: br br 1) Original of the in... (show quote)
Did you look at the pixel-level details of the enlarged image? Are you satisfied with seeing those soft details? Whether free or fee, do you honestly think those soft details are an improvement? Why would you need to increase the resolution of this image at all? What was the purpose? Why 6400px wide? For what purpose? Would a smaller enlargement be a better approach, if an increase is needed at all?
Aug 25, 2023 09:59:23 #
CHG_CANON wrote:
Did you look at the pixel-level details of the enlarged image? Are you satisfied with seeing those soft details? Whether free or fee, do you honestly think those soft details are an improvement? Why would you need to increase the resolution of this image at all? What was the purpose? Why 6400px wide? For what purpose? Would a smaller enlargement be a better approach, if an increase is needed at all?
It's called "proof of concept". The defect happens at the tiling stage.
Yes, I can do less enlargement... and yes it can and should be perfected.
As I stated, it is the first (usable) try... I'm working on improving it.
Previous tries were worse... much worse. I believe that I'm a mere couple of hundreds of lines of code to get it right. But it's only a side project for fun, let's see what happens.
**And try a 4x enlargement with Photoshop of a 2Mpx photo. I'm sure I can already beat that!

The whole point was to show what is possible using AI tools for photography. The best is about to come !!

If you want to reply, then register here. Registration is free and your account is created instantly, so you can post right away.