Milky way Pano questions
Apr 8, 2023 12:32:53 #
Last year I camped out near a remote peak in New Mexico to photograph a Pano of the Milky Way. My image came out “pretty good” but nothing that would win any prizes.
In this instance, I shot with my Canon 5D IV and Rokinon 14mm f2.8 lens, with the peak in the center of the pano and the Milky Way arching across the top of the peak, from the core to the south, to where the MW sets to the north.
I started my (portrait mode) pano to the north (a little past north as a safety measure to be sure I got all the milky way. I then took several 18 second shots (6 to be exact) with ISO 6400. I then turned the panning head 15 degrees the right and took another 6 shots, etc., until I had covered the entire arch of the MW with a bit of additional area on either side (about 195 degrees total. I had taken a foreground Pano at blue hour which I later blended.
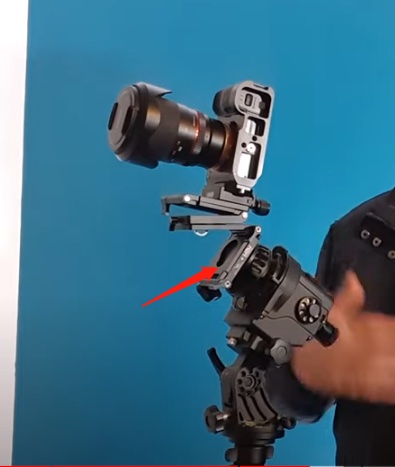
THIS TIME: I want to make a similar image with my R5 and the same lens, but instead of taking several images for stacking at each of the pano positions, I plan to use my iOptron StarGuider pro to take tracked images at each position, but with much lower ISO. On my iOptron I will be using a pair of “Move Shoot Move” brand of Z brackets, in a configuration similar to the attached image.
A FEW QUESTION FOR THOSE IN THE KNOW:
1. Should I re-level the Z brackets (so the camera is level) for each Pano panel, or should I just let it continue to rotate and follow the natural course of the stars motion? (The brackets have bubble levels)
2. PhotoPills says the horizontal FOV of my 14mm (in portrait mode) is about 81 degrees. Last time I turned the camera 15 degrees at a time, and ended up with 13 pano sections to stitch together which was probably overkill. This time I’m thinking of turning the camera 40 degrees which, if my math is right, should give me about 50% overlap between pano sections. So, I’d end up with about 5 panels. Does this seem about right? Suggestions?
3. I’m thinking of using ISO 400 - is that too low, or should I go for 800? The whole purpose of using the tracker is to shoot at lower ISO but Im not sure what the sweet spot is?
4. What’s the best tracking time to get the best images and still be able to get them all stitched in post? I’m thinking 3 or 4 minutes? Would love to hear from anyone with experience.
I know these probably seem like dumb question, but I’m spending some money to rent a camper to do an over night and just trying to gather as much info as I can to maximize my probability of success. Thanks for any inserts to these questions or any additional insights / suggestions you might provide.
In this instance, I shot with my Canon 5D IV and Rokinon 14mm f2.8 lens, with the peak in the center of the pano and the Milky Way arching across the top of the peak, from the core to the south, to where the MW sets to the north.
I started my (portrait mode) pano to the north (a little past north as a safety measure to be sure I got all the milky way. I then took several 18 second shots (6 to be exact) with ISO 6400. I then turned the panning head 15 degrees the right and took another 6 shots, etc., until I had covered the entire arch of the MW with a bit of additional area on either side (about 195 degrees total. I had taken a foreground Pano at blue hour which I later blended.
THIS TIME: I want to make a similar image with my R5 and the same lens, but instead of taking several images for stacking at each of the pano positions, I plan to use my iOptron StarGuider pro to take tracked images at each position, but with much lower ISO. On my iOptron I will be using a pair of “Move Shoot Move” brand of Z brackets, in a configuration similar to the attached image.
A FEW QUESTION FOR THOSE IN THE KNOW:
1. Should I re-level the Z brackets (so the camera is level) for each Pano panel, or should I just let it continue to rotate and follow the natural course of the stars motion? (The brackets have bubble levels)
2. PhotoPills says the horizontal FOV of my 14mm (in portrait mode) is about 81 degrees. Last time I turned the camera 15 degrees at a time, and ended up with 13 pano sections to stitch together which was probably overkill. This time I’m thinking of turning the camera 40 degrees which, if my math is right, should give me about 50% overlap between pano sections. So, I’d end up with about 5 panels. Does this seem about right? Suggestions?
3. I’m thinking of using ISO 400 - is that too low, or should I go for 800? The whole purpose of using the tracker is to shoot at lower ISO but Im not sure what the sweet spot is?
4. What’s the best tracking time to get the best images and still be able to get them all stitched in post? I’m thinking 3 or 4 minutes? Would love to hear from anyone with experience.
I know these probably seem like dumb question, but I’m spending some money to rent a camper to do an over night and just trying to gather as much info as I can to maximize my probability of success. Thanks for any inserts to these questions or any additional insights / suggestions you might provide.
Apr 8, 2023 13:37:23 #

Basil wrote:
Last year I camped out near a remote peak in New M... (show quote)
Basil, since I am a retired physics prof who also taught a course in Intro to Astronomy, I think this is a wonderful project. And New Mexico with its low rainfall should be good place to do this. (I live in the Shenandoah Valley of Virginia.)
My only comment is that I presume you have a program that will stich the photos together. There are many available. Doing it my hand can be problematic unless you are only taking the middle of each photo.
I'm also presuming that you have set your wedge for the camera/telescope correctly so that the z-axis (perpendicular to the plane of the celestial sphere which contains the celestial equator) points directly as the North point of the celestial sphere which is awfully close to the North Star.
Best wishes. --Richard
Apr 8, 2023 13:58:41 #
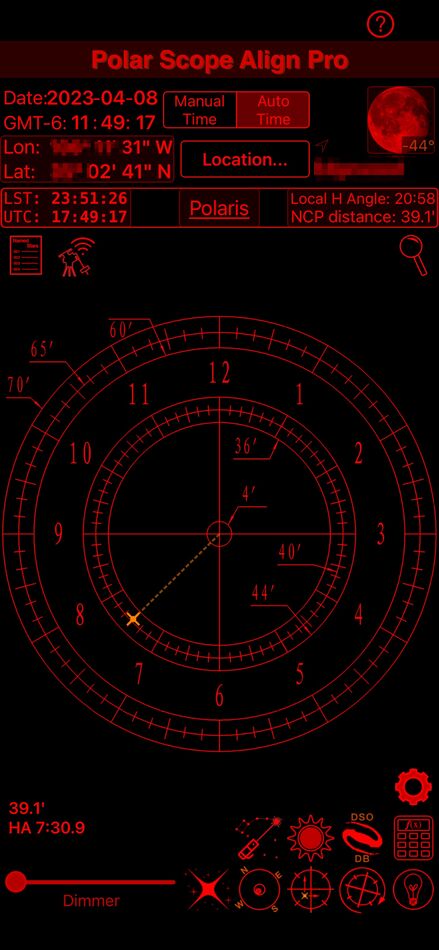
When I use the Star Tracker, I always align the center axis with true north. In the case of very wide angle lens like 14mm, usually just pointing towards Polaris is sufficient to avoid star trails. However, I usually try to get it as close as possible to true north. First, I use a laser pointer to align the center axis of the star tracker with Polaris (There is a spotting scope in the center of the tracker). Then, looking through the tracker scope, I adjust AZ-EL to place Polaris exactly where it should be in the scope's reticle. I have an APP on my iPhone called PS Align Pro which will tell me, based on my exact location and time of day, exactly where I need to place Polaris so that the center of the scope is pointing exactly at true north (over kill for 14mm but I do it anyway).
(And yes, I can stitch the images in either Lightroom or Photoshop.)
(And yes, I can stitch the images in either Lightroom or Photoshop.)
Apr 8, 2023 17:12:41 #
PoppieJ
Loc: North Georgia
if you are shooting the whole arc of the milkway the 6 shots is about right. when I shoot with my star tracker I usually go for ISO 800 and about 1 minute but you need to do a test shot and adjust so that the stars are right enough without being over exposed. Then remember to take the same shots without the star tracker for whatever land mass that you are putting in the foreground, here again you may have to adjust exposure time so that you can see the foreground
Apr 8, 2023 22:54:05 #
Basil wrote:
When I use the Star Tracker, I always align the ce... (show quote)
Great. You are definitely set up for your nighttime work on the Milky Way. Sounds like a lot of fun and challenge. --Richard
Apr 8, 2023 23:34:03 #
PoppieJ wrote:
if you are shooting the whole arc of the milkway the 6 shots is about right. when I shoot with my star tracker I usually go for ISO 800 and about 1 minute but you need to do a test shot and adjust so that the stars are right enough without being over exposed. Then remember to take the same shots without the star tracker for whatever land mass that you are putting in the foreground, here again you may have to adjust exposure time so that you can see the foreground
Thanks. I was thinking ISO 800 or possibly 400 and from 1-2 minutes exposure, depending on which ISO I end up with. ISO 800 is the most likely choice, but your right, I need to take some test shots before I get to my planned "shoot" time just to see how things are looking. One thing I'm concerned about is how difficult it will be to properly stitch the different frames of the pano together. I've done a pano where I shot multiple shots for each frame and stacked them in Stary Landscape Stacker, then stitched the results together in PS but those were not tracked shots. Came out ok. I've also shot single frame MW shots with the tracker, then blended a previously shot foreground (usually shot near the end of golden hour or beginning of blue hour). But what I haven't done is shoot a pano using the tracker. This is going to be a new adventure.
Apr 9, 2023 06:51:49 #
PoppieJ
Loc: North Georgia
Basil wrote:
Thanks. I was thinking ISO 800 or possibly 400 an... (show quote)
photoshop should be able to stack it fairly easily. You might even be able to stack it in stary landscape stacker. I have only stacked multiple shots not tracked in SLS but I think that it has an option for pano
Apr 9, 2023 10:51:23 #
PoppieJ wrote:
photoshop should be able to stack it fairly easily. You might even be able to stack it in stary landscape stacker. I have only stacked multiple shots not tracked in SLS but I think that it has an option for pano
Well, actually I won't need to stack images as I'm only taking one image per pano section (I'm using a tracker). So stacking isn't what I'm concerned about - it's stitching the images that I'm worried about. Since the tracker will be blurring the foreground I'm concerned about using LR or PS to accurately stitch the sections of the pano together.
Apr 9, 2023 23:58:39 #
Basil wrote:
Well, actually I won't need to stack images as I'm only taking one image per pano section (I'm using a tracker). So stacking isn't what I'm concerned about - it's stitching the images that I'm worried about. Since the tracker will be blurring the foreground I'm concerned about using LR or PS to accurately stitch the sections of the pano together.
Basil, if you have photos that overlap each other by 1/2 or more, I'd do the stitching by hand. This amount of overlap should allow you to begin laying one ending photo down, say beginning with the left most image.
Then cut 1/4 from the left of the next image and overlap correctly over the right end of the first photo. Then cut 1/4 off the left end of the next photo and correctly overlap it on top of the right end of the one you just laid down and keep on going until you finish. I use MS Paint in Windows as the program in which to do this pasting, but you can do this in other image editors, too.
The reason I suggest this much overlap is that stitching programs tend to fit a curved arc model to the top and bottom of each image before stitching them. However, with this much overlap, the center of the top and bottom is straight. Except for the two end photos, only the middle half of each image will show.
Just some ideas of how to stitch by hand without needing thread, needle and a thimble.
 --Richard
Apr 13, 2023 20:52:49 #
All the MW panos I have done with a DSLR were done on a tripod with a pano head. A 20mm lens, 15 sec exposures @ ISO1600. Stitched in Lightroom.
If you want to reply, then register here. Registration is free and your account is created instantly, so you can post right away.