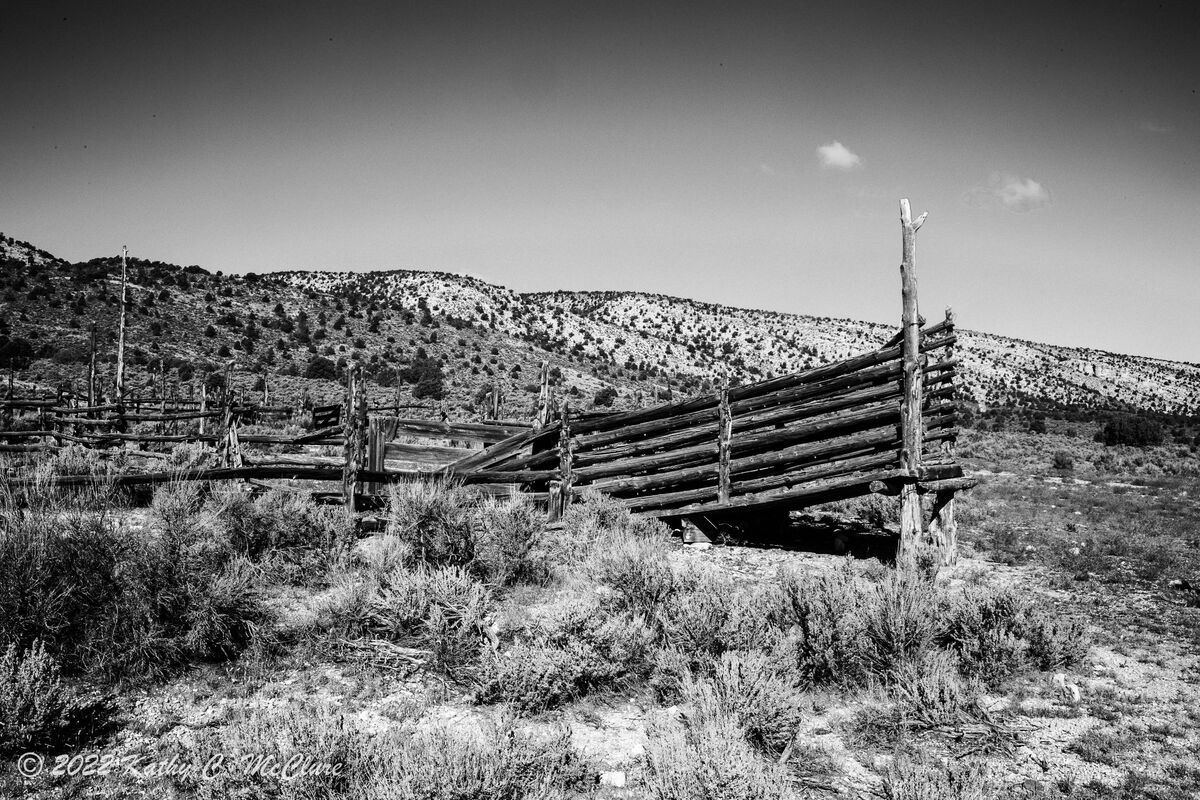
Two versions done two different ways
Nov 19, 2022 15:54:27 #

AzPicLady wrote:
So the answer is to use Silver Efex, but harsh? I'll try that. At least you didn't get that wierd thing in the sky!!! Thanks!
The key to this is to try out the different presets and see which one moves towards the direction you want to take it. You can tweak adjustments on the right-hand side, but I tend to let it go back to Lightroom where I finish the adjustments. And I did let it darken the sky just a bit since it really fit with the image.
Nov 19, 2022 15:59:14 #

JimH123 wrote:
The key to this is to try out the different presets and see which one moves towards the direction you want to take it. You can tweak adjustments on the right-hand side, but I tend to let it go back to Lightroom where I finish the adjustments. And I did let it darken the sky just a bit since it really fit with the image.
OK, I'll look stupid. Where is the "harsh" setting?
Nov 19, 2022 16:16:04 #
AzPicLady wrote:
OK, I'll look stupid. Where is the "harsh" setting?
All the presets are found on the left side of Silver Efex pro. Notice that I am in a group called "Recently Used". There is a category called "All" in which I would find it. And Once I use it, it can also be found in "Recently Used" so I can find it again more easily.
Now it is possible that you have this turned off. Notice at the top there is something that looks like a door with an arrow pointing in to it. If I press that button, the presets will disappear and now there would be a little door with the arrow pointing out of it.
Give it a try.

Nov 19, 2022 16:17:23 #
Nov 20, 2022 07:29:49 #
JimH123 wrote:
The key to this is to try out the different presets and see which one moves towards the direction you want to take it. You can tweak adjustments on the right-hand side, but I tend to let it go back to Lightroom where I finish the adjustments. And I did let it darken the sky just a bit since it really fit with the image.
So this is what I got. I actually used one of the film settings to get this. I still have the dome, but it's better. If anyone is still following this, let me know if you think this is better. I might try using the neutral density filter to try to lighten up the corners a bit.
Nov 20, 2022 10:03:40 #
AzPicLady wrote:
So this is what I got. I actually used one of the film settings to get this. I still have the dome, but it's better. If anyone is still following this, let me know if you think this is better. I might try using the neutral density filter to try to lighten up the corners a bit.
Did you use a polarizing filter for this shot? If so, it could be the cause of the dome effect. Your lens is indicated to be 28mm and this was on a full frame camera. It is not recommended to use a PL filter for wide angle shots since the sky will be darkened differently in different parts of the sky.
I had adjusted the copy I provided to minimize that effect, but it did take a bit of work.
Nov 20, 2022 11:06:06 #
JimH123 wrote:
Did you use a polarizing filter for this shot? If so, it could be the cause of the dome effect. Your lens is indicated to be 28mm and this was on a full frame camera. It is not recommended to use a PL filter for wide angle shots since the sky will be darkened differently in different parts of the sky.
I had adjusted the copy I provided to minimize that effect, but it did take a bit of work.
I had adjusted the copy I provided to minimize that effect, but it did take a bit of work.
I did not use a polarizer. That's what's curious. And it doesn't appear in the LR version.
Nov 21, 2022 10:36:27 #
AzPicLady wrote:
I did not use a polarizer. That's what's curious. And it doesn't appear in the LR version.
Try this. Open the RAW image in Lightroom, and adjust the Dehaze control to the left which will cause the entire image to get lighter, especially the sky. And then edit in SilverEfexPro and I used the HighStructure - harsh preset. Then back to Lightroom. Use the Vignette adjust to fix the upper corners. Adjust the Luminance Noise Reduction a bit to take out noise in the sky. Then reduce exposure to your liking. And the result is no sky dome.
Nov 21, 2022 11:04:34 #
JimH123 wrote:
Try this. Open the RAW image in Lightroom, and adjust the Dehaze control to the left which will cause the entire image to get lighter, especially the sky. And then edit in SilverEfexPro and I used the HighStructure - harsh preset. Then back to Lightroom. Use the Vignette adjust to fix the upper corners. Adjust the Luminance Noise Reduction a bit to take out noise in the sky. Then reduce exposure to your liking. And the result is no sky dome.
I don't have dehaze. My LR is too old for that. I wondered about using the Vignette thing. I don't usually, so I'm not sure what it actually does. I'll try that. Thanks so much, Jim!
Nov 21, 2022 14:29:42 #
AzPicLady wrote:
I don't have dehaze. My LR is too old for that. I wondered about using the Vignette thing. I don't usually, so I'm not sure what it actually does. I'll try that. Thanks so much, Jim!
The vignette adjust allows you to add (slide to the right) or reduce or remove (slide to the left) a vignette that you see in the image.
Here is something else to try. Now this is after I had moved the dehaze adjust to the left in LR, then I called SilverEfexPro and chose HighStructure Smooth. But then I when to the section called "Finishing Adjustments" and I pulled the Toning Strength slider to the right with the Silver Hue at 30. Notice how the tone changed making it look more like an old image. (Original on left, new tone on right) Then went back to LR and used the Shandows and Blacks sliders to darken the foreground while leaving the sky alone.
And now it looks like it was taken many years ago.
As seen in SilverEfexPro
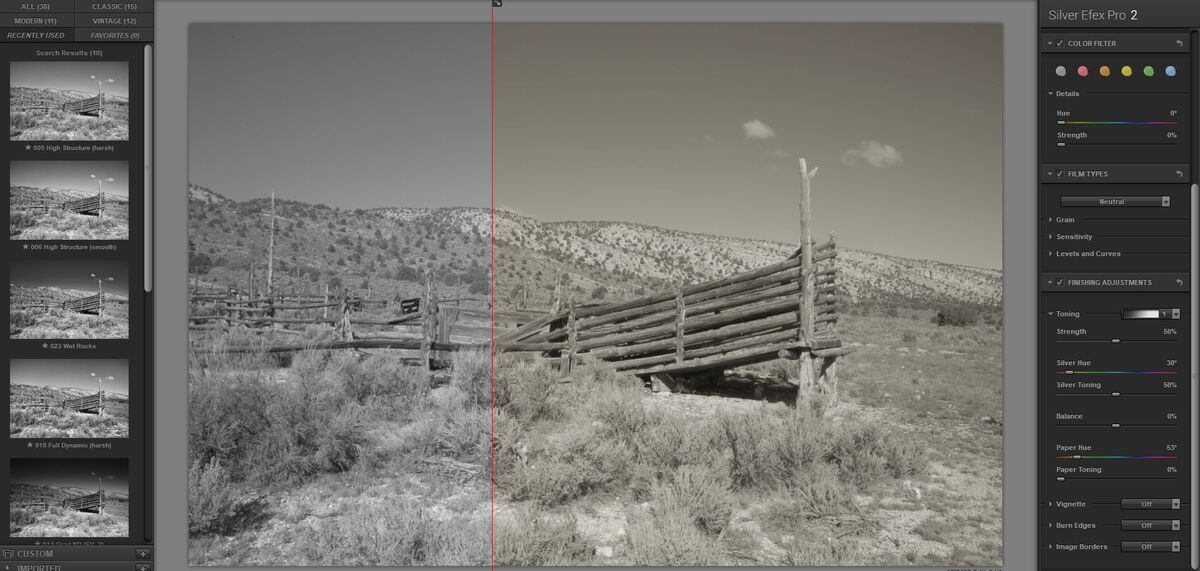
(Download)
A trip back to LR where I darkened the shadows and blacks
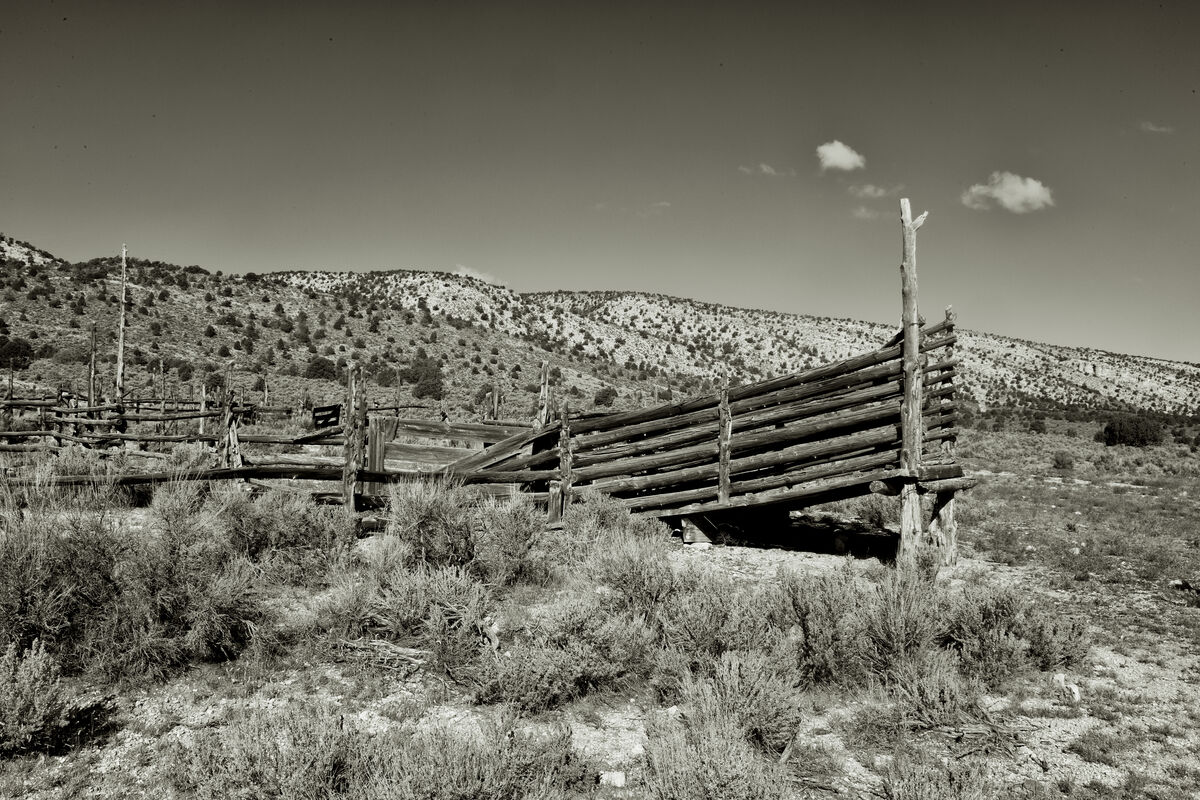
(Download)
Nov 21, 2022 14:44:48 #
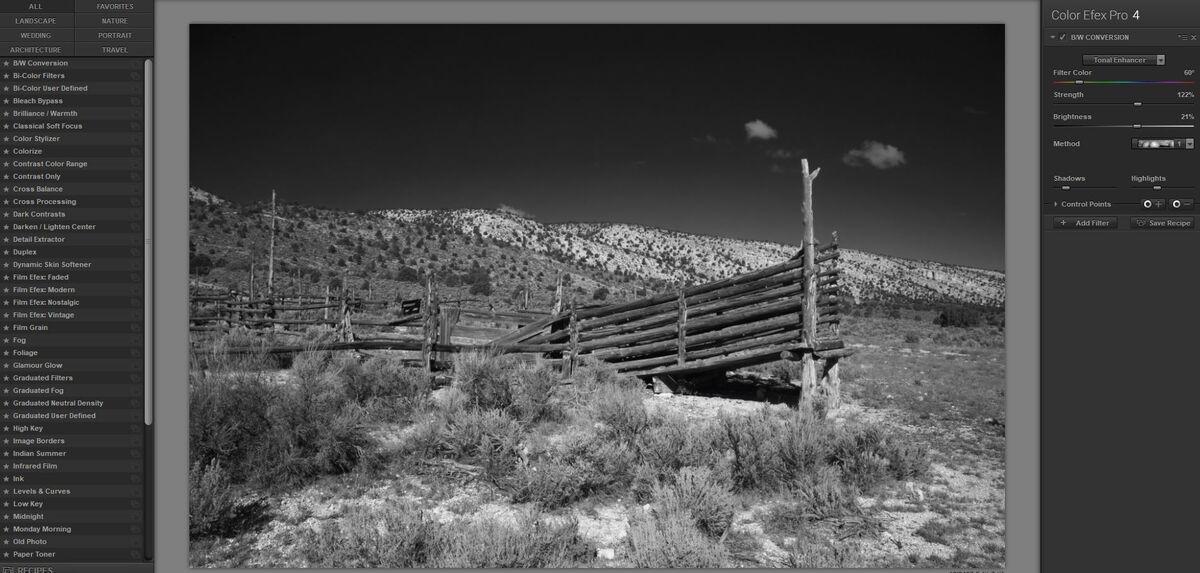
And here is another look using NIK's Color Efex Pro to do a color conversion to B&W. Notice how this time, the sky can be made to look dark like you would see with an IR image (although the vegetation doesn't have the IR look) by using tonal enhancer.
As you can see on the far left, there are a multitude of directions that this could go.
As you can see on the far left, there are a multitude of directions that this could go.
Nov 21, 2022 15:02:48 #
JimH123 wrote:
The vignette adjust allows you to add (slide to th... (show quote)
I really like the look of the second one in this post. I really appreciate your hanging with me in this exercise.
Nov 21, 2022 15:03:34 #
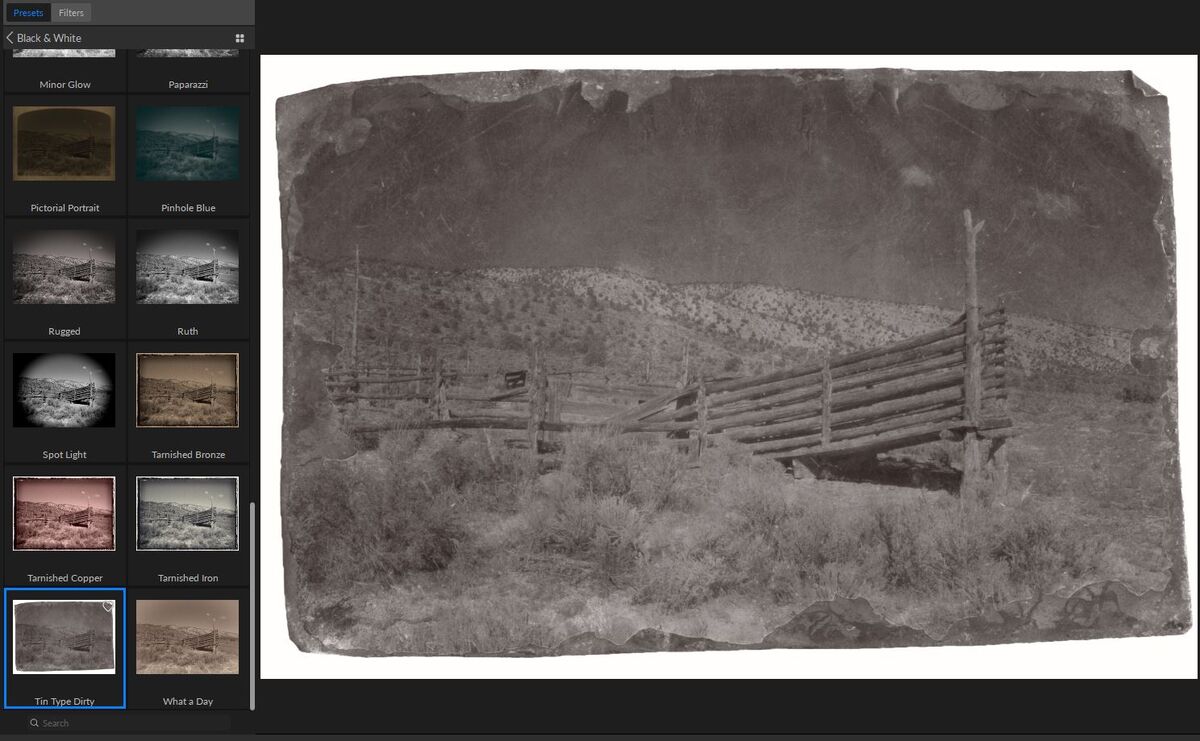
And just for fun, this is a B&W conversion done in ON1 Effects under Black & White with a preset called Tin Type. This is an old-time method of making images and it sort of faded out of use by around 1860. I have a copy of one of these images taken of my 3rd GG Grandparents, and the software did quite a good job of simulating what such an image would look like.
Certainly not up to today's standards. But in those days, it was all they had to work with.
Certainly not up to today's standards. But in those days, it was all they had to work with.
Nov 21, 2022 15:04:47 #
JimH123 wrote:
And just for fun, this is a B&W conversion done in ON1 Effects under Black & White with a preset called Tin Type. This is an old-time method of making images and it sort of faded out of use by around 1860. I have a copy of one of these images taken of my 3rd GG Grandparents, and the software did quite a good job of simulating what such an image would look like.
Certainly not up to today's standards. But in those days, it was all they had to work with.
Certainly not up to today's standards. But in those days, it was all they had to work with.
That's fun. Thanks for posting.
Nov 21, 2022 15:05:07 #
AzPicLady wrote:
I really like the look of the second one in this post. I really appreciate your hanging with me in this exercise.
I'm glad you enjoyed going through this exercise and possibly learned something. Good luck with what you are doing.
If you want to reply, then register here. Registration is free and your account is created instantly, so you can post right away.