Help with RawDigger calibrating/determining highlight clipping hack with Nikon Z
Oct 9, 2022 05:42:00 #
Having been following the ETTR/ETBR thread I decided to download RawDigger to see if I could determine the accuracy, rather than just using ACR, of a hack that gives the Nikon Z real-time highlight clipping indication.
This 'hack' is the one presented by Yasarex some months ago and involves loading a modified 'picture control' where the curve is altered to push values around 250/253 to 0. This causes those values (areas) to appear black in both the EVF and subsequently the camera produced jpeg. Typical uses where I have found it useful is when working fast shooting backlit subjects with bright skies, I find it easier than using the histogram.
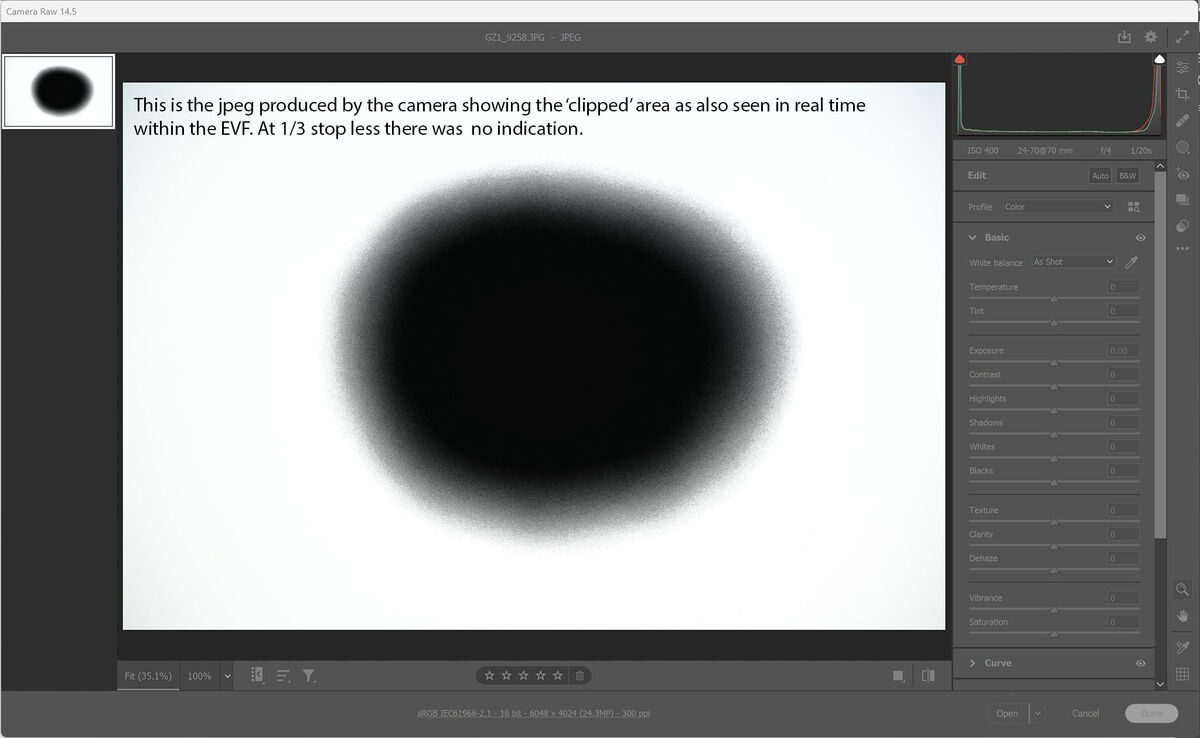
My dilemma now is RawDigger is confusing me so here goes. I ran a test shooting a white screen and incrementing exposure by 1/3 stops each side of where the 'clipping/overexposure' warning could be seen. The image I put in RawDigger is the first indication the clipping was occurring as seen in the EVF and in the jpeg, a 1/3 stop before it was not.
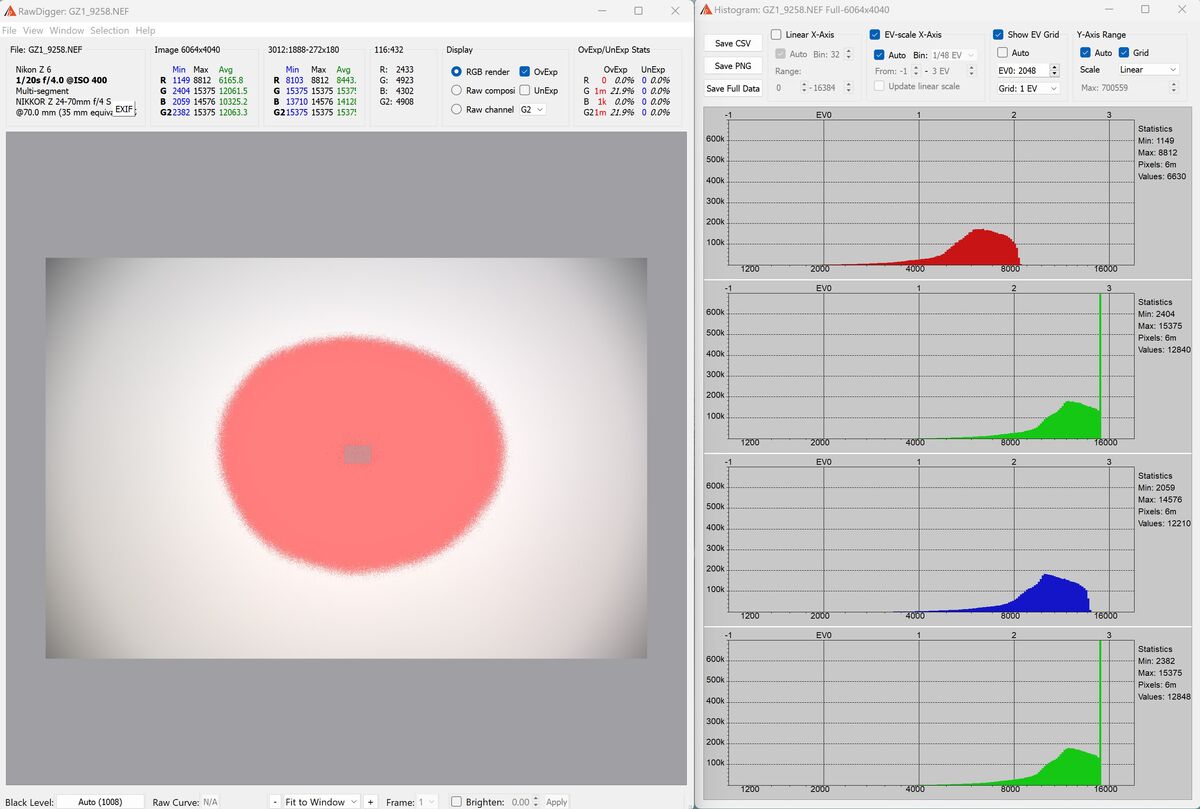
Raw Digger is showing the image is overexposed in the indicated area and at a max value of 15375 in the Green channel. Should this value not be higher?
I'll attach screen shots in the next post.
This 'hack' is the one presented by Yasarex some months ago and involves loading a modified 'picture control' where the curve is altered to push values around 250/253 to 0. This causes those values (areas) to appear black in both the EVF and subsequently the camera produced jpeg. Typical uses where I have found it useful is when working fast shooting backlit subjects with bright skies, I find it easier than using the histogram.
My dilemma now is RawDigger is confusing me so here goes. I ran a test shooting a white screen and incrementing exposure by 1/3 stops each side of where the 'clipping/overexposure' warning could be seen. The image I put in RawDigger is the first indication the clipping was occurring as seen in the EVF and in the jpeg, a 1/3 stop before it was not.
Raw Digger is showing the image is overexposed in the indicated area and at a max value of 15375 in the Green channel. Should this value not be higher?
I'll attach screen shots in the next post.
Oct 9, 2022 05:48:22 #
The below for info is the jpeg showing the overexposure warning as also seen in the EVF. Also the RawDigger screenshot. Note the similarity between the jpeg and RawDigger indication.
Oct 9, 2022 08:36:59 #
Ysarex
Loc: St. Louis
Grahame wrote:
Having been following the ETTR/ETBR thread I decid... (show quote)
I get the exact same result from RawDigger with my Z7. Channel clipping occurs with a value of 15375. You're thinking the maximum value should be 16384 (2 ^ 14) but in practice it's usually a bit lower than the theoretical maximum.
NOTE: In the example you presented only the green channel is clipped -- red and blue are unclipped. A good raw converter will use the intact data in the red and blue channels to successfully reconstruct the green channel.
Grahame wrote:
I'll attach screen shots in the next post.
Oct 9, 2022 11:08:11 #

Ysarex wrote:
I get the exact same result from RawDigger with my Z7. Channel clipping occurs with a value of 15375. You're thinking the maximum value should be 16384 (2 ^ 14) but in practice it's usually a bit lower than the theoretical maximum.
So do I. Nearly all of my cameras have a maximum raw value of about 2^13.9. A 0.1 stop difference is insignificant and undetectable since we usually adjust exposure in 1/3 stop increments.
Ysarex wrote:
NOTE: In the example you presented only the green channel is clipped -- red and blue are unclipped. A good raw converter will use the intact data in the red and blue channels to successfully reconstruct the green channel.
Although that might seem to be happening I personally don't think it's something you should rely on.
Of course, there is little you can do with specular highlights other than to let them blow out.
Oct 9, 2022 11:21:57 #
Grahame wrote:
My dilemma now is RawDigger is confusing me so here goes. I ran a test shooting a white screen and incrementing exposure by 1/3 stops each side of where the 'clipping/overexposure' warning could be seen. The image I put in RawDigger is the first indication the clipping was occurring as seen in the EVF and in the jpeg, a 1/3 stop before it was not.
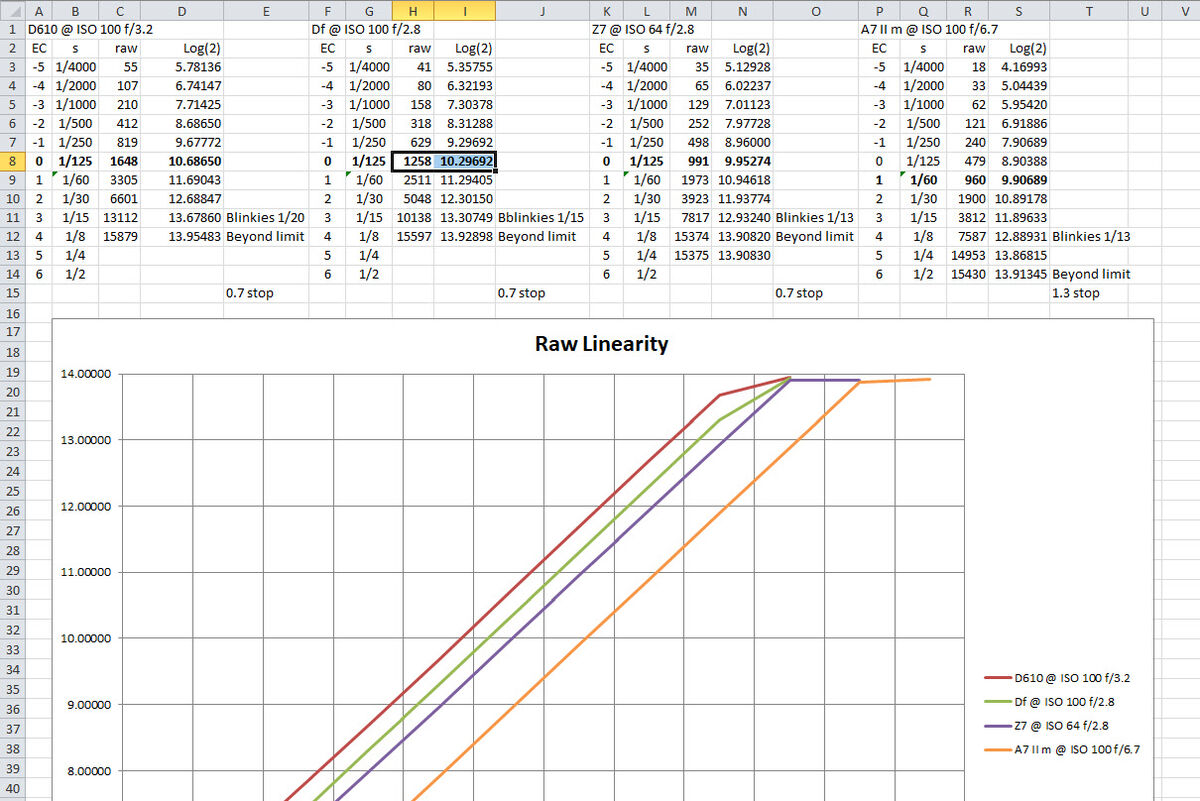
I have done a lot of testing using RawDigger looking for the onset of blinkies. Here are the results from one of these studies. For all three Nikons the blinkies start at about 0.7 stops before the green raw limit is reached. For the A7 II it's about 1.3 stops.
Oct 9, 2022 14:01:20 #
Ysarex
Loc: St. Louis
selmslie wrote:
Although that might seem to be happening I personally don't think it's something you should rely on.
There's nothing "might seem" about it. Highlight reconstruction is a function/feature of many raw processing apps. The green channel typically clips before the red and blue channels but in any circumstance where one channel clips ahead of the other two it's therefore possible to use the data in the two unclipped channels to reconstruct the clipped data. Different apps do this to greater/lesser degrees of success and as in anything available in the software and cameras we use it's up to the user to test and verify and decide if they want to apply it.
It's fine if you don't wish to personally rely on it but the "might seem" remark suggests the function may not be successfully doing what it's designed to do and that's not the case.
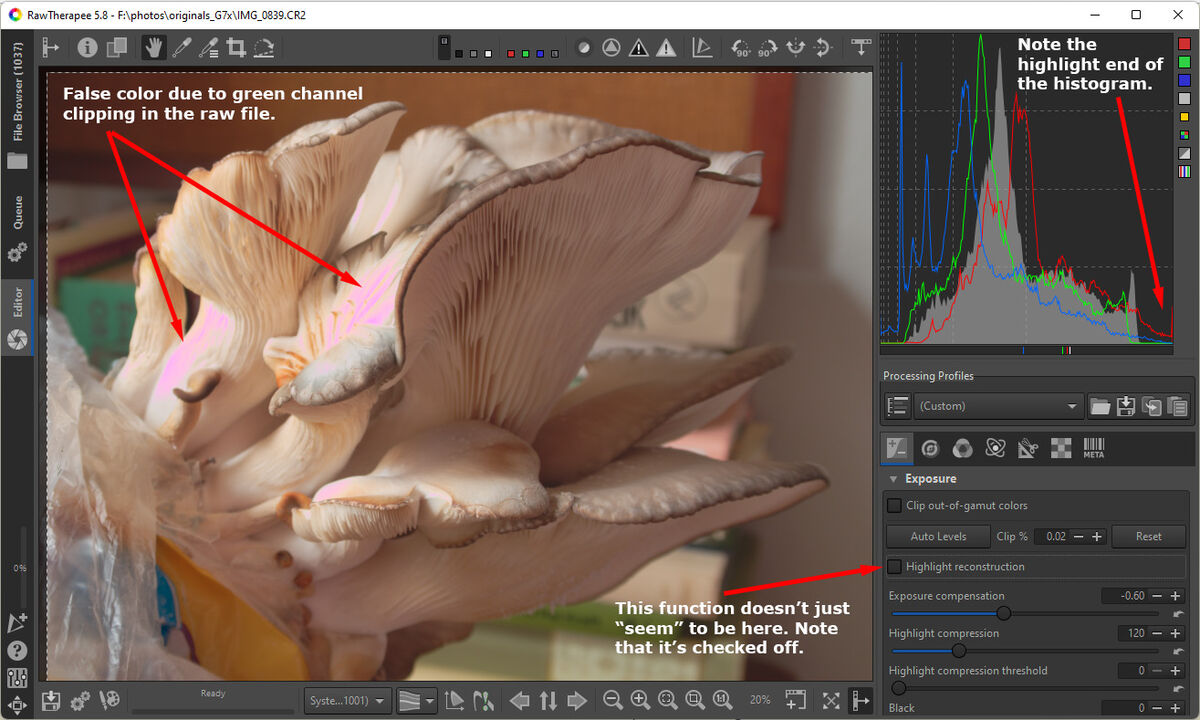
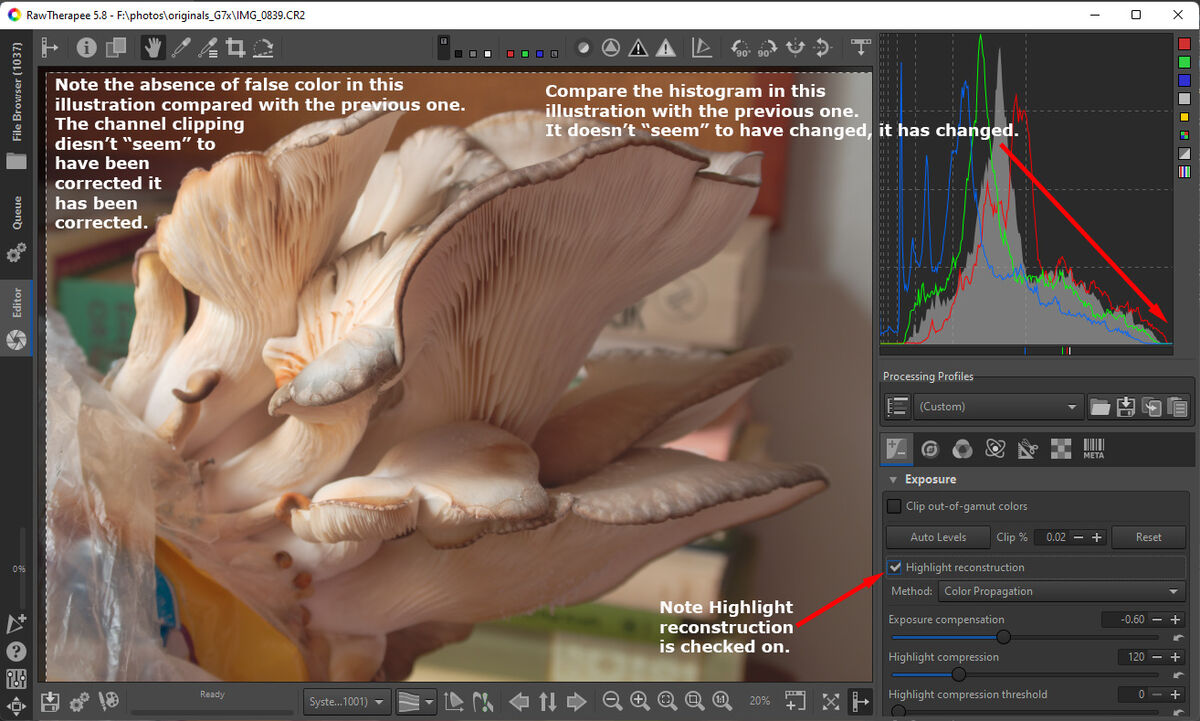
The raw file used in the two illustrations below has a clipped green channel on the brightest highlights of the mushroom. I used RT for the illustration because it makes the function discreetly available and names it correctly. RT provides a choice of 4 different highlight reconstruction algorithms that generate different results. It doesn't just "seem" to work -- it works well.
Oct 9, 2022 14:38:35 #
Ysarex wrote:
It's fine if you don't wish to personally rely on it but the "might seem" remark suggests the function may not be successfully doing what it's designed to do and that's not the case.
You might be able to find software like Darktable to do this but I would rather avoid that by not creating the problem in the first place. That's why I use the raw green channel as the control for avoiding blown highlights.
If I can't do it in Capture One without a plug-in I'm not interested in looking for another solution.
Oct 9, 2022 14:55:38 #
Ysarex
Loc: St. Louis
selmslie wrote:
You might be able to find software like Darktable to do this but I would rather avoid that by not creating the problem in the first place. That's why I use the raw green channel as the control for avoiding blown highlights.
If I can't do it in Capture One without a plug-in I'm not interested in looking for another solution.
If I can't do it in Capture One without a plug-in I'm not interested in looking for another solution.
Capture One handles highlight reconstruction seamlessly and better or as well as any of the other raw processing apps. You have the software that does the best job at highlight reconstruction. You are welcome to avoid using it and it's perfectly fine for you to say so. Your "might seem" comment however implied that highlight reconstruction functions may not do what they purport to do and that's not correct.
Oct 9, 2022 16:58:55 #
Ysarex wrote:
I get the exact same result from RawDigger with my Z7. Channel clipping occurs with a value of 15375. You're thinking the maximum value should be 16384 (2 ^ 14) but in practice it's usually a bit lower than the theoretical maximum.
Thanks for the clarification, I now know what I'm seeing in RawDigger is normal.
Oct 9, 2022 17:07:05 #
selmslie wrote:
I have done a lot of testing using RawDigger looking for the onset of blinkies. Here are the results from one of these studies. For all three Nikons the blinkies start at about 0.7 stops before the green raw limit is reached. For the A7 II it's about 1.3 stops.
I may also undertake some testing at some time of the blinkies now I have RawDigger. But I've found that with the aids we now have to set it right before taking the shot there is almost never a need to 'check' the result you got with respect to exposure.
Oct 11, 2022 10:31:39 #
Grahame wrote:
I may also undertake some testing at some time of the blinkies now I have RawDigger. But I've found that with the aids we now have to set it right before taking the shot there is almost never a need to 'check' the result you got with respect to exposure.
The live viewfinder histogram turns out to be no more useful than the others.
Here's how I tested the blinkies:
- I focused the lens at infinity and then switched to manual focus
- I set it to meter the spot at the center of the image.
- I displayed a calibrated white screen of an almost empty folder.
- On aperture priority, I took a series of shots starting at EC+2.7 through EC+4 in 0.3 stop increments.
- I noted where the image the blinkies started.
- In RawDigger, I displayed the first image and clicked on Selection/Set Selection by numbers.
- I centered the selection and set the width and height to 100 to measure the center of the area covered by the spot.
- I clicked Selection/Selection Histogram.
As I went through the series, the first one (EC+3.3) that corresponded with the start of the blinkies showed the green spike half way between 8000 and 16000.
The next one (EC+3.7) had more blinkies on the camera but the green channel was still below the limit.
The last one (EC+4) hit the raw limit of 15375 for the green channel. On the camera the entire image was flashing.
This confirms my prior testing which is, when you see blinkies you are very close to the raw limit.
I would bet that it applies to other cameras in the Z series and it's close to the results I got with a D610 and a Df although they end up a little lower than the Z7's EC+3.7.
Oct 12, 2022 08:07:24 #

selmslie wrote:
The live viewfinder histogram turns out to be no m... (show quote)
So for us less technically inclined, the takeaway is pay attention to the blinkies and try to make good photographs. Got it, I think.
Oct 12, 2022 09:41:35 #
Hip Coyote wrote:
So for us less technically inclined, the takeaway is pay attention to the blinkies and try to make good photographs. Got it, I think.
You still need to know what the blinkies are telling you for your particular camera.
The three Nikons I tested are consistent. The blinkies start about 0.7 stops before the raw green channel blows out.
In the A7 II they (and the Zebra warnings) start about 1.3 stops below the limit but that might be different for newer Sony models.
In the Fuji X100T and iPhones I tested (SE and 13 Pro), once you see blinkies the green channel is already blown out.
Those are the only models I can speak for.
If you are seeing blinkies and then having trouble recovering highlights then you probably need to do a little testing with your camera. You may not need to resort to RawDigger but it helps.
Oct 12, 2022 11:43:14 #
selmslie wrote:
You still need to know what the blinkies are telling you for your particular camera.
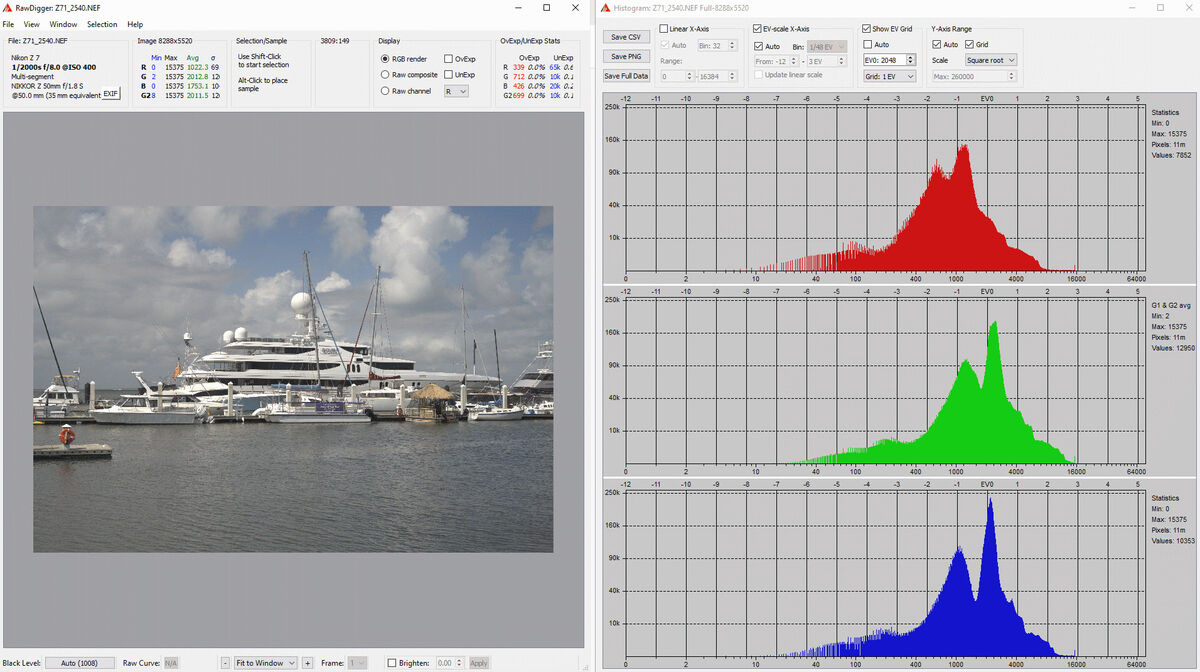
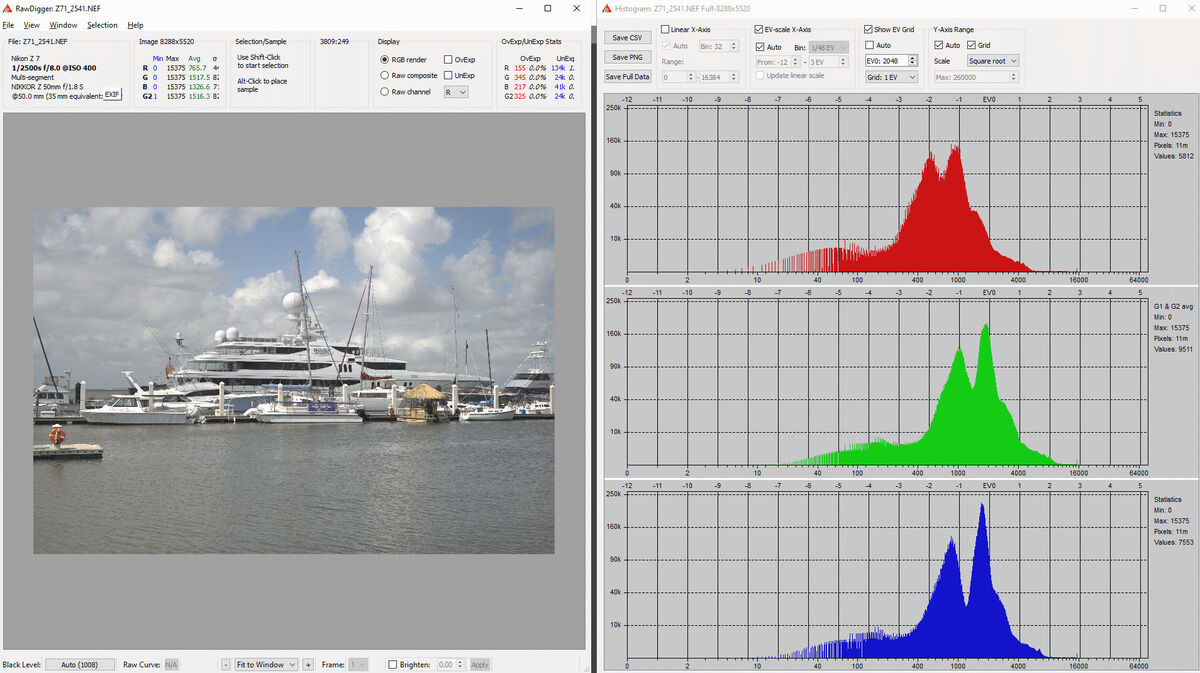
Here are two hand-held shots taken within a minute of each other. I noticed on the first image that there were some blinkies across the white fiberglass decks. Just to be sure that they were not significant, I reduced the exposure by 0.3 stop and took another shot. The second shot had no blinkies. That told me that the first shot was about 0.7 stops from the raw limit.
There are still a tiny number of blown specular highlights in both captures but that's OK.
1/2000s @ f/8 ISO 400 - LV 15
(Download)
1/2500s @ f/8 ISO 400 - LV 15.3
(Download)
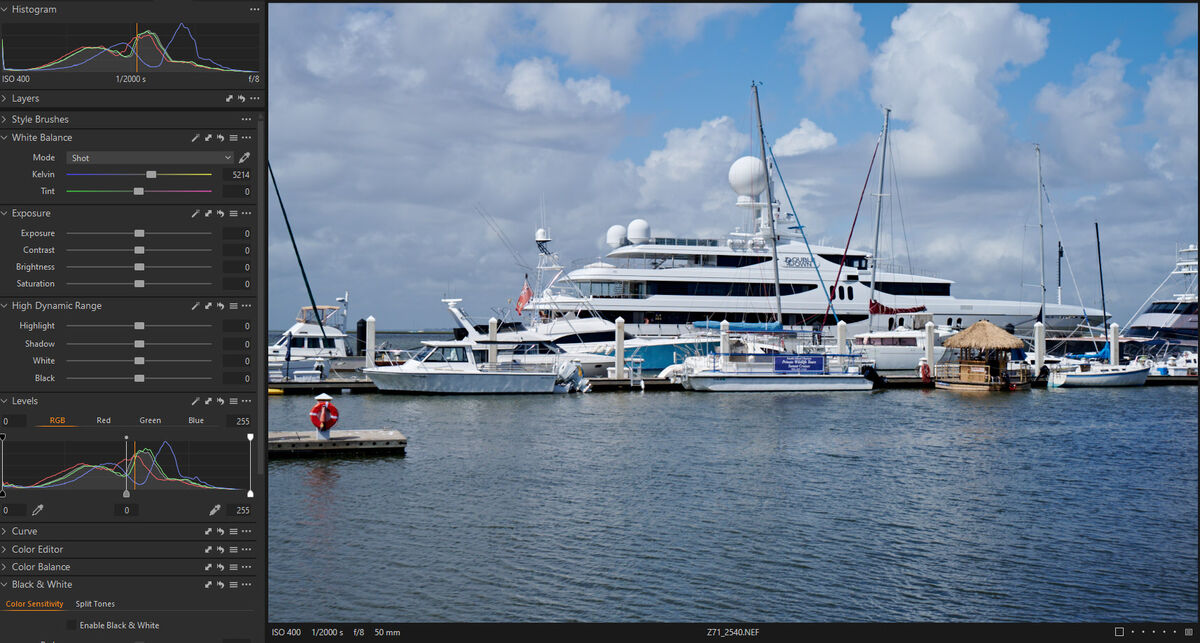
The first image with no adjustments (same as the JPEG SOOC if I had saved one)
(Download)
Oct 12, 2022 19:32:36 #
a6k
Loc: Detroit & Sanibel
While RawDigger is the premium tool, FastRawViewer can tell you where the overexposure begins with some minor increments and is also a very useful program for reviewing the results of a set of raw images. It is very good at quickly examining a bunch of images, can also show the matching JPG if there is one, can easily move the ones selected by the user to a reject folder. I use that feature in reverse, moving only the good ones to a "workonit" folder since I have fewer of those than of the rejects.
A few incremented exposures of a white monitor screen can quickly reveal the beginnings of clipping just as accurately as RawDigger because the underlying code is the same. In addition, the controls allow incrementing an exposure in the raw image, also showing clipping.
I use both products and they are both valuable. I just want, here, to point out the ease of use of FRV to get the same basic result without as much detail.
If you want to reply, then register here. Registration is free and your account is created instantly, so you can post right away.