How to help with Sun Haze????
Oct 5, 2022 18:30:38 #
Oct 5, 2022 19:23:07 #
Najataagihe wrote:
"In the mornings..."
First thing in the morning, everything is going to be blue.
The sun comes up and all the moisture from the dew and the ground starts evaporating, creating a light fog - especially, if the moisture is contained by trees.
By "light fog", I mean it doesn't even look like fog.
To cut through it, use a light yellow filter and correct the color in post-processing.
Good luck!
Do NOT use any filter. NONE. Also play it safe by ignoring entirely all the content of any posts from such phony experts.
Anyone who suggests adding more glass has no credibility in general. Mentally blacklist all such sources.
Oct 5, 2022 19:36:14 #

TommiRulz wrote:
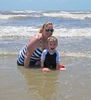
I am a horse show photographer, in the mornings the sun creates this crazy weird sun haze. Most the time I can fix it in post, but not always. I have attached some pictures so you can see. Do you guys know of a filter that might help with this?? Thanks for your time
I’m not sure if my advice can match the pros here. First off I would try to walk around and see if I can find a better vantage point. Most often I use a circular polarizing filter in a situation like this. I would try a wide angle lens with few elements. That might help. If I am incorrect in my advice, please critique me so I can better understand.
Oct 5, 2022 21:25:23 #
Scruples wrote:
I’m not sure if my advice can match the pros here. First off I would try to walk around and see if I can find a better vantage point. Most often I use a circular polarizing filter in a situation like this. I would try a wide angle lens with few elements. That might help. If I am incorrect in my advice, please critique me so I can better understand.
Okay. Polarizer: Thaz a double loser. It has waaaay too much glass and has no pictorial use cuz the sun is at the wrong angle for any effect.
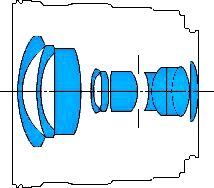
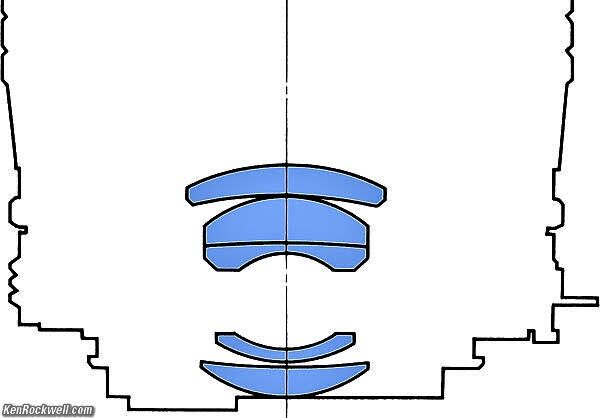
Next. Wide angle lenses: Usually built with large curvatures and many more elements than longer lenses. Again too much glass just begging for flare. Also near impossible to fit an effective hood.
~~~~~~~~~~~~~~~~~~~~~~~
The most likely ideal candidates for shooting into the morning sun are Sigma 45/2.8 and 90/2.8 ... for reasons already covered in the thread. These do not fit every camera, but they do fit the most appropriate cameras.
If forced to use a wide lens, Sigma has a 24/3.5. Hard to find an f/3.5 wide angle these days !
I have no special loyalty to Sigma. They just happen to have a line of rather conservative AF prime lenses that no one else offers.
Oct 5, 2022 21:59:47 #
User ID wrote:
Okay. Polarizer: Thaz a double loser. It has waaaay too much glass and has no pictorial use cuz the sun is at the wrong angle for any effect.
Next. Wide angle lenses: Usually built with large curvatures and many more elements than longer lenses. Again too much glass just begging for flare. Also near impossible to fit an effective hood.
Next. Wide angle lenses: Usually built with large curvatures and many more elements than longer lenses. Again too much glass just begging for flare. Also near impossible to fit an effective hood.
Thank you for clarifying those points. I thought a CPL would help. Obviously I am in error. As for a wide angle lens I actually thought that it too has fewer elements. I appreciate your advice and insight.
Oct 5, 2022 22:42:06 #
Scruples wrote:
Thank you for clarifying those points. I thought a CPL would help. Obviously I am in error. As for a wide angle lens I actually thought that it too has fewer elements. I appreciate your advice and insight.
Oct 6, 2022 03:42:26 #
TommiRulz wrote:
THANK YOU - very good advise - I tried fixing the bay horse in post but it did not look as good as yours.... I will play with your tips today and see if I can get it better. THANKS again
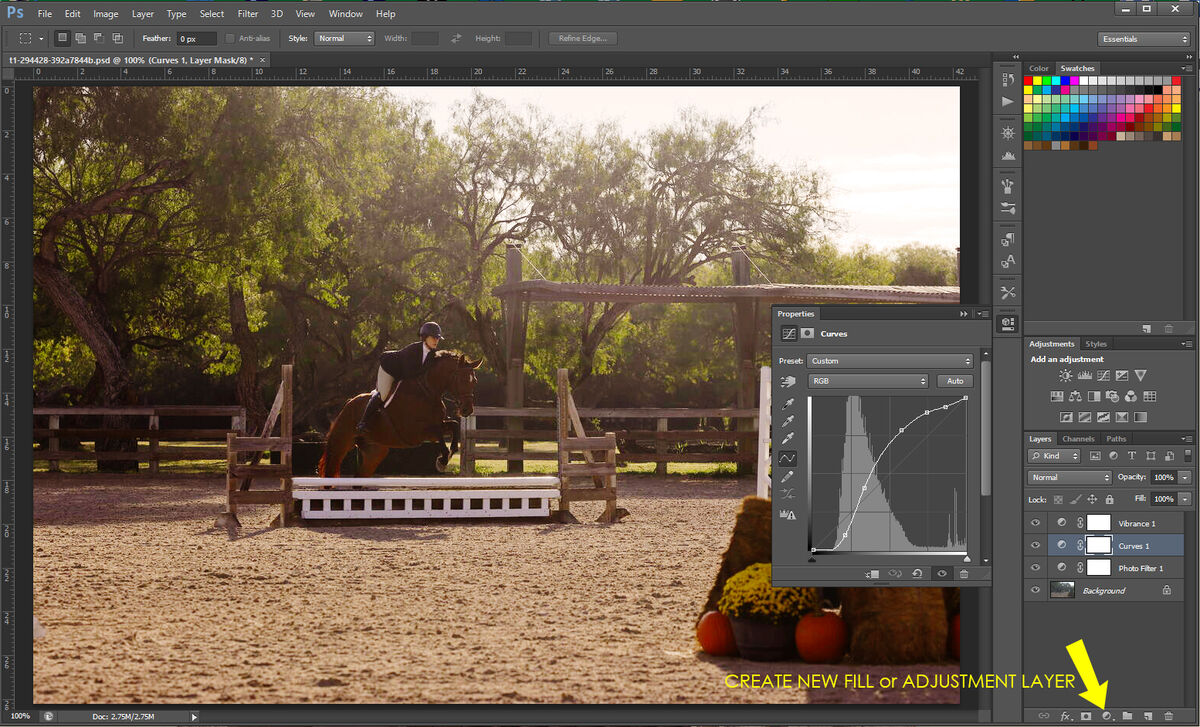
Here are the actual adjustment on one of the photos.
In Photoshop:
1. click the "Create new fill or adjustment layer"
2. choose the adjustment you need
3. apply the adjustment as per you see fit.
The adjustment layers are called "non destructive edit" meaning, any changes in them are not fixed and do not change the original image. You can keep playing with them without any problem But when you save to jpeg you can accidentally overwrite the original. So when you open the image in photoshop, immediately save it as PSD with a different file name. Maybe just add the letter e (for edit)in the file name so they will sit side by side in the folder list. This is to prevent accidentally writing over your original file.
Note that each adjustment layer affects everything under it. How you arrange them (which one is on top or under) can create a different outcome.
With variables too easy to mix up, understanding what each adjustment brings into play is important, to avoid wild guessing and waiting for luck.
Since we were dealing with haze, we;
A. Use the warming filter to subdue the blue tint/balance the color
B. Use the S-curve to finely adjust the light to dark zones of the image, with the aim of creating more contrast hence maximising the visibility of details
C. Use the Vibrance to increase the contrast within the colors, and the Saturation to make the colors more vivid.
In a nutshell we did 4 things.
a, balance the color to remove the blue tint.
b, adjust the levels to bring out tonal contrast and details
c1, adjust the color depth to bring out color contrast
c2, Adjust the saturation to bring out more color
Please note that this is just one way to skin the proverbial cat. Different images may require a different approach and usually with PS, many ways are possible to get the same/similar result.


Oct 6, 2022 04:18:53 #

Wallen wrote:
.....balance the color to remove the blue tint.....
You have made the very useful observation that haze very often has a pronounced blue tint. My preferred method of using that fact is to use the HSL tool to darken and desaturate blue. If there's a lot of blue sky in the shot there'll be a limit to how far you can go with that technique, but it's so effective it's worth applying it even if it's just partial. I've often gone to the extent of desaturating and darkening blue globally then selecting the sky, water or whatever and reintroducing blue to replace what was lost in those parts. Moderate use of split toning can also be used to strengthen a diminished ambient colour (with the technique just described that would be mostly in the highlights).
Again you make the useful observation that haze causes a loss of contrast, sharpness, detail and saturation. I find that a combination of Contrast (mostly) and Clarity (tweaks) is best for dealing with the loss of contrast. The HSL tool allows colours to be strengthened individually as required.
One of the more effective adjustments that you can make to reduce haze is to lower the highlights (and to a lesser extent the mid tones if you have that option). The effect of the Shadows slider usually extends up into the mid tones so lifting the shadows too high can aggravate haze in a way that's difficult to mitigate.
But since most editors nowadays have a Dehaze slider, that's the best single slider adjustment. Often with an extreme adjustment of Dehaze the blacks become too pronounced and solid, which can be mitigated by moving the Blacks slider to the right a little. Plus if you apply adjustments via selections you can avoid aggravating haze by simply avoiding it, or alternatively avoid problems elsewhere by limiting your adjustments to the haze itself. Global adjustments will always be more limited in that scenario.
Oct 6, 2022 05:16:26 #
TommiRulz wrote:
I am a horse show photographer, in the mornings the sun creates this crazy weird sun haze. Most the time I can fix it in post, but not always. I have attached some pictures so you can see. Do you guys know of a filter that might help with this?? Thanks for your time
You could try using a tripod and a cable release. That way you could get the camera set up and then stand beside it with the cable release. That way the horses won't see you lurking behind your camera - which from their point of view probably looks a bit threatening. You could even lean against the fence just like all of the other spectators so the horses will be none the wiser. My other advice would be to stand in shadow if possible, to avoid getting direct sunlight on the lens. My other other advice would be to use silent mode if you have it.
Oct 6, 2022 05:41:44 #
R.G. wrote:
You have made the very useful observation that haz... (show quote)

There really are many ways to tackle the haze problem.
Prevention is always a top answer, and the simplest solution a close second. Although it is best to
understand the cause or fault because that will lead to knowing how to prevent it (or making it happen as a favored effect) and if unavoidable, which tool or tools can provide a solution.
Giving one options or preferred workflow.
Oct 6, 2022 08:01:06 #

TommiRulz wrote:
Hey Everyone - thank you so much for all the advice !!!! I tried moving to the back of the arena, but it was spooking the horses, so I had to come back to the front. I do use a huge lens hood, and I can usually fix in post but sometimes it looks weird. I hate to admit this, but I do know how to open RAW files on my computer. So far the jpegs have been good enough. I will buy a haze filter today and give that a try. THANKS AGAIN -- You all are awesome
If you can find a spot that shades the front element of your lens...I think this is caused by the sun shining on your lens.
Oct 6, 2022 08:10:20 #
rlv567 wrote:
Yes, just tell the show to reposition everything so you can get good shots!!! Then there will be no problem.
Loren - in Beautiful Baguio City
Loren - in Beautiful Baguio City
Right!!! No problem... ha ha
Oct 6, 2022 08:11:52 #
burkphoto wrote:
Many things can create this hazy look. br br b &... (show quote)
Thank You so much!!! Love all of this
Oct 6, 2022 08:16:28 #
Alphabravo2020 wrote:
This happened to me on a recent shoot when I took ... (show quote)
ha ha I live in South Texas.... the hottest and most humid place in the world... I have learned the hard way that my cameras can't come inside at night during busy weekends.... They have a very safe place in my garage else I will lose an hour in the mornings defogging
Oct 6, 2022 09:02:23 #

If you want to reply, then register here. Registration is free and your account is created instantly, so you can post right away.