Triptych
Apr 27, 2022 21:37:16 #

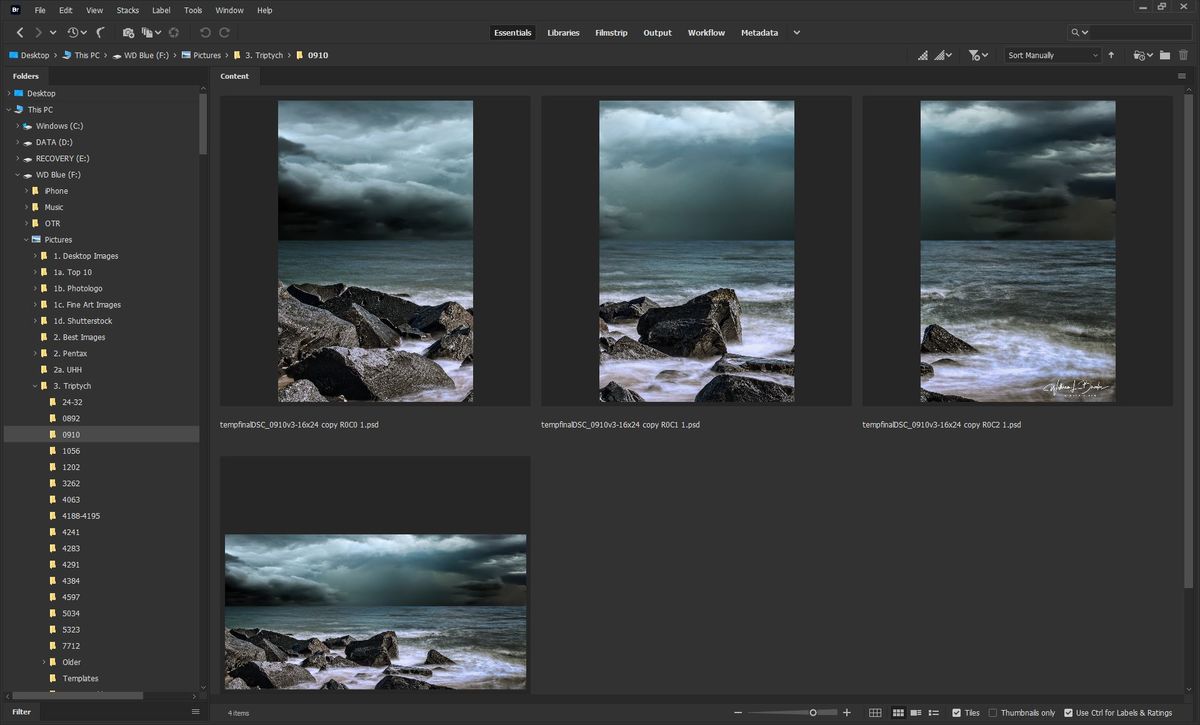
I've looked all over for a triptych program. It can be done in lightroom, supposedly, but I can not figure it out. I have a photo I want to split into three pieces, but it only accepts three different photos (I can manually split the photo and add it), but this is time consuming.
I'm having bay photo do one for me, and I thought I had done it correctly, but they had to change it, as a custom one, which I can now do, but again time consuming.
I saw something, a program from a printer service, somewhere once, that all you have to do is upload the photo and it does the dividing automatically. This is what I'm looking for.
Lightroom has some templates, but you have to divide the photo first, and add the three parts as separate images.
Apr 27, 2022 22:13:35 #

PhotoSplit and ImageSplitter are two programs that will do this. Here's the Googe search I did:
https://www.google.com/search?q=program+to+split+photo+into+3&client=avast-a-1&sxsrf=APq-WBsU2xFa9Y09GmXPl6c8_7pU2DW8BA%3A1651111831913&source=hp&ei=l_dpYoGwNOKJptQP0pW26Ag&iflsig=AHkkrS4AAAAAYmoFp51OL1H-3sbFgvbSr_0ITuiNgeU1&oq=program+to+split+photo+&gs_lcp=Cgdnd3Mtd2l6EAEYBTIFCCEQoAEyBQghEKABMgUIIRCgATIFCCEQoAEyBQghEKsCMgUIIRCrAjIICCEQFhAdEB4yCAghEBYQHRAeMggIIRAWEB0QHjoECCMQJzoRCC4QgAQQsQMQgwEQxwEQ0QM6CwgAEIAEELEDEIMBOg4ILhCABBCxAxDHARCjAjoICC4QgAQQsQM6CAguEIAEENQCOggIABCABBCxAzoLCC4QgAQQsQMQ1AI6CwguEIAEELEDEIMBOgUIABCABDoOCC4QgAQQsQMQxwEQ0QM6BQgAELEDOgoIABCxAxCDARAKOgsILhCABBDHARCvAToLCAAQgAQQsQMQyQM6BQgAEJIDOggIABCABBDJAzoGCAAQFhAeOgUIABCGA1AAWK9NYO1yaABwAHgAgAF_iAGeEpIBBTExLjEymAEAoAEB&sclient=gws-wiz
https://www.google.com/search?q=program+to+split+photo+into+3&client=avast-a-1&sxsrf=APq-WBsU2xFa9Y09GmXPl6c8_7pU2DW8BA%3A1651111831913&source=hp&ei=l_dpYoGwNOKJptQP0pW26Ag&iflsig=AHkkrS4AAAAAYmoFp51OL1H-3sbFgvbSr_0ITuiNgeU1&oq=program+to+split+photo+&gs_lcp=Cgdnd3Mtd2l6EAEYBTIFCCEQoAEyBQghEKABMgUIIRCgATIFCCEQoAEyBQghEKsCMgUIIRCrAjIICCEQFhAdEB4yCAghEBYQHRAeMggIIRAWEB0QHjoECCMQJzoRCC4QgAQQsQMQgwEQxwEQ0QM6CwgAEIAEELEDEIMBOg4ILhCABBCxAxDHARCjAjoICC4QgAQQsQM6CAguEIAEENQCOggIABCABBCxAzoLCC4QgAQQsQMQ1AI6CwguEIAEELEDEIMBOgUIABCABDoOCC4QgAQQsQMQxwEQ0QM6BQgAELEDOgoIABCxAxCDARAKOgsILhCABBDHARCvAToLCAAQgAQQsQMQyQM6BQgAEJIDOggIABCABBDJAzoGCAAQFhAeOgUIABCGA1AAWK9NYO1yaABwAHgAgAF_iAGeEpIBBTExLjEymAEAoAEB&sclient=gws-wiz
Apr 28, 2022 06:45:21 #

The link mess above by revhen in short form is
https://apps.apple.com/us/app/photosplit-for-instagram/id1210179946
But... if on a desk or laptop computer vs phone there are programs... some free:
https://moviemaker.minitool.com/moviemaker/image-splitter.html
"PhotoScape is a free photo editing software using which you can split images on Windows 10. Along with several image editing features, it provides an image splitting feature that enables you to tile images into multiple parts. A dedicated Splitter tool is available in it to easily split images into multiple sections."
https://simplyphotoscape.wordpress.com/tag/photoscape-splitter/
Apr 28, 2022 08:38:04 #
These are the links I have -
http://www.adorama.com/alc/0013914/article/Shooting-a-Triptych-Ep-109-Take-Make-Great-Photography-with-Gavin-Hoey-Adorama-Photography-TV
http://www.photofiltre-studio.com/pf7-en.htm
http://www.makeuseof.com/tag/how-to-easily-and-automatically-create-diptychs-and-triptychs-in-photoshop/
http://www.adorama.com/alc/0013914/article/Shooting-a-Triptych-Ep-109-Take-Make-Great-Photography-with-Gavin-Hoey-Adorama-Photography-TV
http://www.photofiltre-studio.com/pf7-en.htm
http://www.makeuseof.com/tag/how-to-easily-and-automatically-create-diptychs-and-triptychs-in-photoshop/
Apr 28, 2022 09:57:41 #
Of Course, KIS, Keep it Simple would be to use the canvas and image resize followed by cropping the wide photo into 3 separate photos. Keep the original and label the cropped photos L Mid Rt. This is in keeping with what Frank asks, "I have a photo I want to split into three pieces,"
Going along with UHH question-asking habit of not supplying information when asking questions we have no idea if this is a panorama or a 10inch tall 9" wide photo that he wants 3" wide photos; I bet not.
Frank, we do not read minds... what size photo are you talking about... perhaps you could upload it and we could play with it! Please, click post the original.
Apr 28, 2022 11:44:59 #
JFCoupe
Loc: Kent, Washington
I learned how looking at You Tube videos.
In LR, select your three images.
In the Print module, under the area where you select the print size and margins, there is a question about the number of rows and columns. Select one row and three columns.
Below that where you select the paper choice (for ICC profiles) there is the option to go to the printer or file. Select file and effectively export the triptych to your Pictures folder on your computer.
If you want to print, you can import the back into LR or PS and print as normal.
This is a really basic instruction from memory, as I am not at my desktop machine and can't be more precise. Again, You Tube can be a great resource on How To.
Apr 28, 2022 14:41:47 #

Hi Frank. I printed a bunch of tryptics for a school as artwork for their walls. I found On1 Resize worked well and was much simpler than some other methods I used previously. I am attaching the original image and the 3 photo slices.
Hope this is helpful.
Hope this is helpful.
Apr 28, 2022 22:08:23 #
Thanks all for your replies. I can do this in photoshop as easy as pie, for a three panel of equal sizes. But when it comes to, say the middle one a different size, it takes a lot more work to get it to look right. So, what I was looking for was a plug n play so to speak. I saw a site somewhere, sometime ago, that all you have to do is set the sizes and then just drag and drop the photo on the grid on the grid and it did the work. I guess you could say I'm getting lazy.
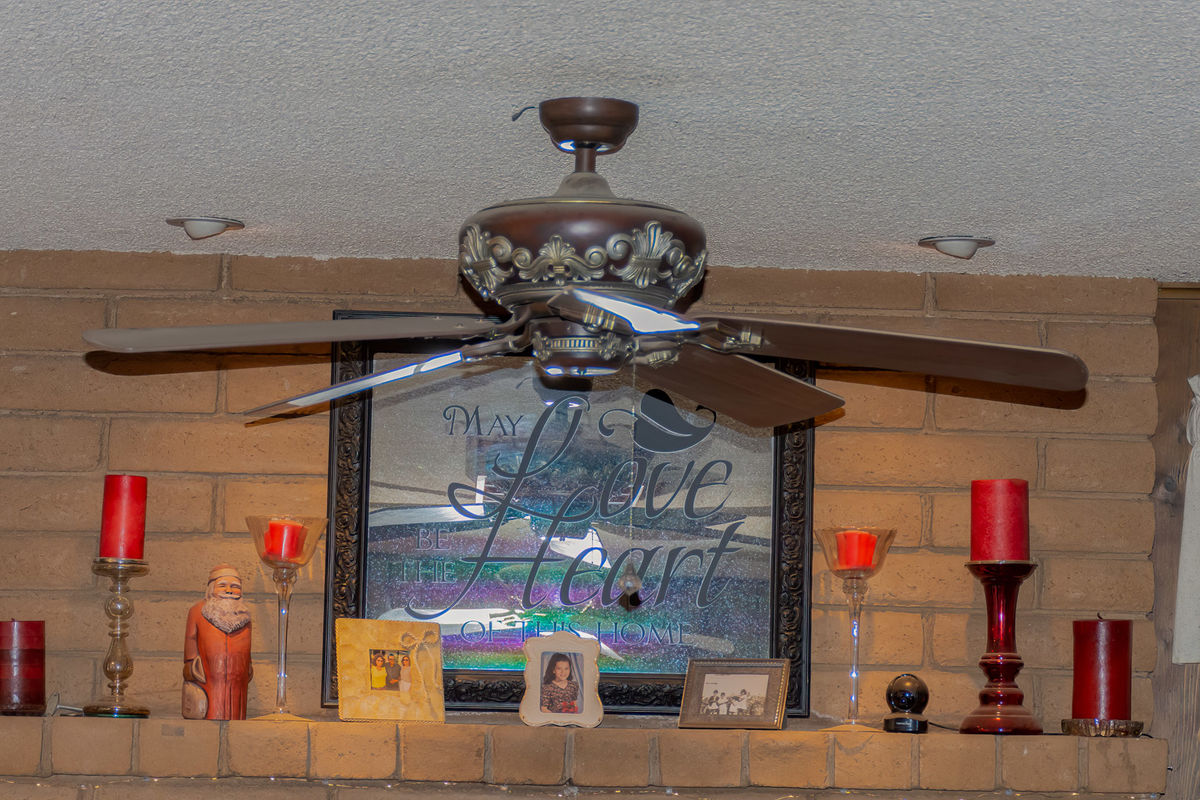
I had bay photo print me one on acrylic of a photo I posted here a week or so ago. Here it is. 30x20. going over the fireplace to replace a mirror. It was my wifes idea.
I had bay photo print me one on acrylic of a photo I posted here a week or so ago. Here it is. 30x20. going over the fireplace to replace a mirror. It was my wifes idea.

Apr 28, 2022 23:18:01 #
Apr 29, 2022 02:52:19 #
Order a 30x20 print.
Cut it into 3 10x20 'slices'
Frame them, mat them, whatever.
Hang 'em on the walk.
Admire & enjoy.
Easy peasy
Cut it into 3 10x20 'slices'
Frame them, mat them, whatever.
Hang 'em on the walk.
Admire & enjoy.
Easy peasy
Apr 29, 2022 10:52:40 #
larryepage
Loc: North Texas area
twowindsbear wrote:
Order a 30x20 print.
Cut it into 3 10x20 'slices'
Frame them, mat them, whatever.
Hang 'em on the walk.
Admire & enjoy.
Easy peasy
Cut it into 3 10x20 'slices'
Frame them, mat them, whatever.
Hang 'em on the walk.
Admire & enjoy.
Easy peasy
I've learned that there is one more step. When you make the cuts, it is necessary to decide whether to print the complete surfaces of all three sections, or whether to remove strips of the image where the cut is made...as if portions of the image are blocked by "mullions" in a window. Sometimes not doing this can result in images that don't sit well together, maybe even to the point of being disconcerting when the pieces don't fit anymore.
Apr 29, 2022 15:33:07 #
larryepage wrote:
I've learned that there is one more step. When you make the cuts, it is necessary to decide whether to print the complete surfaces of all three sections, or whether to remove strips of the image where the cut is made...as if portions of the image are blocked by "mullions" in a window. Sometimes not doing this can result in images that don't sit well together, maybe even to the point of being disconcerting when the pieces don't fit anymore.
This it true Larry. Once divided and separated by 1 inch, some ot the lines etc. may not line u so some, 1/2", on each side needs to be trimmed. For a 30x 20 photo, the canvas needs to be 32x20 with the 0ne inch separation. The eye will make up the missing 1 inch.
Apr 29, 2022 15:34:36 #
Apr 29, 2022 15:40:18 #
twowindsbear wrote:
Order a 30x20 print.
Cut it into 3 10x20 'slices'
Frame them, mat them, whatever.
Hang 'em on the walk.
Admire & enjoy.
Easy peasy
Cut it into 3 10x20 'slices'
Frame them, mat them, whatever.
Hang 'em on the walk.
Admire & enjoy.
Easy peasy
Not quite that easy.....it will not look right unless you trim 1" off the two seams (1/2 inch on each piece). The left panel will need to be trimmed 1/2 inch on the right, the right panel would need to be trimmed 1/2" on the left, and the center 1/2" on each side, for the photo to look right. The eye makes up for the missing pieces. Otherwise, yes if you want to frame an image, that would work. But it will not work for any other material. I used acrylic for the above photo, which gives the photo more depth. Some things look great in on metal, such as landscapes.
May 14, 2022 19:44:21 #
so.......i got it back.....they did a good job.
Here is the mantel before and after.
After I got it hung, I realized it is a little high. I centered it on the area, but it needs to be lowered about 5-6 inches. This will put the middle part on a joint, which I can not put the hanger on. It's hard to see, but this is an adobe brick wall with joints. If I put a wood strip on the wall it will show more than the brick, and will not be flat on the wall, but farther out at the top.
I may just leave it. It can be seen as you enter the front door, but the fan is in the way until you get closer. My wife wants in on the mantel, but I don't think it goes good there?
If you want to reply, then register here. Registration is free and your account is created instantly, so you can post right away.