Cupped 35mm Film
Feb 16, 2022 16:41:57 #
I have 1000 -2000 35mm pictures that I want to scan. They are in 5 frame strips and cupped 3/16". I have decided to digitize these with a DSLR w/ macro lens so dof is my problem. I will process them with Negative Lab Pro. The 2 frame holder I have does not straighten them sufficiently to process (Epson's 4990 scanner 35mm film holder and a home made holder that pins the film firmly). I have not bought the Lomography DigitaLIZA. I am looking for recommendations how I can straighten them adequately and quickly. Help.
Feb 16, 2022 17:27:33 #

I have scanned negatives from my mother that have an assortment of curls to them. I got a piece of glass about 10"x7" taped the edges to protect my fingers. To do the scan, I place the negatives under the glass to hold them flat then proceed. I also have film holders just don't do the job.
Feb 16, 2022 21:29:13 #
Feb 16, 2022 21:48:07 #

Alan361 wrote:
Thanks, I will get some glass and try.
You may find that the glass sandwich produces Newton’s rings. This link addresses the issue using anti Newton glass: http://www.betterscanning.com/scanning/insert35.html
You can Google “anti Newton glass” for other sources and alternatives
Feb 17, 2022 05:38:16 #

I'll second Better Scanning.
--Bob
--Bob
TriX wrote:
You may find that the glass sandwich produces Newton’s rings. This link addresses the issue using anti Newton glass: http://www.betterscanning.com/scanning/insert35.html
You can Google “anti Newton glass” for other sources and alternatives
You can Google “anti Newton glass” for other sources and alternatives
Feb 17, 2022 07:22:27 #
I used a PlusTek 8200I for several hundred a couple years ago, but have trouble getting it to work with Windows 10, and with Vuescan as a substitute driver. I am now using my big Epsom 600. On both, the negative holders themselves are not strong enough to take out the curl, but the slot in the PlusTek, and the weight of the Epsom lid seem to do the job. I just found another few hundred, left over from my B&W developing days and small kids. Just opened my new Nikon 850--what a different concept!
Feb 17, 2022 09:03:01 #
Alan361 wrote:
I have 1000 -2000 35mm pictures that I want to sca... (show quote)
Yup, I have done it the same way more or less as Wjones, with a sheet of glass with the edges taped over. There are a few ways that the copy can be actually taken. 1) Using a flat bed scanner like an Epson 600 or other model; a sheet of glass cut large enough to cover your strips of 35mm or 6cm negatives or transparencies, with a bit of excess glass for taping the edges. From my experience the scanning software will not scan automatically each frame with out the scanner film holder frame/tray, so you would have to play with PP a bit or copy each film image one at a time and like not more than two strips of film at a time. [I have an Epson V850 and so can scan an entire 8x10" area or negative. My other V500 is much more limited] 2) Using a camera, place film on a film / slide sorting light box with a translucent top; place an edge taped sheet of glass over the film; using a tripod and needed accessories aim straight down on the the film frame and crop tight. Take a digital image copy of the negative.
From personal experience I have found copying using a scanner pretty easy but the issue of dust. Copying with a digital camera I have found to be OK for B&W Negatives, Color Transparencies, and Prints, but not Color Negatives. One really needs the scanner software to reverse the masked color of color negative film. I have made digital copying of many sorts and sizes over the years. And have employed a several methods depending on the equipment I had available. That has grown over the years. The high end professional V850 Pro comes with glass covered film carriers. That can be a pain with four glass surfaces to keep clean, plus two more with the scanner bed and lid. I do lots of brushing and air blowing.
I agree with the other UHH'ers suggestion of using a piece of glass but wrote more for other readers benifit.

Feb 17, 2022 11:33:23 #
NC Dave
Loc: North Carolina
"Glass sandwiches" are good for holding curly negatives. Consider using glass from an old flat bed scanner (everyone has several of those, right ?) because it probably already has anti-reflective qualities.
Feb 17, 2022 13:37:13 #
I appreciate all of your responses.
Every day I read items of interest and amazed with the insight and knowledge you all put forth.
Thanks
Every day I read items of interest and amazed with the insight and knowledge you all put forth.
Thanks
Feb 17, 2022 14:00:00 #
While anti -newton ring glass sandwich will provide the 'flattest result' (along with n anti tactic cloth or brush to make your life easier).
If you have an old 35mm enlarger negative carrier , you can easily file it slightly oversize (many cropped the image area slightly) you can get pretty flat results with no glass surfaces to worry about. You still have to carefully clean the negatives. I have even used masks cut from 4 ply black mat board in a pinch.
If you take the time to construct a negative 'stage' that holds everything securely and allows you to change negatives without having to completely refocus, & back it up with a good small LED light source, you can move along quite quickly. I shot Tethered to the computer with Canon Utility software and it worked very well ( live view focus on a big screen)
good luck
Feb 17, 2022 14:35:15 #
MJPerini wrote:
While anti -newton ring glass sandwich will provid... (show quote)
Yes, a glassless negative carrier does a good job, and if you can find one of the carriers that allows you to load an entire 35mm roll, and advance it a frame at a time, so much the better.
Curious about a couple of film to digital questions:
Has anyone experimented with projecting the image from an enlarger onto a scanner (perhaps with a ground glass instead of the cover in transparency mode)?
And secondly, in the opposite direction (digital to analog), has anyone tried mounting a digital projector (perhaps with a different lens) on an enlarger column in place of the enlarger head, projecting an image onto photo paper to expose a silver print?
Feb 17, 2022 15:07:09 #

Alan361 wrote:
I have 1000 -2000 35mm pictures that I want to sca... (show quote)
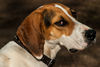
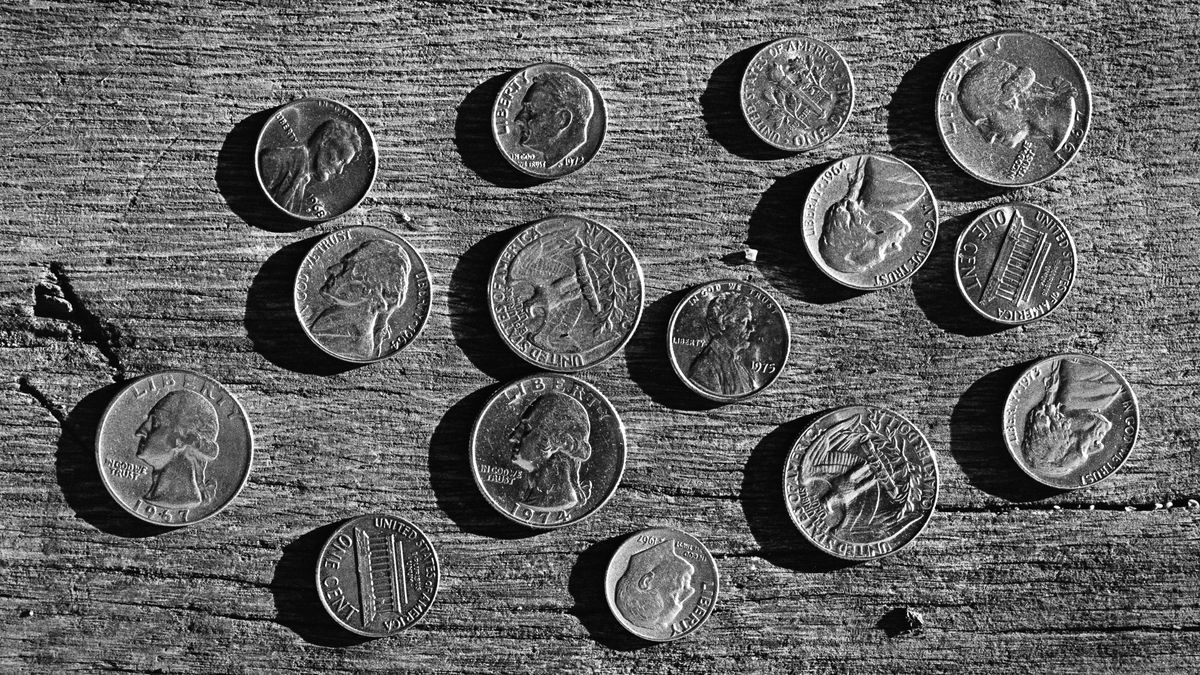
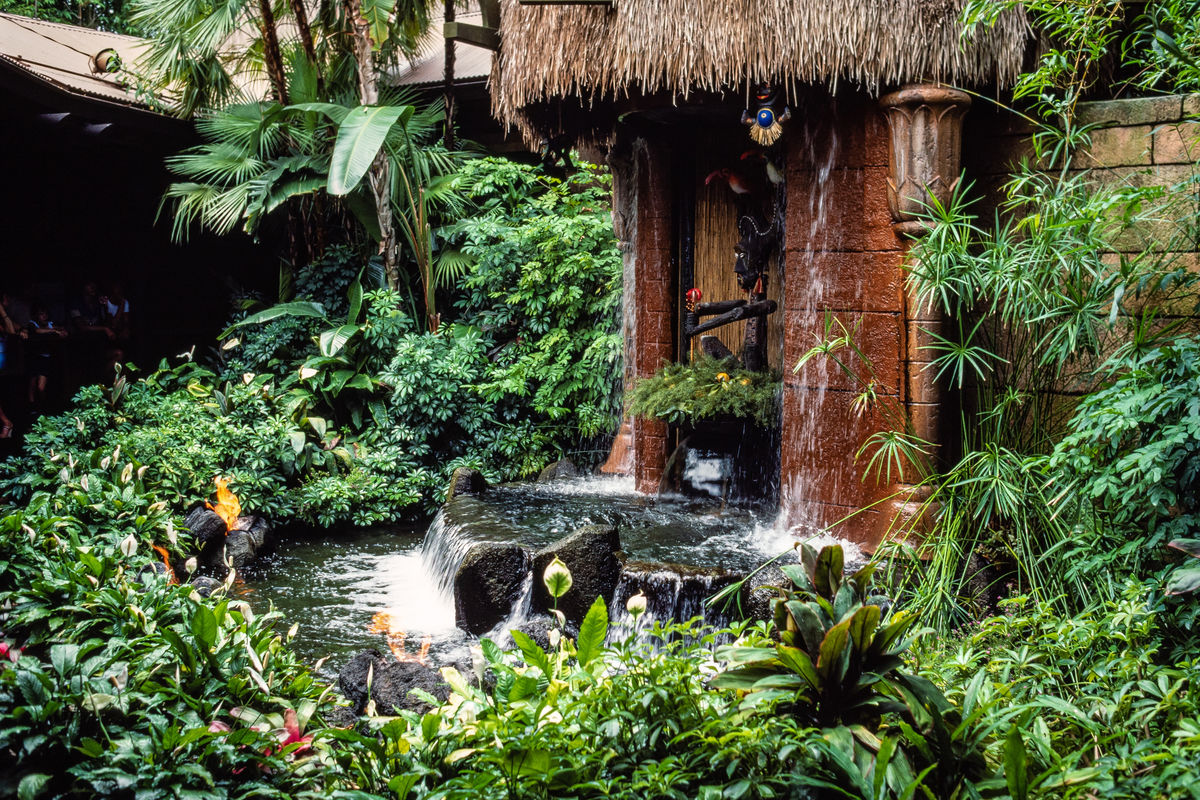
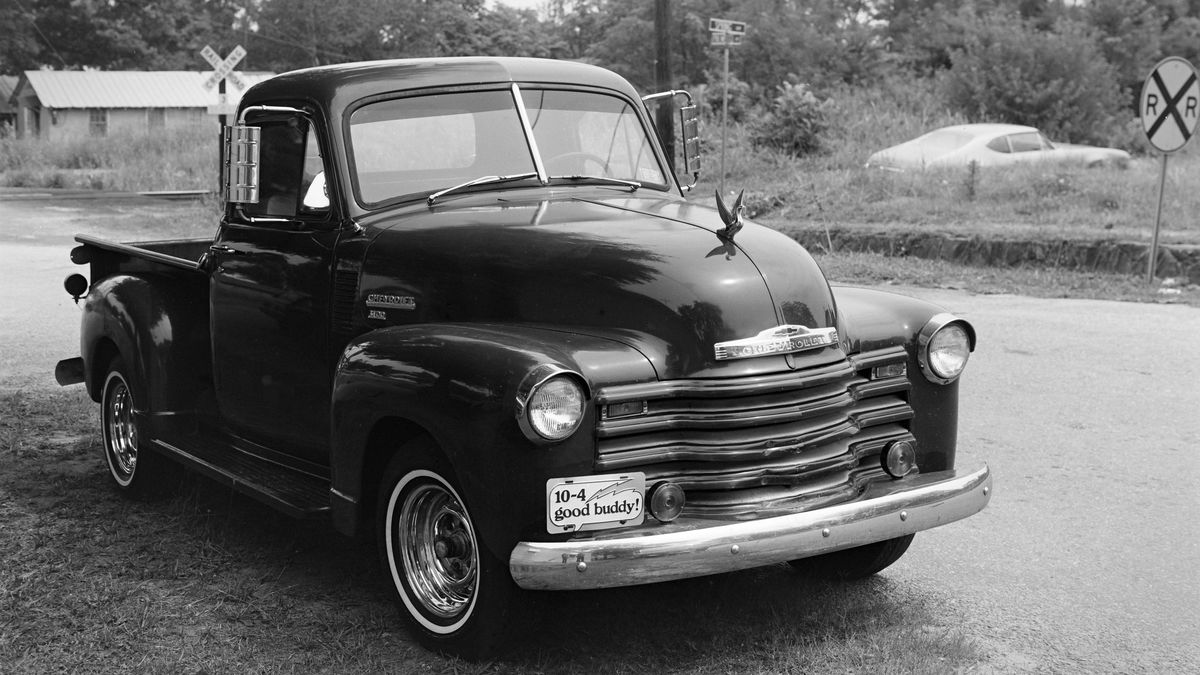
Please read the attached PDF white paper. It's how I do it.
Below the PDF attachment is a 35mm Tri-X image, camera scanned with the setup described in the paper.
Below that is a 35mm Kodachrome 64 slide image, camera scanned with the setup described in the paper.
Last is a 35mm H&W Control VTE film image, camera scanned with the setup described in the paper.
Feb 17, 2022 15:20:35 #
lamiaceae wrote:
Yup, I have done it the same way more or less as W... (show quote)
Mike, color negatives respond well to Negative Lab Pro processing in Lightroom Classic. Here's a straight sample from a 1979 negative (I did a little dust spotting, but that's all). Notice that it has some uneven color shifts in the dye layers. There is a bit of a yellowish green cast in the center of it.

Feb 17, 2022 15:43:52 #
TriX wrote:
Yes, a glassless negative carrier does a good job,... (show quote)
The solutions in my white paper, attached a few posts above this, work great. If you go to the link in the PDF that explains the Essential Film Holder, Andrew explains why his device is probably the best compromise between price and quality. You can buy commercial units for $1000 and up that advance a roll of film through a gate above a light source. They don't work well for strips. Nearly all the inexpensive solutions such as scanner film holders and the "Digitaliza" don't hold the film flat enough, or subject it to too much dust. The EFH does need a strip of four 35mm full frame negs, but I show a workaround for that.
In 1994, at what was then Delmar Studios' lab, our electronics shop experimented with putting a digital projection device into one of our optical printers, and projecting it onto paper using the existing multi-up portrait printing lens decks. It was a complete failure, because the technology for color management was not there at the time. It had a very low resolution — 1024 x 768 pixels. That doomed it as well.
Back in the 1980s, I used a setup that featured an *inverted* Beseler 4x5 enlarger color head. Above that was a "film compound" — a device that held either a strip of film on registration pins, or a slide in a clamp set. You could move the film or slide in 0.001" increments, both horizontally and vertically. Above that, was a pin-registered Nikon F3HP with a precision composition grid in the viewfinder. It had a bellows with an enlarger lens on it. A copy stand held the camera on an adjustable column. The purpose of that rig was to copy and composite multiple film images to one frame of film. We could fit up to 16 slides on one frame of film, or zoom down into a slide to crop/enlarge about 1/6 of its area.
That was the sort of model for the setup in my white paper. While not as precise, my current rig has all the essential parts. I'm simply duplicating slides and negatives to digital raw files, instead of Ektachrome 5071 duplicating film... Any image compositing will be done in software.
Feb 17, 2022 16:23:05 #

burkphoto wrote:
Please read the attached PDF white paper. It's how I do it.
Below the PDF attachment is a 35mm Tri-X image, camera scanned with the setup described in the paper.
Below that is a 35mm Kodachrome 64 slide image, camera scanned with the setup described in the paper.
Last is a 35mm H&W Control VTE film image, camera scanned with the setup described in the paper.
Wonderful shooting

If you want to reply, then register here. Registration is free and your account is created instantly, so you can post right away.