Removing a Van
May 3, 2021 10:57:41 #
juan_uy
Loc: Uruguay
Good work!
As Rongnongno that mirror part could be improved.
Also maybe the ramp where the van was may be improved with some more work.
Personally, I would have also removed the light post and the modern gates under the arch.
As Rongnongno that mirror part could be improved.
Also maybe the ramp where the van was may be improved with some more work.
Personally, I would have also removed the light post and the modern gates under the arch.
May 3, 2021 12:30:23 #
Very good George, I too would have removed the light and fences under the arch...
May 3, 2021 14:57:40 #

newsguygeorge wrote:
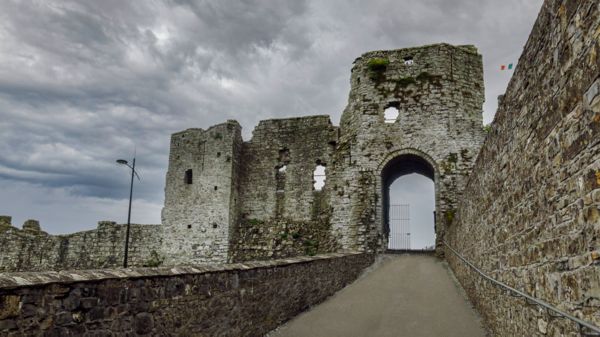
I used the Photoshop clone and healing brush tool to remove a caterer's van from the ramp leading to a castle's sallyport.
I kind of worked on it and made some improvement, if you want I can post them.
There is still a repeating pattern on top of the left wall.
May 3, 2021 15:17:32 #

Rongnongno wrote:
I kind of worked on it and made some improvement, if you want I can post them.
There is still a repeating pattern on top of the left wall.
There is still a repeating pattern on top of the left wall.
Please do. Thanks.
May 3, 2021 16:07:20 #
May 3, 2021 16:07:36 #
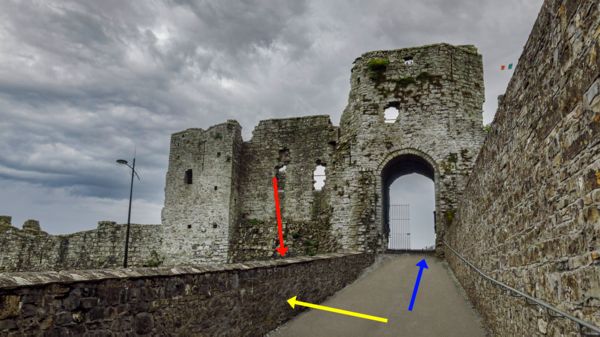
Flaws...
Red arrow
► Could not get rid of the repeating pattern.
► Toward the end the top is flat vs curved
Yellow arrow
► The wall comes from the opposite side
► Could not match the tint
Blue arrow
► I cheated, I used another image to recreate the asphalt.
► I had trouble matching the tint
► Where the arrow points at there is a highly visible edge.
I did not remove the pole nor the building partly visible in the door opening, lower right. These details seem important and avoid creating a clinical image.
May 3, 2021 18:54:38 #

Rongnongno wrote:
You missed a part of it...
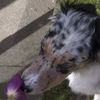
Right view mirror...
Right view mirror...
Had I been able to do as well, I would have kept the van's horn so I could toot it.
May 3, 2021 19:01:32 #
Thanks to all who commented and to Rongnongno for making the changes. I suspect my eye sight, which is poor, and smaller monitors were the challenge for me. But, I learned with this thread --- I'll post process with more zooming in the future.
May 3, 2021 19:34:05 #

Good work. Visible in Download, are some "clone scars" (repeating patterns) on the ramp that could be cleaned up using the Healing brush. Did you try Content-Aware Fill?
May 3, 2021 20:39:02 #
dat2ra wrote:
Good work. Visible in Download, are some "clone scars" (repeating patterns) on the ramp that could be cleaned up using the Healing brush. Did you try Content-Aware Fill?
I'll consider doing more with it. I am sure I used content aware. Thanks.
May 4, 2021 05:50:17 #
Heather Iles
Loc: UK, Somerset
Rongnongno wrote:
Flaws... br br Red arrow br ► Could not get rid o... (show quote)
You did a good job Ron, but please tell me how do you see such fine detail? Do you enlarge it 200% and inspect it? It is for this reason that I do not enter DPI's in the club competitions as my pp work is not up to standard. Perhaps you could elaborate as it might help me and others.
H
May 4, 2021 10:17:56 #
Heather Iles wrote:
You did a good job Ron, but please tell me how do you see such fine detail? Do you enlarge it 200% and inspect it? It is for this reason that I do not enter DPI's in the club competitions as my pp work is not up to standard. Perhaps you could elaborate as it might help me and others.
H
H
There is no simple answer here...
First I used the initial correction offered to improve on it.
I look at an image first then decide what to do. In this case there were two main issues: the wall and the road.
Neither gave enough sampling to use regular tools such as healing or content aware so...
The road? As I mentioned, I cheated I used another image that a road with a similar texture. I made a selection from that image into this one. Of course, it did not fit. The key was to transform it while using the move tool (Ctrl, Alt and Shift key options came to the rescue). Then I did an average color of the original road which was deep olive. I created a fill layer above the road layer, made a quick mask using the new road to control it then used opacity to let the texture come out while keeping the olive tint.
There are still several issues... My road is flat, the existing one, according to the wall on the right, is not as regular. I also did not lose time on selection edges to make it melt hence the warning arrows to illustrate the flaw there.
The wall came with it own problems... Not only the sampling it poor but there are two areas to work with, not just one.
The first one is the rounded stones on top of the wall. I did not find any sampling elsewhere. I had to use what was there. Basically drew a line on a separate layer from the left side to where I think the wall should meet the tower. I drew it too low, warping the perspective - another flaw. I used a short selection from the left top to the van, made a copy on a layer and moved/transformed in place. Then I made yet another selection using the now longer top and used the same process to reach the wall.
The wall then was an issue the sampling was just too short, nothing to play with. I looked at the other wall made a single selection out of it and using a layer, move and warp placing it over what I guessed the wall where the wall would be. Trying to match the tint did not work all that well. Opacity came to rescue somehow but not enough as if it was too faint the repetitions would show too much (they do in the white areas)
This result is far from being perfect and is in need or severe editing to remove the flaws I left behind. For example this morning I realized I did not apply sharpening on the wall.
One tool I use frequently and did not mention... The fade edit tool. (Shift-control-F) this allows to control the opacity (fade) of the previous edit as if the edit was on an independent layer. You can use this tool only on the most recent edit.
May 4, 2021 11:15:35 #
Heather Iles
Loc: UK, Somerset
Rongnongno wrote:
There is no simple answer here... br br First I u... (show quote)
Thanks, Ron, for taking the time to explain your pp work which will help me and others, but it just proves that if your pp work is not up to standards don't enter competitions as the Judges would mark you down. Meanwhile, I will have to keep practicing and stick to printed photos for competitions.
Much obliged.
May 4, 2021 11:34:05 #
May 4, 2021 11:55:00 #

If you want to reply, then register here. Registration is free and your account is created instantly, so you can post right away.