RegiStax, wavelet settings
Mar 5, 2021 18:41:25 #
saidel42
Loc: NJ
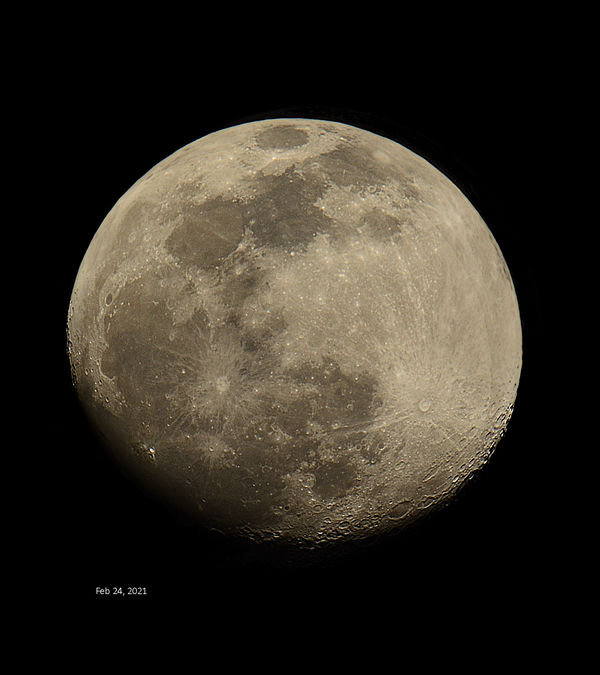
I started using Registax 6 for moon shots fairly comfortably but my wavelet settings are all over the place. Does anyone else have experience with using wavelets in this program and what settings do you use? [I have different saved files with settings for wavelets 3,4,5,6 at 10 and 20. I tried higher numbers and the exaggeration was obvious.] Here is a moon shot from 02-24-21 in NJ. Equipment: Nikon D7100 (mirror up before each image), Tamron G1 150-600 at ~550, and this image is processed from the best 10 of 20.
Any comments will be appreciated as I am a novice at this type of photography.
Any comments will be appreciated as I am a novice at this type of photography.
Mar 6, 2021 07:11:52 #
I am going to be interested in the replies to your post. I have that exact shot taken on the same night 2/24/2021. My experience with RegiStax is similar. I processed a set of images through PIPP and then RegiStax and they actually came out worse than the images straight out of the camera.
I usually shoot RAW and JPG and often compare my camera-processed JPGs to my processed images to see how my software editing is performing. In this case, my JPGs were sharper overall than those from RegiStax.
I thought the settings on the wavelets filtering were most likely the cause and had set them to some setting recommended from someone else from a youtube video. Since this experience I have been studying and trying to determine my next move.
Mar 6, 2021 07:49:50 #
saidel42
Loc: NJ
Hi Red6,
I too capture in RAW and JPG. I do know this. My original JPG's are always flatter than wavelet filtered images, but I also find it easy to overcompensate with wavelets.
Each of the levels 1-6 refers to a 2-dimensional filter of different sizes. I find 1 almost useless because it begins to enhance what used to be called the grain of the image. 6 and 5 are very useful. 2 I use sparingly and 3 carefully.
The other thing I've found is that using 4 thru 6, stay below 10, maybe even 5. I pick some region of the image that is flat and use the magnified image in RegiStax to watch what happens. For instance, the ridges radiating from Tycho are useful to set the wavelet filters. I use them to enhance the radiating lines but not excessively, almost like the contrast filter in Photoshop (or any other graphics program). After I am happy with the setting, I look at the 3-D comet structures at the terminus to see that they are not excessively enhanced.
The final image is better than the original, IMHO. Sometimes I have to trade-off the directly illuminated area from the tangentially illuminated areas to not over filter.
Anyway, rsvp if you have more questions or comments.
Best wishes,
Bill
Mar 6, 2021 21:26:27 #
Ballard
Loc: Grass Valley, California
saidel42 wrote:
I started using Registax 6 for moon shots fairly c... (show quote)
Hi saidel42
I have found to get any noticeable benefit from wavelets you need to stack at least 100 or more images. Normally I will use video and capture a 1000 or more images, stack them and then use wavelets or unsharp masking. When stacking fewer images unsharp masking functions that seems to work better, with large stacks wavelets seem to work better. With wavelets I usually start with bottom slider (largest pixel group or wavelets) and work my way up to the smallest groupings. Also be careful not to over do it as this does make the image look worse (grainy and adds too much contrast on fine feature and or digital artifacts start to creep in). The wavelet settings to use really vary from image to image, so it is best just to paly with the setting until you get what you like.
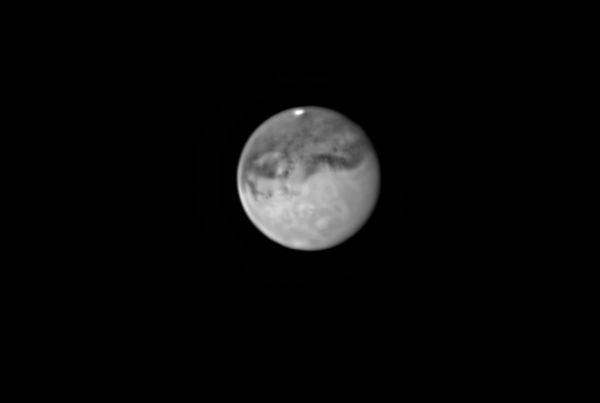
As an example below is a stacked image of Mars taken with a red filter and a monochrome camera. This is followed by the same image using Wavelet processing (using Registax6). The third image is the same using an unsharp mask. The image was taken on 10/28/2020 as a .ser video file and the stack contains ~8000 frames. The stacking was done using Autostakkert since the video was too large to stack with Registax6 which is only a 32 bit program, but was used for the wavelet processing. The first image is a .tif file so you can download and play with it without any jpeg compression. For the wavelet image the settings used were 49.0,14.0 35.5, 38.6, 49.6, 2.1 on the respective layers (1,6). This was in linear mode, I never have found the (Dyadic 2^n) mode to be useful.

Stacked image of Mars ~8000 frames

(Download)
Wavelet processed image (Wavelets work better on this image than the unsharp mask)

(Download)
Processed with unsharp mask
(Download)
Mar 6, 2021 22:24:17 #
saidel42
Loc: NJ
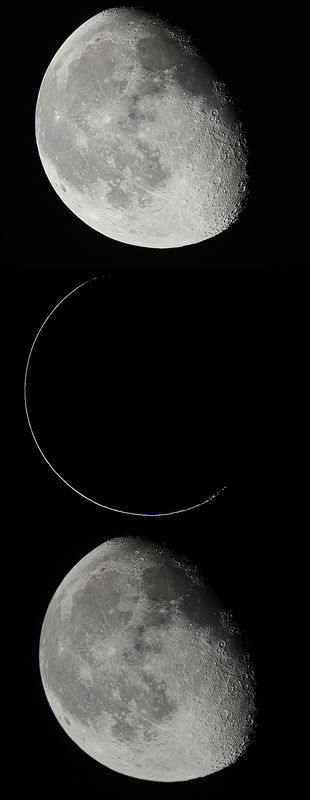
Thanks for the great reply. I'll keep your words (and sizes) in mind. I don't do video yet so I'm stacking about 20-to 50 individual images. I find if I keep the magnitudes of wavelet filters 3 or 4 to 6 down below 10, maybe even about 5, that the wavelets do better than unsharp. Now I'm also using a DSLR with a 600 mm lens so the large image may be more suitable to wavelet filtering. One other thing. Note the white border line in both your processed images but not on the original. That is an artifact.
I remove that white line in photoshop using the following:
duplicate image, on the copy go to Image > Adjustments > Replace color. I set the slider to pick up most of the image internal to the white line (this is a judgement call). I set the replacement to Lightness=0 and the actual replacement color to black (0,0,0). I then return to the Color of the Selection above so the fuzziness of the color does not intrude into the white line (middle image).
I remove whatever is left inside the white border by editing by a combination of a black paint can judiciously applied, lassoing some regions and deleting, and using the paintbrush. Then I use the resulting white line and layer it under the original. Using layer>align along the top and left edges, I then layer difference.
It does not work all the time, but when it works, it does great. In my moon shots, it worked perfectly. I just tried it with your bottom image...eh, not so good. I think it did not work because the downloaded image was 72 dpi while my originals is 300. I had more to work with with my photos. I include a before (top) and after(bottom) for you.
If you want to reply, then register here. Registration is free and your account is created instantly, so you can post right away.