Indexed - Push and Mitigate (tutorial).
Jan 22, 2021 08:37:14 #

new text 1/29/2021: The most basic way to make an adjustment in photo editing is to push the adjustment up to the point where it starts to produce unwanted effects, then back off slightly. That way the extent of the adjustment is determined by how quickly the unwanted effects appear. However, if you know something about how to mitigate (correct) those unwanted effects, you can push the adjustment further - up to the point where your mitigations stop working.
Most photo editors have tools for adjusting all of the basic properties of a photo and because of that they also give you the ability to reverse the unwanted effects of pushing any of the adjustments that affect an image's basic properties.
Note that the Clarity slider is not what you would call a basic tool because its effect is applied "intelligently" (i.e. selectively), and because of that its effects cannot be reversed easily using the other tools. Excessive use of the Clarity slider can introduce diffuse haloing which is often undesirable and cannot be easily eradicated.
However, where things like contrast, brightness levels (whites through to blacks) and colour strength (saturation) are concerned, those factors can all be adjusted (up to a point) in order to correct the unwanted effects of pushing adjustments that affect an image's basic properties.
Pushing and mitigating can also be used with sharpening and denoise. That subject is covered later.
As a technique, pushing and mitigating has its limits because there will usually be a limit to how much pushing you can do before any unwanted effects become uncorrectable. Simple trial and error can be used to quickly find that point. With a bit of practice you will quickly get a feel for how much pushing you can give an adjustment before the unwanted effects become uncorrectable.
---
It should be obvious from the above that pushing and mitigating allow you to do a better job of optimising your editing. Any time spent learning how to mitigate the unwanted effects of excessive adjustments is time well spent and it will have general benefits in your photo editing.
---
Contrast.
You're probably already familiar with the connection between the Contrast slider and the Tone adjustment sliders - Whites, Highlights, Mid Tones, Shadows, Blacks and Brightness (possibly called "Exposure" or some such). If you're not familiar with that connection I recommend that you spend a little time becoming familiar with it and I also recommend that when doing your basic editing you adjust contrast and tone levels at the same time.
Contrast adjustments and tone level adjustments affect each other as follows:-
If you increase Contrast you make the brights brighter and the darks darker. From the other perspective, if you brighten the Blacks or Shadows you lose contrast and if you darken the Whites or Highlights, again you lose contrast.
When you push contrast it may be only the darks that start to look wrong (too dark and solid), or it may be only the brights that look wrong (too bright and harsh). If either of these is the case, rather than reversing the contrast adjustment you may find that you can solve the problem by just lifting the Blacks (and/or Shadows), or by just lowering the Whites (and/or Highlights) - depending on which of the unwanted effects you have. In this way you get to keep the benefits of the pushed contrast adjustment.
HDR processing of a single image includes lifting the darks and lowering the brights. Doing so brings out details in the shadows and the highlights and also makes them less attention-grabbing (may or may not be a good thing). However, making the darks brighter and the brights darker can leave the image lacking in contrast. The challenge is then to keep the benefits of the lifted darks and the lowered highlights while at the same time restoring contrast to a level that looks normal to the eye. It may seem like you're just making adjustments then reversing them, but with a bit of practice the right combination of adjustments can result in an image that looks perfectly normal but has more visible detail and more eye-friendly highlights and shadows.
If you have a Dehaze tool, mitigating skills will allow you to push that adjustment further than you would normally. What you will find is that if you push the Dehaze tool adjustment too far, the first unwanted effect to manifest (typically) is the dark areas in the image becoming too dark and solid. That effect can be reversed (up to a point) by lifting the Blacks. It is often the case in photo editing that the most you can achieve is tweaks. That will sometimes be the case with pushing and mitigating.
---
Saturation.
Overdoing the global Saturation or Vibrance adjustments is the quickest way to get an overcooked, overprocessed look. However, typically some colours start to look oversaturated before others, and that overcooked look can appear before every part of the image has its optimum amount of saturation. If your photo editor has an HSL (Hue, Saturation and Luminosity) tool (or its equivalent) you can use it to target specific colours to strengthen, weaken, brighten, darken or tint-shift them.
One possibility is to use the HSL tool first, before applying any basic Saturation or Vibrance adjustments. Alternatively you can increase the base level of saturation first (using Saturation and/or Vibrance) to the point where the image starts to look partially overcooked, then use the HSL tool to target the problem colours to subdue them. With a bit of practice you can gauge how much pushing an image can take before the mitigating becomes excessive. In this way you can quickly optimise the saturation levels throughout the image.
That approach is more effective than using the HSL tool on its own without increasing the base level of saturation first. When you increase the base level of saturation you're guaranteeing that everything gets some strengthening. The capabilities of HSL tools can be limited in the sense that they may not affect all tints equally. A common example of that is the Lightroom HSL tool which leaves dark green vegetation largely untouched (bright yellow-green vegetation is another matter).
My own basic workflow includes that last step. In Lightroom I push Saturation to about one third of the way to maximum (the exact amount varies depending on the image) and then I use the HSL tool to run through the whole range of colours. That gives me the opportunity to not only optimise the saturation of each colour (add or subtract as required) but also to adjust the brightness of each colour and if necessary tint-shift it as well (great for doing things like autumn colours).
---
Sharpening and denoise are complementary and should be done together. The usual objective is to give a result that doesn't look over-sharpened but doesn't look too soft either. That involves finding the optimum balance between sharpening and denoise.
If there are problem areas in an image, rather than compromising your global adjustments to accommodate those problem areas it's better to select those areas and give them extra adjustments of their own. That way the global adjustments can be pushed further. The extra local adjustments may be to reverse the effects of too much sharpening or denoise in those areas or they may be for adding more sharpening or denoise (whatever is required). Again there will be a limit to how much the global adjustments can be pushed before any localised unwanted effects become uncorrectable.
---
Adjustments - Global v Local.
The basic editing sliders apply adjustments globally and it may be the case that other adjustments like those in the HSL section can only be applied globally. The trouble with global adjustments is that unwanted effects can start to appear in some areas before every part of the image has received an optimum level of adjustment. Rather than just stopping at the first appearance of unwanted effects, problem areas can be selected and given local adjustments to either reverse or enhance the global adjustment (as required). In Lightroom that can be done using the Adjustments brush (for basic adjustments such as saturation, contrast, brightness levels, sharpening and denoise).
In some cases it may be quicker and easier to push the global adjustment first then select the problem areas for local adjustments, as opposed to using moderate global adjustments (that don't produce any unwanted effects) then selecting the areas that need more and applying local adjustments to them. Which way round you do it will depend on which are more prevalent - the overtreated areas or the undertreated areas. It's easy to spot which are which.
---
(Example to follow)
Jan 22, 2021 08:38:23 #
Example.
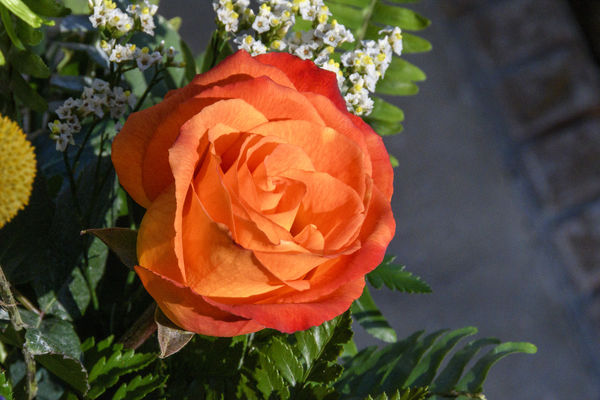
The following image (provided by Rongnongno) can be used (with his permission) to demonstrate one possible application of pushing and mitigating.
The following demonstration focuses on the flower. If you want to use that image to experiment further you can select the flower to apply the suggested adjustments locally. However, for the purposes of this demonstration the flower doesn't have to be selected - you can just ignore the background and focus on the effects that the suggested adjustments have on the flower.
---
If you wanted to increase the definition of the flower's petals, one of the simplest ways is to use the Contrast slider. However, most photo editors use an RGB or CMYK colour space (as opposed to LAB), in which case your Contrast slider will also affect saturation. As a consequence, when you increase contrast the flower's saturation also increases. If you try this with the sample image you'll find that the saturation very quickly becomes excessive.
So do we have to limit the amount of contrast that we apply? No - we simply reduce the flower's saturation to a more realistic level. You'll find that you can apply large amounts of contrast before the effect on the flower's saturation becomes unmitigable.
---
Jan 22, 2021 10:45:27 #
Jan 22, 2021 11:17:18 #
Jan 23, 2021 08:25:03 #

Jan 23, 2021 09:58:41 #
Jan 23, 2021 12:19:12 #
Jan 23, 2021 12:29:02 #
Jan 23, 2021 12:48:24 #
It's a cold, miserably windy day in the desert. I'm going to sit here in this warm room, in front of my computer, and try some of your ideas.
Jan 23, 2021 13:05:55 #
Curmudgeon wrote:
It's a cold, miserably windy day in the desert. I'm going to sit here in this warm room, in front of my computer, and try some of your ideas.
Even if you didn't go the whole nine yards and base your whole workflow on it, it's worth having as a technique for those times when a bit of extra pushing pays big dividends.
Jan 23, 2021 15:35:36 #
Thanks for putting so much time and effort into this post! Much appreciated...
Jan 23, 2021 16:24:54 #
tommystrat wrote:
Thanks for putting so much time and effort into this post! Much appreciated...
Thank you Tommy, and you're welcome.
Jan 25, 2021 08:36:26 #
juan_uy
Loc: Uruguay
Thanks for sharing this RG.
I saw it on Friday's morning and kept the tab until now that I had the chance to read it.
Very interesting content!
I saw it on Friday's morning and kept the tab until now that I had the chance to read it.
Very interesting content!
Jan 25, 2021 09:08:00 #
juan_uy wrote:
Thanks for sharing this RG.
I saw it on Friday's morning and kept the tab until now that I had the chance to read it.
Very interesting content!
I saw it on Friday's morning and kept the tab until now that I had the chance to read it.
Very interesting content!
Thank you Juan. Glad you found it interesting.
If you want to reply, then register here. Registration is free and your account is created instantly, so you can post right away.