A Different Kind of B&W - Part 3
Jan 13, 2021 06:35:32 #
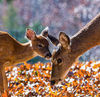
Last set, I did do 3 items on the Honey Do list before I processed these. Going forward I'll keep this process in mind when I'm shooting. Thought I'd share !!
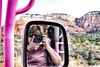
If you would like, Please click on the picture, doing so will link you to the gallery page where the shot can be seen in higher resolution and full page. Thanks for viewing and Have A Blessed Day !!!


If you would like, Please click on the picture, doing so will link you to the gallery page where the shot can be seen in higher resolution and full page. Thanks for viewing and Have A Blessed Day !!!
Jan 13, 2021 07:01:15 #
Jan 13, 2021 07:05:31 #

The photo of the Statue of Liberty appears timeless and monumental. Its perspective differs from the touristy shots.
Stating the obvious, it stands for a pure quality of our dear nation: Liberty. It calls us to ourselves. This is no small thing during our time of division forced by the news media and elites for their advantage.
Contemplation of this monument and the national motto "E Pluribus Unum" (From Many One) together could inspire a general patriotism beneficial to our national dialog.
By itself, this result could promote its own healing and a sense of unity.
Jan 13, 2021 07:08:10 #
They are quite beautiful! If you have some time, could you let us know how this is done, what tools you use?
Jan 13, 2021 07:10:53 #

This are all wonderful. I have done a few like that and the recipients enjoyed them.
Jan 13, 2021 07:12:41 #
LoriL wrote:
These are beautiful!
Thank You very much, delighted you enjoyed them !!!

Jan 13, 2021 07:17:40 #
anotherview wrote:
The photo of the Statue of Liberty appears timeles... (show quote)
Thank You very much !!! I truly appreciate your comment !!! Well said, Thank You Again !!!
Jan 13, 2021 07:21:43 #
Real Nikon Lover wrote:
This are all wonderful. I have done a few like that and the recipients enjoyed them.
Thank You very much. I appreciate it, and I agree that the response has been very favorable to this process
Jan 13, 2021 07:32:36 #
RGreenway wrote:
They are quite beautiful! If you have some time, could you let us know how this is done, what tools you use?
Thank You very much, delighted to share !!!
These were all edited in Lightroom. Use raw file for edit. Start in the HSL- Saturation, move all sliders to -100 so you've completely de-saturated the images. Create a user preset , mine is De-Sat 1 so you don't have to do this step for every picture. Then click on the targeted adjustment symbol. top left corner of the HSL. Move to the area you want to bring the color back into, left click your mouse and hold, slide your mouse up to increase the saturation. You'll see the color sliders for those colors moving to the right, saturate to taste. I do the other editing in the basic and detail panels first before re saturating. Remember this is a global adjustment. You may need to use an adjustment brush or radial filter to desaturate areas that you don't want the color to appear in the rest of the image, so it works best on shots like the purple of the iris, or the female finch shot. Shots where that's the only area that or those colors are !!! PM me if I can help further.
Jan 13, 2021 07:45:24 #


Jan 13, 2021 07:47:42 #
Jan 13, 2021 08:16:57 #

Jan 13, 2021 08:52:09 #
jaymatt wrote:
Nice! I like all of these.
Would you mind sharing your technique?
Would you mind sharing your technique?
Thank You John,
Happy to share !!Remember the tractor shot in the first post. I did the desaturation first, then all the editing in the basic and detail panels, also use a vignette frequently. On that tractor shot, in HSL Saturation, I used the targeted adjustment left clicked on the green rim of the tractor and held my finger on the mouse and pushed the mouse upward until I had saturated it to taste. Much of the glow affect in these comes from a brush or radial filter ouytside the subject and bringing the clarity way down and sometimes increasing the exposure or whites in the radial filter or brush. Hope this is helpful...Dave
These were all edited in Lightroom. Use raw file for edit. Start in the HSL- Saturation, move all sliders to -100 so you've completely de-saturated the images. Create a user preset , mine is De-Sat 1 so you don't have to do this step for every picture. Then click on the targeted adjustment symbol. top left corner of the HSL. Move to the area you want to bring the color back into, left click your mouse and hold, slide your mouse up to increase the saturation. You'll see the color sliders for those colors moving to the right, saturate to taste. I do the other editing in the basic and detail panels first before re saturating. Remember this is a global adjustment. You may need to use an adjustment brush or radial filter to desaturate areas that you don't want the color to appear in the rest of the image, so it works best on shots like the purple of the iris, or the female finch shot. Shots where that's the only area that or those colors are !!! PM me if I can help further.
Jan 13, 2021 10:14:03 #
Beautiful rendering of some excellent captures. Thanks for sharing your method. Please stay safe and keep on sharing.
Jan 13, 2021 10:18:32 #
Ourspolair wrote:
Beautiful rendering of some excellent captures. Thanks for sharing your method. Please stay safe and keep on sharing.
Thank You very much, and you’re very welcome!! 😊👍
If you want to reply, then register here. Registration is free and your account is created instantly, so you can post right away.