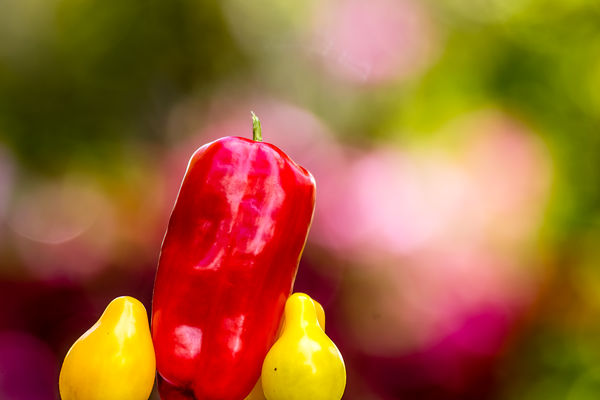
More 100-400 trials, or "Still Life with Veg"
Aug 28, 2020 13:23:45 #
Aug 28, 2020 13:25:35 #
bleirer wrote:
Still musing over whether to keep this lens.
What do you believe are its shortcomings?
Aug 28, 2020 13:27:22 #
PixelStan77 wrote:
What do you believe are its shortcomings?
That it is not a $12,000 lens I guess. Could be a touch sharper maybe?
Aug 28, 2020 13:32:10 #
bleirer wrote:
That it is not a $12,000 lens I guess. Could be a touch sharper maybe?
Tripod and F8-11 will give you sharpness and will act like a $12,000 lens
Aug 28, 2020 13:42:56 #
PixelStan77 wrote:
Tripod and F8-11 will give you sharpness and will act like a $12,000 lens
That is a tripod but f 6.3.
Aug 28, 2020 13:49:08 #

The colors are wonderful. The image isn't soft, just lacking the finest of detail. Over the years, I've kicked older lenses that don't 'appear' the same as new versions when the images are intermingled. Alone this seems fine. But, you have to judge if the images are indistinguishable or distinguishable from your other lenses, and whether that presents an issue.
Aug 28, 2020 13:56:10 #
CHG_CANON wrote:
The colors are wonderful. The image isn't soft, just lacking the finest of detail. Over the years, I've kicked older lenses that don't 'appear' the same as new versions when the images are intermingled. Alone this seems fine. But, you have to judge if the images are indistinguishable or distinguishable from your other lenses, and whether that presents an issue.
I ran the camera and this lens through the Spydercheckr, it really didn't adjust much from the standard. So that part I am very happy with.
Aug 28, 2020 14:15:13 #

At f 6.3 you have a very shallow depth of field. Image looks quite sharp to me. What is it that makes you undecided whether to keep the lens or not?
Aug 28, 2020 14:19:03 #

Aug 28, 2020 14:24:03 #
amfoto1
Loc: San Jose, Calif. USA
I judge images on more than just sharpness and fine detail. While those things are important, how a lens renders colors, how it renders an out-of-focus background, how it deals with high contrast situations and counteracts chromatic aberrations are important, too.
No lens is perfect. In this case the colors and background blur are wonderful.
Some careful, selective sharpening can bring out fine details. I hope you don't mind, I wanted to see how much was possible, so used Photoshop to apply both a high pass filter and unsharp mask on just the veggies in this images. Below is the result. Compare it at 66% or 100% against your images. I think using sharpening added some micro-contrast that enhances details nicely. (Virtually every image needs some post-processing... don't know how much you might have already done to this image.)
When I sharpen I often do so very selectively, to keep from "adding grain" to out of focus areas. I also try to watch the edges where there's an abrupt transition from in-focus to out of focus. I often see images where I think that was overdone and the results look odd... maybe sort of over-processed or stylized. To me it often looks best to slightly soften those abrupt transitions, as a part of masking to hold back sharpening in the OOF areas.
Here's the result, after a high pass filter and unsharp mask were applied only to the veggies...
Aug 28, 2020 14:24:30 #
amfoto1
Loc: San Jose, Calif. USA
I judge images on more than just sharpness and fine detail. While those things are important, how a lens renders colors, how it renders an out-of-focus background, how it deals with high contrast situations and counteracts chromatic aberrations are important, too.
No lens is perfect. In this case the colors and background blur are wonderful.
Some careful, selective sharpening can bring out fine details.
I hope you don't mind, I wanted to see how much was possible, so used Photoshop to apply both a high pass filter and unsharp mask on just the veggies in your image. Below is the result. Compare it at 66% or 100% against your images. I think using sharpening added some micro-contrast that enhances details nicely. (Virtually every image needs some post-processing... don't know how much you might have already done to this image.)
When I sharpen I often do so very selectively, to keep from "adding grain" to out of focus areas. I also try to watch the edges where there's an abrupt transition from in-focus to out of focus. I often see images where I think that was overdone and the results look odd... maybe sort of over-processed or stylized. To me it often looks best to slightly soften those abrupt transitions, as a part of masking to hold back sharpening in the OOF areas. However, notice that even though I softened the sharpening near the edges, it still amped up the rim lighting effect, especially on the red pepper.
Here's the result, after a high pass filter and unsharp mask were applied only to the veggies...

Aug 28, 2020 14:34:22 #
amfoto1 wrote:
I judge images on more than just sharpness and fin... (show quote)
Interesting result. My image already had Lightroom sharpening, also masked, and smart sharpen in Photoshop right before exporting.
Tell me more about how to do high pass and unsharp mask in Photoshop?
Aug 28, 2020 14:35:21 #
Note Alan's result and comment. I too add a touch more sharpening to images from extenders vs the same lens without.
Aug 29, 2020 02:00:40 #
amfoto1
Loc: San Jose, Calif. USA
I don't use Lightroom for sharpening. I just leave it at the default setting, which I think applies a little.
I do sharpening in Photoshop... usually either unsharp mask or high pass filter... sometimes a bit of both (as in your image).
The way I do a high pass in Photoshop is...
1. Create a copy layer of the main layer.
2. Use the little pull down menu to change the new layer from "normal" to "overlay"
(image will look awful temporarily, until the next step)
3. From the menu go into filter > other > high pass.
4. The new/top layer will now be "gray".
(image should look fairly normal again)
5. After you've selected high pass, a small window will open where you can choose the strength of the high pass filter. I usually use between 1.5 pixel and 3.5 pixel, depending upon the image. For your image I used 1.5 pixel (which wasn't enough, IMO).
6. While still working on that new/top layer (high pass), click the mask symbol at the bottom of the tool tray (it's the third icon from left... a white rectangle with a black dot in the center). This adds a mask to the layer.
7. Switch to a tool and paint "black" on all the areas of the mask that you don't want the effect. I usually use a soft or semi-soft brush for this... changing the size to increasingly refine the edges of the masked area where it transitions from effect/no effect. Don't worry if you make a mistake. You can switch to "white" and recover anything that was accidentally painted away with black.
8. By using the soft brush, I usually blend the transition so that it's not too abrupt, which can look odd.
9. Sometimes it's possible to use "select" tools on the base layer... such as the magic wand or select color ( for example if there's a blue sky where sharpening isn't wanted). I'll do this with complex images that have a lot of fine detail, where it would be really time consuming to simply paint as described above. "Expanding the selection" by 1 or 2 pixels can help prevent too abrupt an edge. Depending upon how the selection is made, it might be necessary to "invert" it (under the "select" menu). Once the selection has been made, switch back to the high pass filter layer and set up a large brush and paint away the area.
10. It's also to "fade" the effect, if wanted. What I do is first paint it away fully with a black brush, then switch to a 10% white brush and "bring back" the parts I want to have a partial effect. Repeated strokes can create the fade of the effect. Sometimes it helps to change brush size.
11. It's usually best to err a little too strong with the high pass filter (step 5 above), because you can always change the transparency of the high pass layer to reduce the effect. That's easier than having to repeat the process or do it over again. I didn't do this and felt the high pass filter sharpening of your image fell a bit short... that's why I used an unsharp filter on it too.
12. Finally sharpening like the above is usually done as one of the final steps in post-processing.... after the image has been sized for it's final use. Definitely do any noise reduction long before you do any sharpening (I try to always do NR before reducing the size of an image... but if I'm increasing the size of in image, I'll do it after the size change). I didn't see any need for NR on your image (I'm guessing it was shot at fairly low ISO).
Once all the work is done, "flatten" the image (under the "layer" menu) before saving as a JPEG (if wanting to save without flattening, perhaps so you can re-open it and do more work on it later, this can be done saving it as a PSD).
Essentially it's the same thing to selectively apply an unsharp or smart sharpen filter. Just create a copy of the base layer (the image), apply the desired effect to it. You don't need to do steps 2 through 5. After sharpening the top layer, add a mask to it and paint away any area you don't want the effect. This is even easier than the above, because you can temporarily "turn off" the base layer, to very clearly see what you're doing. A similar process can be used to blur a background or to selectively do color corrections, as well as some other selective image "fixes".
It probably took me longer to write this than to actually do it! I do it often enough that I had to open an image in Photoshop and apply the filter... couldn't remember the steps without looking.... they are sort of unconscious and second nature for me now.
I'm pretty sure there are some other ways to make and refine selections that may speed up the process, so that it involves less detailed hand work. I'm a slow learner! Only been using Photoshop for about 25 years! Newer versions of PS might have even more options... I'm still using CS6.
I do sharpening in Photoshop... usually either unsharp mask or high pass filter... sometimes a bit of both (as in your image).
The way I do a high pass in Photoshop is...
1. Create a copy layer of the main layer.
2. Use the little pull down menu to change the new layer from "normal" to "overlay"
(image will look awful temporarily, until the next step)
3. From the menu go into filter > other > high pass.
4. The new/top layer will now be "gray".
(image should look fairly normal again)
5. After you've selected high pass, a small window will open where you can choose the strength of the high pass filter. I usually use between 1.5 pixel and 3.5 pixel, depending upon the image. For your image I used 1.5 pixel (which wasn't enough, IMO).
6. While still working on that new/top layer (high pass), click the mask symbol at the bottom of the tool tray (it's the third icon from left... a white rectangle with a black dot in the center). This adds a mask to the layer.
7. Switch to a tool and paint "black" on all the areas of the mask that you don't want the effect. I usually use a soft or semi-soft brush for this... changing the size to increasingly refine the edges of the masked area where it transitions from effect/no effect. Don't worry if you make a mistake. You can switch to "white" and recover anything that was accidentally painted away with black.
8. By using the soft brush, I usually blend the transition so that it's not too abrupt, which can look odd.
9. Sometimes it's possible to use "select" tools on the base layer... such as the magic wand or select color ( for example if there's a blue sky where sharpening isn't wanted). I'll do this with complex images that have a lot of fine detail, where it would be really time consuming to simply paint as described above. "Expanding the selection" by 1 or 2 pixels can help prevent too abrupt an edge. Depending upon how the selection is made, it might be necessary to "invert" it (under the "select" menu). Once the selection has been made, switch back to the high pass filter layer and set up a large brush and paint away the area.
10. It's also to "fade" the effect, if wanted. What I do is first paint it away fully with a black brush, then switch to a 10% white brush and "bring back" the parts I want to have a partial effect. Repeated strokes can create the fade of the effect. Sometimes it helps to change brush size.
11. It's usually best to err a little too strong with the high pass filter (step 5 above), because you can always change the transparency of the high pass layer to reduce the effect. That's easier than having to repeat the process or do it over again. I didn't do this and felt the high pass filter sharpening of your image fell a bit short... that's why I used an unsharp filter on it too.
12. Finally sharpening like the above is usually done as one of the final steps in post-processing.... after the image has been sized for it's final use. Definitely do any noise reduction long before you do any sharpening (I try to always do NR before reducing the size of an image... but if I'm increasing the size of in image, I'll do it after the size change). I didn't see any need for NR on your image (I'm guessing it was shot at fairly low ISO).
Once all the work is done, "flatten" the image (under the "layer" menu) before saving as a JPEG (if wanting to save without flattening, perhaps so you can re-open it and do more work on it later, this can be done saving it as a PSD).
Essentially it's the same thing to selectively apply an unsharp or smart sharpen filter. Just create a copy of the base layer (the image), apply the desired effect to it. You don't need to do steps 2 through 5. After sharpening the top layer, add a mask to it and paint away any area you don't want the effect. This is even easier than the above, because you can temporarily "turn off" the base layer, to very clearly see what you're doing. A similar process can be used to blur a background or to selectively do color corrections, as well as some other selective image "fixes".
It probably took me longer to write this than to actually do it! I do it often enough that I had to open an image in Photoshop and apply the filter... couldn't remember the steps without looking.... they are sort of unconscious and second nature for me now.
I'm pretty sure there are some other ways to make and refine selections that may speed up the process, so that it involves less detailed hand work. I'm a slow learner! Only been using Photoshop for about 25 years!
Newer versions of PS might have even more options... I'm still using CS6.Aug 29, 2020 08:23:09 #
amfoto1 wrote:
I don't use Lightroom for sharpening. I just leave... (show quote)
Thank you for the very detailed tutorial. I will definiitely try that. I usually sharpen in a little in lightroom but then do output sharpening in Photoshop with smart sharpen. There one of the choices is 'gaussian' (The same as unsharp mask I'm told) but also a choice of 'lens blur' or 'motion blur.' I don't know what method of sharpening those use.
I will add about modern photohop, one can convert the layer to smart object, making all filters re-adjustable. Of course your method the duplicated layer can be deleted, so it's all good.
Bill
If you want to reply, then register here. Registration is free and your account is created instantly, so you can post right away.