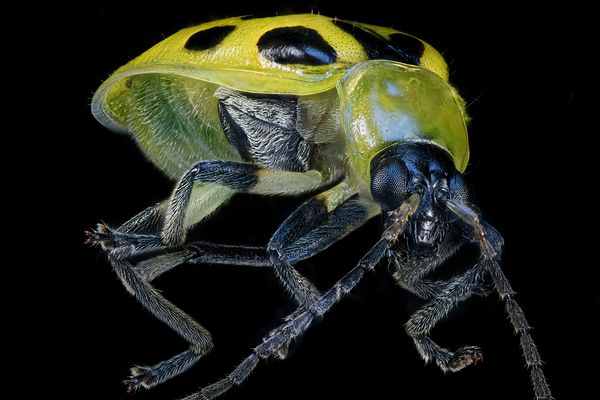
Focus Stacked Image of a Twelve Spotted Beetle
Aug 21, 2020 09:06:01 #

I found this yellow black spotted Cucumber Beetle while scouting the yard yesterday foraging in one of the Hibiscus flowers along the fence and I brought it in for a focus stacking session.
Here's what I have learned about why they are considered to be a such a destructive pest:
"Striped and spotted cucumber beetles can cause serious losses in cucumbers, muskmelons, and watermelons. Cucumber beetles are a major concern to muskmelon and cucumber growers because they vector the bacteria that causes a disease, bacterial wilt of cucurbits.
While the adults feed mainly on foliage, pollen and flowers, their feeding on melon rinds late in the season may reduce market quality. Larvae of these insects feed on roots and stems, but this damage is minimal compared to the potential losses due to bacterial wilt. The spotted cucumber beetle are also known as the southern corn rootworm."
Aug 21, 2020 10:10:42 #

Aug 21, 2020 10:51:22 #
Aug 21, 2020 14:44:06 #

Oddly beautiful, Gary. I have been looking at your posts too long (LOL).
Aug 21, 2020 17:23:09 #
UTMike wrote:
Oddly beautiful, Gary. I have been looking at your posts too long (LOL).
Thanks, UTMike. I enjoy a salad of topics with things of beauty being among them. Insects and spiders are far from beautiful (except for some butterflies and moths) however they are highly complex, specialized for their environments and diets, and they are everywhere. Entomologists estimate that there are over 148-million insects in various stages of their life form compared to every person on earth.
Therefore at any time, it is estimated that there are some 10 quintillion (10,000,000,000,000,000,000) individual insects alive.
I figured that if step up my game a bit that I can have them all photographed by the end of the year.

Aug 21, 2020 17:27:39 #
Here I couldn't understand how my son went to Clemson (ouch) and studied bugs. (entomologist). I still trying to justify my near bankrutcy. lol
Aug 21, 2020 18:00:26 #
LEWHITE7747 wrote:
Here I couldn't understand how my son went to Clemson (ouch) and studied bugs. (entomologist). I still trying to justify my near bankrutcy. lol
Clemson is surely among the best which means that your son is quite special to go there for their standards are quite high (as well as tuition).
I don't have a clue what an entomologist earns compared to the other sciences. Each time that I have given advice to someone getting ready to transition from highschool to college I have a talk with them about "following the money" meaning study something that has a high earning potential and one that covers a wider spectrum of possibilities. Higher education as well as passion are wonderful things however making a living in a lifestyle that they would like to be accustomed to for them and their future family is just as important, if not even more so.
Aug 21, 2020 18:38:32 #
I went to Marquette Dental School(yes , a license to steal). I've fouund that after awhile money is irrelevant and that happiness is more important. He has an MBA and is doing good. You are right especially the cost of education being so high, You are a wise man, there is no free lunch.
dr
dr
Aug 21, 2020 18:57:59 #
LEWHITE7747 wrote:
I went to Marquette Dental School(yes , a license to steal). I've fouund that after awhile money is irrelevant and that happiness is more important. He has an MBA and is doing good. You are right especially the cost of education being so high, You are a wise man, there is no free lunch.
dr
dr
What a small world we live in. I retired as a mechanical system designer as a Design/Build Mechanical Contracting firm. One of our recent projects was to design and install the systems for the medical gases and plumbing network for the A.T. Still Missouri School of Dentistry and Oral Health. We did a lot of healthcare facilities including hospitals and outpatient surgery centers however this one was one of our greatest challenges. It truly is an amazing facility here. Also, my favorite macro lens is the Lester A. Dine macro system used for dental photography.
https://www.atsu.edu/missouri-school-of-dentistry-and-oral-health
Aug 21, 2020 19:02:41 #
Aug 22, 2020 09:03:47 #
rv8striker
Loc: St. Louis, MO area
sippyjug104 wrote:
I found this yellow black spotted Cucumber Beetle ... (show quote)
I always enjoy your posts and admire your work. I was wondering if you might share some of our techniques? I’m curious about the number of images in your stacks, how you are lighting your subjects and how you focus each of the images. I presume you are using a focus rail. If so, what is the make and model of the rail. I wasted some money on a rail that has turned out to be a disappointment. Any of the above info would be much appreciated. Thanks in advance and keep up the great work.
Aug 22, 2020 09:09:30 #

sippyjug104 wrote:
I found this yellow black spotted Cucumber Beetle ... (show quote)
Gorgeous example and great image as well Sippy......really pretty Bug...let's see more of it from the top-down ...the spots are probably exciting too. It's cool no question. Wow.
Aug 22, 2020 11:35:36 #
rv8striker wrote:
I always enjoy your posts and admire your work. I was wondering if you might share some of our techniques? I’m curious about the number of images in your stacks, how you are lighting your subjects and how you focus each of the images. I presume you are using a focus rail. If so, what is the make and model of the rail. I wasted some money on a rail that has turned out to be a disappointment. Any of the above info would be much appreciated. Thanks in advance and keep up the great work.
Thanks ever so much for asking for I truly enjoy sharing what I do and how I do it.
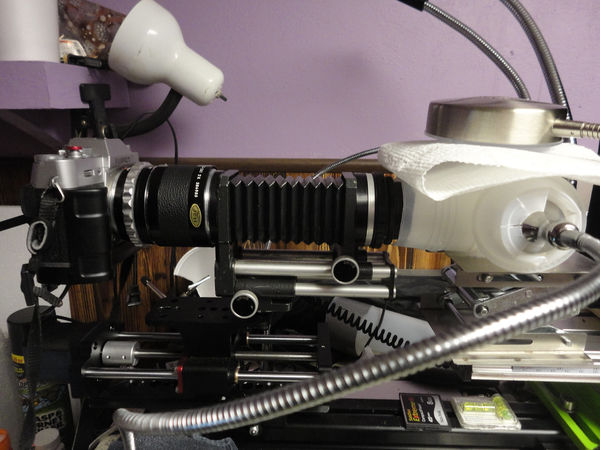
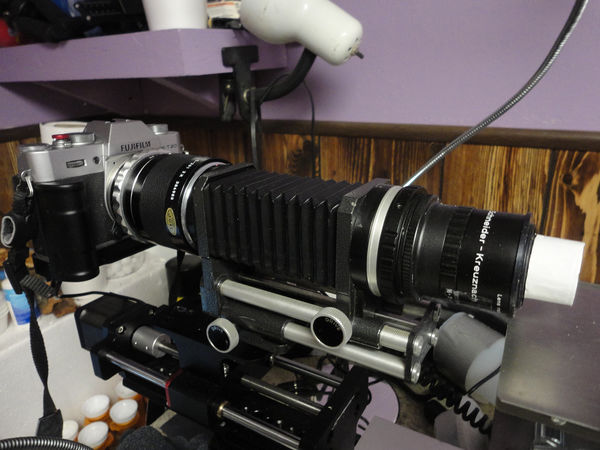
The camera that I have been using is a little Fujifilm X-T20 ASP-C sensor so it is nothing special except that it is mirrorless and I can shoot in a electronic shutter mode to save wear and tear. I started out using a Nikon D810 however I racked up over 250,000 shutter actuations so I swapped it out to conserve it for other work.
I use a variety of macro lenses, enlarger lenses and microscope objectives depending on the size of the subject and how much of it that I want to showcase. The Cucumber Beetle was taken with the 5X microscope objective due to its size and that I wanted to include more of it in the frame. I choose my lenses based on what will fill the frame of the camera. I seldom ever crop an image for I don't like to throw away pixels.
A bellows, extension tubes or a helicoid extension tube are used to extend the lens to achieve the magnification desired for the subject. When I use Infinity type microscope objectives as the lens for the camera I use a Raynox DCR-150 as the 'tube lens' which is 208mm which I focus to infinity before attaching the objective to it.
I shoot with lenses both forward (normal use) and reverse mounted again based on the desired magnification that I am looking for.
I started out my adventure in focus stacking by using a manual '4-way focus rail' which in theory sounded good however in application not so much so. I started by mounting it on a tripod to which I hung weights on to help stabilize it. Way too sensitive to vibration from touching the knob of the rail plus I kept bumping the darn thing so I quickly gave that up.
As a mechanical designer, I know that a broad low base is the most stable. I got a piece of 3/4-inch plywood 12-inches wide x 30-inches long. Marked a line down the center length of the board, drill a hole and put a female thread 1/4-20 insert in it and mounted the rail to it at about 12-inches from the end of the board.
I put some vibration pad under the ends of the board and set weights on both ends to hold it down. I placed in on the granite countertop and it was PERFECT for magnified work. Plus I could easily pick it all up to move it.
The 4-way rail remained to be the weak link of the set up for the camera sat up too high and which allowed torque leverage so the weight of the lens acted like an overhung load that wanted to tilt the lens ever so slightly downward plus it would flich each time I turned the knob to advance the camera. No Good.
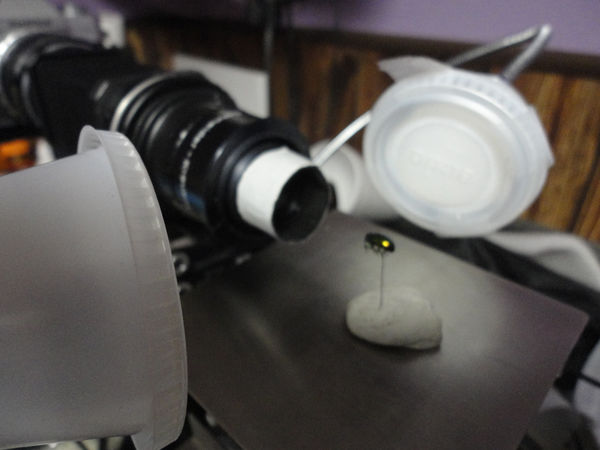
So...if the mountain won't come to Mohammed, then Mohammed must go to the mountain. I took the camera off the rail and mounted it firmly to to board and I put the subject on the manual focus rail and moved it each time instead. PERFECT solution. Now I never had to touch the camera through the entire sequence of shots. It makes no difference between which of the two move toward each other for each shot.
Shoot in the Mirror Up Mode and use an wireless shutter release for optimum performance and minimal vibration. Vibration is no good for magnified work and the higher the magnification...the more magnified the impact of vibration. Movement is not tolerated. If you ever want to see a demonstration, try holding a laser pointer dead still when pointing it on a wall.
Illumination is a science and an adventure of its own. I started out with speedlight flashes and an assortment of homemade diffusers. One...I was burning through batteries. Two...the recycle time of the flach between shots was a pain. Three...they would overheat and at times quit on me. No Good for me although many others are experts with using them.
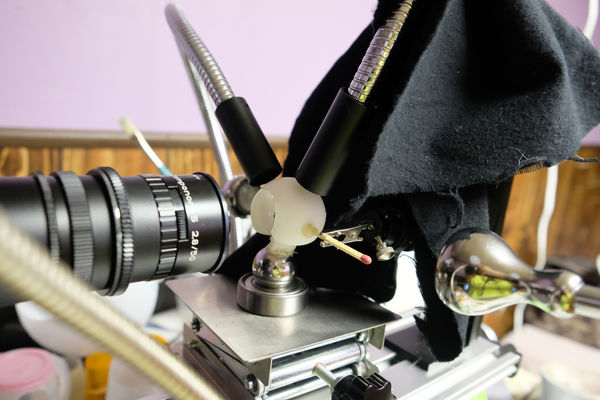
So...constant lighting became my favorite option. I use two IKEA JANSJÖ LED lamps and a flat head multi LED lamp that I diffuse with layers of packing foam. I place one on each side of the subject and the flat one over the top of the subject. I place them very, very close just out of the view of the camera. I use many, many different ways to diffuse my light including putting the subject into ping-pong balls and illuminating them from the outside surface. I also create light tents and tunnels using plastic cups on either the lens or turned upside down over the subject.
My sessions average in the 200 to 600 shots per stack. Keep in mind that I shoot a flat depth of field were only a tip of a hair is in focus and all else is a blur. More normal sessions and techniques are usually less than 100 and when using a standard 1:1 macro lens they are more in the 30 to 50 range.
I try to shoot something every day and I do several sessions at that so I needed something more consistent than my turning a knob a 60 times to one full rotation so I invested in a digital motorized focus rail that I now program on my PC to control the movement of the camera and to actuate the shutter...wait...move...shot each time.
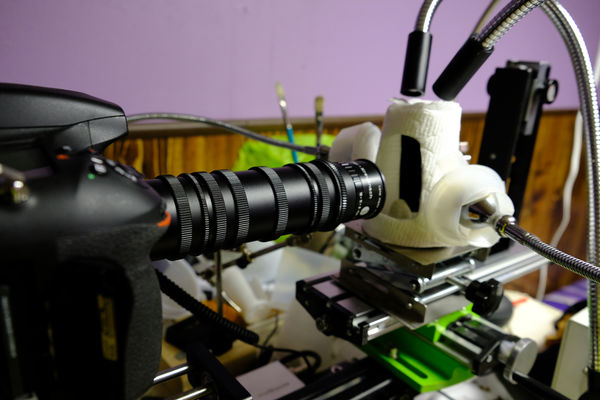
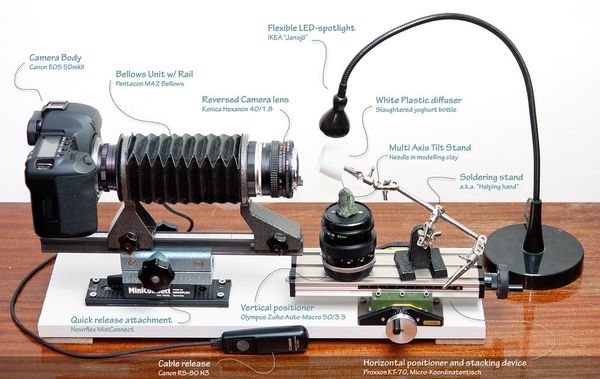
Here are a few photos of my setup as well as one that best describe the 'tabletop macro photography' setup that I found to be highly inspirational and quite inexpensive. The sliding work table in it that you will see can be had for $39.00. I have one and it is very, very handy as well as a laboratory scissor jack to raise and lower the subject. The sliding work table moves the subject forward and back as well as left and right.
Please note: The final illustrated image of the macro rig is that of others...not mine. Also..the camera is stationary with a bellows and a reversed prime camera lens and the subject moves toward the camera for each shot. I provide this image by others for inspiration only.
Aug 22, 2020 11:43:26 #
Blair Shaw Jr wrote:
Gorgeous example and great image as well Sippy......really pretty Bug...let's see more of it from the top-down ...the spots are probably exciting too. It's cool no question. Wow.
Thanks, Blair. I'll give it a shot so to speak.
Aug 23, 2020 08:37:26 #
sippyjug104 wrote:
Thanks ever so much for asking for I truly enjoy s... (show quote)
Un grand merci pour le partage de vos exprimentations.
Cordialement
If you want to reply, then register here. Registration is free and your account is created instantly, so you can post right away.