I'm Trying to Learn Flash Portraiture during Covid Lockdown
Aug 5, 2020 10:31:26 #
I’m trying to learn flash portraiture, and because I’m just starting out, I’m resisting GAS by doing it on a budget, using off-camera speedlights only. The flashes I’m using are a Godox TT685 and 2 vintage Vivitar 283’s triggered with SL-2 optical slaves. The light modifiers are 2 Godox softboxes on 7’ light stands for the key and fill lights and a DIY 14” snoot tube fashioned out of drawing paper, lined with crinkled aluminum foil. A gray bedsheet serves as my studio backdrop. I use a 43” round reflector occasionally. I’m having fun practicing off-camera flash lighting and would love to get criticism, advice, suggestions, any tips and hints on improving my speedlight portrait technique from all those UHH’ers who are so good at studio portraiture in general. I would enjoy learning about particular equipment that you all find very useful for this genre.
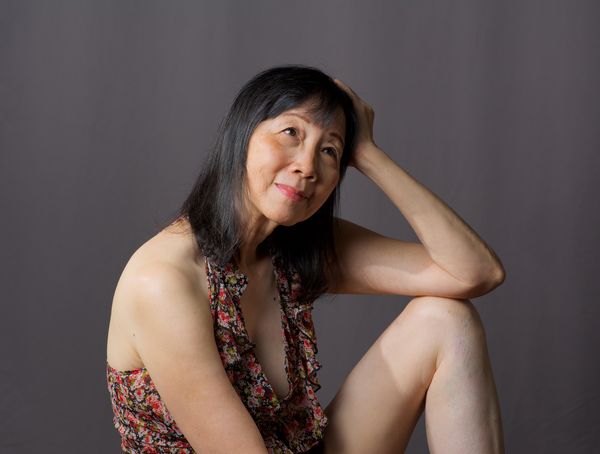
Regarding the photo submitted, I think the light on the subject’s face should be a bit softer. The softboxes, equipped with double diffusion layers, were about 4’ away, and the flash power was about ¼ at 28 mm Zoom setting. How does one avoid the highlight sheen on the cheek, forehead, and other facial prominences, ie, get softer lighting? Do I use a wider zoom setting on the keylight flash? Do I feather the keylight more or raise the keylight more?
Thanks much for your input.
Aug 5, 2020 10:57:23 #
i wouldn't raise the keylight - you run the risk of a shadow under the chin which looks quite uncomplimentary. You may want a small fill light coming in from the lower right.
It's been a very long time (halide film, TriX etc.) since i did portrait work ... if you like to tinker, get some different sizes of PVC Schedule 40 pipe ... if you cut a one inch length of the 1" diameter pipe so that it forms a "C" shape (that is. make the cuts along the long axis of the tube) it will act like a clamp when you slip it over the 3/4" stuff - you an clamp all sorts of cloth, reflective stuff - whatever you want ... scrims and gobo (s) galore ... I'm sure u-tube an get you going.
Good Luck!
Aug 5, 2020 11:17:58 #
Aug 5, 2020 19:22:41 #
MSW wrote:
i wouldn't raise the keylight - you run the risk ... (show quote)
Thank you much for the tips. I'll keep working at this.
NMY
Aug 5, 2020 20:17:13 #

She is very pretty. Truly a lovely portrait and out standing subject. I’m not very big on flash work. In part because I can never get the image exactly the way I want it. If you don’t mind some mild critique, I would use a reflector to lose the shadow on her left shoulder and left leg. From some personal frustration, while using a flash, that may throw off the white balance. With a reflector I seem to feel in better control. Another technique that sometimes works is by covering the flash with a piece of tissue paper and holding it in place with a rubber band.
If my critique seemed harsh, please forgive me.
Happy Shooting!
If my critique seemed harsh, please forgive me.
Happy Shooting!
Aug 5, 2020 20:17:56 #

I like your model. The lights you have can serve you well on a budget. Feathering your lights do help with making the light less direct or softer. Make sure you have you main light where you don't cast unwanted shadows on your subject. With this photo I would have placed the main light to camera right and the fill to the left at 1/2 a stop or so less. With digital you get to see what you are shooting right away so a flash meter is not essential but I use one for most of my lighting setups. Do you use one of the 283's as a hair light?
All-in-all you are going well. My other suggestion would be to start with one light and the reflector as fill and then add a hair or background light when you are happy with your results. Keep shooting.
All-in-all you are going well. My other suggestion would be to start with one light and the reflector as fill and then add a hair or background light when you are happy with your results. Keep shooting.
Aug 5, 2020 20:20:47 #
Aug 5, 2020 20:44:56 #
Timmers
Loc: San Antonio Texas.
First, there is no such thing as Flash Portraiture, it is just Portraiture, the flash is only a tool of, or equipment in photography.
Next you have weird distribution of shadow on your subject, that is because you have no clue as to what your doing. This is easily traced to the fact that you have no clue about the most basic principles. This sounds pretty harsh but there is an easy solution. Go to the basics. That would be ol' William Mortenson's Basic Light. Now he called this Pictorial Lighting, there are copies of this on the internet wit plenty of visual illustrations.
Why should you look into this? It is the best foundation for the most basic Portraiture you will find. It is simple and direct. It is also the most fundamental application for all Portraiture. When we say fundamental we mean precisely that. All other studio uses or systems start from this single source. So doing this you will be able to use this as the starting point to alter, add or subtract with any and all other ideas of doing studio portraiture.
You should go and look at the information, be advised that all you need is Mortenson himself, some dead head out there will try some babel but you don't need that, just look at what he says himself. Now, a simple technical explanation of how to set up The Basic Light of Mortenson. It is a two light set up.
First the single primary light (I'm avoiding all the history of 'main light' 'fill light' 'secondary light' that has clouded the issues of the foundational Basic Light ). This light is set up right next to your lens. Make sure it is slightly behind the optic to avoid lens flair. Now, and this is a bit important, the lens needs to be just slightly above the optical axis of the lens, if level or slightly below the optical axis you end up with what many call Frankenstein light. Further, there is psychology in action here, the catch light needs to be slightly or more above the center of the eye. This is related to the effect that we all know the sun must come up over the horizon of the earth. In addition, should you make images for the American and European educated audience, then you will want the light on the left side of the lens. We are taught to read from left to right and so the highlights will fall on the left hand side with shadows to the right hand side.
This type of light placement gives a type of light that in modern parlance is refereed to as Axis Light. But labels are not as important as understand the basic/foundations of one's craft. So you have the first light properly placed, the second light is for the background. We want that to not interfere with the first light, it is simply there to get the background illuminated to the same volume a the first light. You will find that this light, if it's out put is at the same level as the first light, the background will be illuminated at close to that of the subject. Reality, the background light will appear 1/3 stop greater than the first light, and of course this is because the first light is illuminating the background as the background light is as well. So one finds it necessary to move the light forward or you can reduce the output of the background light.
When you see the finished image you might note that this the basic light mimkes that light found outdoors by the sun. The only major difference is that the strong shadow created by the sun is toned down in the shaow of falling on your background. Most workers find this of advantage. You can return that sun like shadow by altering the background. For instance a light gray back ground will look like the medium gray background of your posted image with no second light. You can lighten or darken that background further hy moving the subject/light at the side of the lens further or closer to the background.
From this basic light you will find that moving the main light higher or swinging that light out to the side away from the camera you will get all the variations for modern lighting set ups. Adding one or more lights will become clear and the 'Why' each is done and the 'How' will become clear. But start from the Basic light, it is the correct starting point with any studio lighting.
Aug 5, 2020 21:01:30 #
Timmers wrote:
First, there is no such thing as Flash Portraiture... (show quote)
Thank you for clarifying several points for me. I have always been skittish when it comes to flashes. Now I know where to start practicing
Aug 6, 2020 04:15:38 #
Timmers wrote:
First, there is no such thing as Flash Portraiture... (show quote)
Thank you, Timmers. I do need a lot of education regarding proper lighting for my portrait subject. Your suggested reference by Mortenson is much appreciated, and I will try to get it and go through it. I'd like to have a solid foundation of good technique and, hopefully, I can develop it by working with the simple equipment that I have and applying those basic principles that you speak of. I noticed that lately the forums on Portraiture and People Photography have been less active. Shucks! So I'll look to other UHH sections and knowledgeable portraitists like you for useful criticism and advice along the way. Please take care.
NMY
Aug 6, 2020 04:16:29 #
TTQ225 wrote:
Thank you very, very much. This is stuff I need and will benefit from.
NMY
Aug 6, 2020 04:19:49 #
A10 wrote:
I like your model. The lights you have can serve y... (show quote)
Thank you kindly for sharing your expertise with me. I'm just getting started in using speed lights for portraits, realize that I have a very steep and long learning curve, but I'm giving it a lot of effort. I'd like to just get better and better at this, I appreciate your input tremendously.
NMY
Aug 6, 2020 04:28:35 #
Scruples wrote:
She is very pretty. Truly a lovely portrait and o... (show quote)
Hello Scruples. Nothing is harsh when you're teaching me something. I appreciate your contribution to my learning good portrait technique. Thank you for your kind comments regarding the subject also. She has been a gem to work with the past year, ever since I started doing digital photography.
NMY
Aug 6, 2020 04:32:46 #
quote=Bob Mevis]I like your portrait.[/quote]
Thank you for being so kind to a rank amateur like myself. I'm just now trying to learn portraiture. All these years, I'd been shooting willy nilly on Auto only, till I retired and finally had time to learn new skills. Please take care.
NMY
Thank you for being so kind to a rank amateur like myself. I'm just now trying to learn portraiture. All these years, I'd been shooting willy nilly on Auto only, till I retired and finally had time to learn new skills. Please take care.
NMY
Aug 6, 2020 04:55:59 #
MSW wrote:
i wouldn't raise the keylight - you run the risk ... (show quote)
Hello MSW. Thank you much for all your tips. I'd never even thought of the shadow under the chin, testimony to my being a rank amateur at portraiture. I'm going to try your small fill light on the lower right when I shoot like this again. Also, thank you for sharing your experience with PVC pipes. The little clamp sounds very, very useful, so I'll do that. Like you, I like to make do with what I have, make DIY stuff, and then wring the maximal function out of simple equipment. I'll acquire additional when I'm convinced it'll help me get to the next level, but so far, my preferred mantra has been minimalism yes, GAS no!
Please take care.
NMY
If you want to reply, then register here. Registration is free and your account is created instantly, so you can post right away.