Castle in Clouds
Sep 23, 2012 16:42:37 #

I went up to the Castle with the sole purpose of shooting a series of bracketed shots. I have combined them with Photomatix and then a little tweaking with PSE9. I have just ordered a 23" monitor to work with my laptop as I think my pictures print too dark. C&C welcome
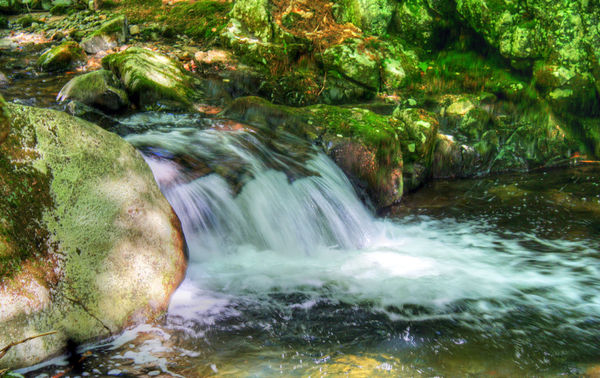
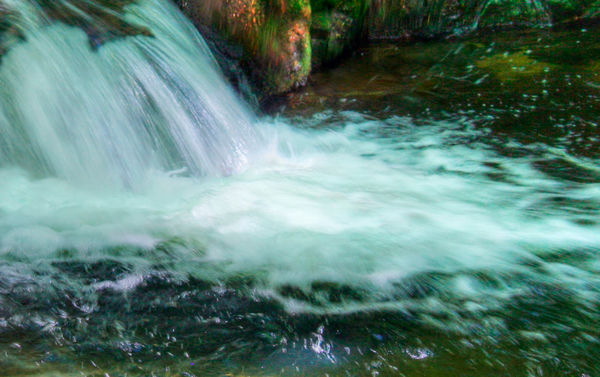
At the base of the waterfall
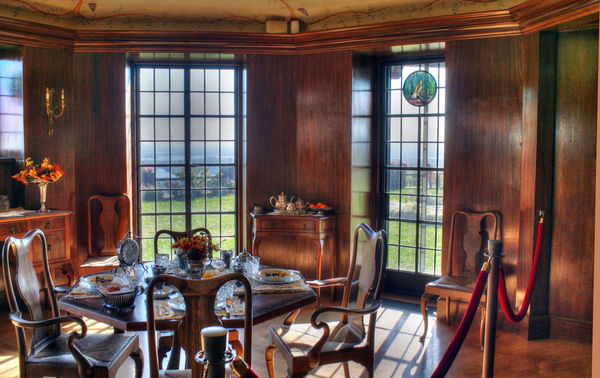
The dining room
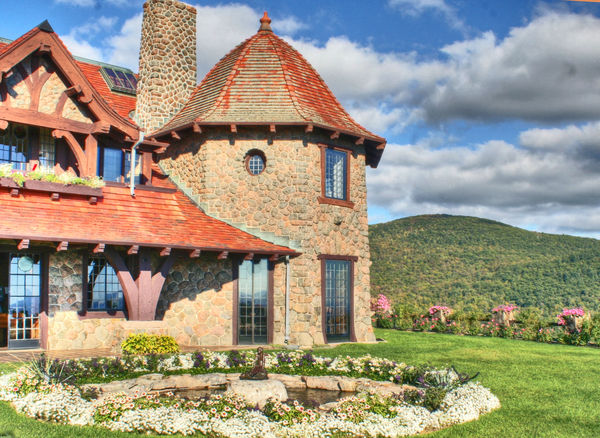
Exterior
Sep 23, 2012 16:49:37 #

Sep 24, 2012 04:40:53 #
Some nice work here Mary and this looks like a great place for HDR
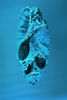
The waterfall. I rather like this shot, time lapse and HDR seem to work well together. A couple of suggestions. I think it might be worthwhile looking at darkening down the rock on the front left as it is competing for attention with the bright spot in the water which is the natural focus point. Also, unfortunately, the bright spot is blown but there is a very easy fix. In PSE, select a zig zag shape in the area of water to the right of the bright spot. Feather the edge by about 50 pixels. Copy and paste. Then put this on top of the blown area. Then reduce the opacity of the pasted area to about 25% and bingo, the blow out is gone, you have a hint of colour and texture where the blowout was but it still remains bright enough to be the focal point. ( I have included a close up of of before and after which I presume is ok as you put in the large version for download but if its not let me know and I will delete straight away.)
The interior. What a fantastic HDR subject and you have managed to capture the atmosphere of polished wood and elegance on rather a grand scale. But this is a very difficult shot as there is such a wide range in light. In an effort to get the details in the dark interior the sky has blown and ended up grey. I see you have you used three bracketed shots, to get the full range I suspect you need at least 7. I also see a dilemma for you in that there is some perspective distortion but if you fix it then you will lose the back of the chair on the left so I think you made the right decision to leave it. But you do need to crop out the brown strip on the right.
The exterior. I really like the way the curve of the hill at the back is an echo of the roofline, it tends to tie the whole pic together. It looks like a very bright day so that the image has ended up a little flat but a tweek of brightness and contrast may help. But you have kept control of the HDR process and avoided blow out in the windows which is often hard to do. Again there is some perspective distortion but again you were correct in not fixing it as you would have lost the top of the roof. Its actually a pity that the top of the chimney is out of shot as well. I don't know how you feel about cloning or what your skills are but it wouldn't be too difficult to fix the chimney in PSE. You do need to fix the brown sliver at the top right hand corner.
Hope this helps and good luck with the new monitor.
Peter

Sep 24, 2012 08:35:24 #
Peter, I like what you did and thank your for pointing out where I missed the "cropping marks"! I hope to get back there in two weeks to catch the foliage and maybe I will use a wide angle lens. I am pretty sure my camera only does the 3 barackets, so I do 0,-2,+2
If you don't mind~I have a question for you. I shoot in Raw and large jpeg format. When I bring the photos into Photomatix, I just import the jpegs, merge them together, see which look I like best, then save and bring into PSE9 to crop, straighten etc. Should I be starting with the Raw and adjusting things like WB and adding black? I'm not sure if this makes it harder to merge in Photomatix.
If you don't mind~I have a question for you. I shoot in Raw and large jpeg format. When I bring the photos into Photomatix, I just import the jpegs, merge them together, see which look I like best, then save and bring into PSE9 to crop, straighten etc. Should I be starting with the Raw and adjusting things like WB and adding black? I'm not sure if this makes it harder to merge in Photomatix.
Sep 24, 2012 08:49:48 #
Nice job Mary and Peter as usual excellent and insightful critiques. Well done.
Sep 24, 2012 09:26:09 #
maryp wrote:
Peter, I like what you did and thank your for poin... (show quote)
My camera initially also only seems to do -2, +2, 0 but you can actually get far more using exposure compensation. Basically the idea is that you set your camera for -2, +2, 0 then wind down the exposure compensation as far as you can and shoot. Then set it to the normal position and shoot then wind it up as far as you can and get three more. With a bit of fiddling I can get _4 to +4 in 1 ev steps which gives me 9 graduated shots, but obviously a tripod is essential so that there is no movement while you are fiddling with the settings. As for bringing pics into Photomatix I have not investigated the range of options and I am sure there are others out there who are far more experienced but I do everything in RAW, I don't take JPEGs at all because I find it slows things down in camera. I put RAW straight into Photomatix and unless I am going for a particular strong look I tend to be fairly conservative in my settings and save the radical stuff for photoshop and Topaz. Photomtix seems to handle the adjustments of white balance and blacks very well. The only time I go into PS first is when its a fiddly handheld alignment which sometimes Photomatix does not handle as well as PS. In that case I align in PS, crop the smallest amount I can so that I have three perfectly sized matched pics, then import into Photomatix as JPEGs which results in a much better alignment. I hope this all makes sense, as I said when looking at Chinaman's work tonight I have had a couple of glasses of wine. But I am always happy to answer questions which doesn't mean that I see as some sort of expert but its just that I am a very happily retired man so I do have the time to answer.
Look forward to seeing more of your stuff.
Peter
Sep 24, 2012 09:52:13 #
Very nice Peter. You communicate very well...Was that your field?
Steve
Steve
Sep 24, 2012 10:58:56 #
Thanks Steve! Peter, I did not know you could bring the RAW into Photomatix~I will have to try it. I do have a tripod but it wasn't allowed in this place, I could have used it at the waterfall though. I'll also fiddle with the exposure settings and so how far I can get!
Sep 24, 2012 11:14:08 #

maryp wrote:
I went up to the Castle with the sole purpose of shooting a series of bracketed shots. I have combined them with Photomatix and then a little tweaking with PSE9. I have just ordered a 23" monitor to work with my laptop as I think my pictures print too dark. C&C welcome
Just the right touch on all of them.
Sep 24, 2012 11:22:11 #

Mary, you have a way of finding interesting items to photograph. My feeling of the third photo would have been to have included more of the structure, and less of the hill side. The reflections in the windows added some appealing interest to the subject. I'm left wondering if there were more windows to the left side of the structure.
Sep 24, 2012 12:11:19 #
maryp wrote:
I went up to the Castle with the sole purpose of shooting a series of bracketed shots. I have combined them with Photomatix and then a little tweaking with PSE9. I have just ordered a 23" monitor to work with my laptop as I think my pictures print too dark. C&C welcome
Nice shots Mary!
Taking a closer look at each photo, the greens in the first seem a bit oversaturated, but I like the composition. I like the fact that you got some outside detail from the windows in the second shot. The 3rd is nicely composed, although from the look of the tilt of the building, the shot seems a little tilted to the right. It also looks a tad overexposed.
The output of Photomatix is actually a bit different depend on the file type. I find the best result comes from raw files as opposed to jpegs or tiffs.
Sep 24, 2012 12:58:32 #
Thank you all! I am going to redo them from my RAW files to see how they come out~should be interesting!
Sep 25, 2012 01:05:04 #
Stevieboy wrote:
Very nice Peter. You communicate very well...Was that your field?
Steve
Steve
Hi Steve. For much of my working career I was a primary school teacher but then I became a primary School head both in Australia and in the UK. But now I am happily back in Australia... retired.
Peter
Sep 25, 2012 09:08:11 #
Peter,
Thanks. You are really good at expressing yourself.
Steve
Thanks. You are really good at expressing yourself.
Steve
Sep 25, 2012 13:28:54 #
FWIW, I had the same problem with photos printing darker than my monitor. I went to buy a monitor, and was told that the reason it worked this way, is because a monitor is backlit, so what you see is brighter. Can't find backlit paper to print on. What was suggested to me, is to lower the brightness on your screen, it will get you much closer to what it will look like on paper. Just a thought, if you haven't already spent the money.
If you want to reply, then register here. Registration is free and your account is created instantly, so you can post right away.