What happened to the colors in the background?
Jul 20, 2020 21:13:22 #
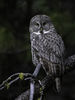
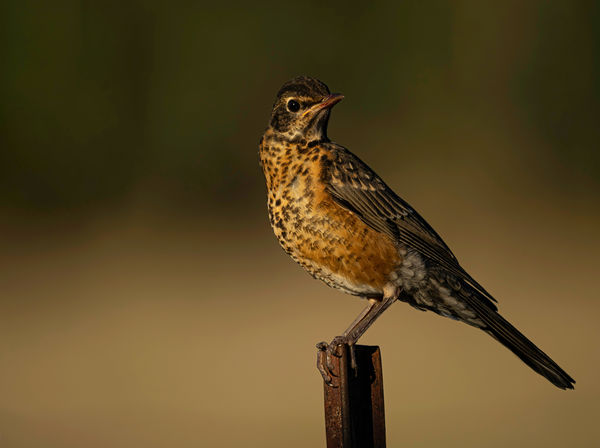
Any ideas what happened when I processed this photo in LR/PS? The top portion of the background is pixelated (I think that is the right term).
Jul 20, 2020 21:16:56 #

Karl's Bird Photography wrote:
Any ideas what happened when I processed this photo in LR/PS? The top portion of the background is pixelated (I think that is the right term).
Don't see that on my monitor - good shot, just a little dark - a tiny tweak is all it would take.
Jul 20, 2020 21:41:44 #

From the image file, it's hard to say why the background is pixelated. (See dark to light transition in background roughly level and to the image left of the bird's stomach.) The pixel resolution and JPEG quality seem 'high' enough to avoid this pixel result. Take the observations and ideas below and consider your workflow between LR and PS, paying attention to the format changes, bit-depth and colorspace as possible areas to modify.
Problem 1 - colorspace is ProPhoto RGB rather than sRGB for posting JPEG images online
Problem 2 - it looks like the image changed from Sony RAW to TIFF and then JPEG, shown below, in PhotoShop. Double-check your parameters and assure the colorspace is consistently ProPhoto RGB and the TIFF is 16-bit up to the point the JPEG is output to sRGB
History Parameters : converted from image/x-sony-arw to image/tiff, saved to new location, from image/tiff to image/jpeg, converted from image/tiff to image/jpeg
Given the history also includes LR, why not return to image from PS and export the JPEG from LR into sRGB? Rather than 16-bit TIFF, why not pass a PSD from LR to PS and back to LR?
Jul 20, 2020 23:19:04 #
Thanks, Paul. That's a lot for me to swallow but I'll check all that out tomorrow when I have more time and I'm more awake. Let's see if I have a rough idea what you are suggesting. ProPhoto RGB has a wider range than sRGB and moving it from LR as ProPhoto RGB to PS I converted the file to sRGB which might have crunched the data resulting in weirdness. Is that close to what you said? I checked some of my other photos and I only see the problem when there is a dark, mostly smooth, mostly green background... and it seems to only be a recent problem. I'm thinking I might have clicked on something that messed up the pixel resolution, especially since I have been watching videos and trying to learn more utilizing LR.
Jul 20, 2020 23:53:01 #
Karl's Bird Photography wrote:
Thanks, Paul. That's a lot for me to swallow but I... (show quote)
Look tomorrow and make sure the external editor definition for what is passed to PS from LR is in the ProPhoto RGB colorspace. I've proposed using a PSD. If using TIFF and you want to remain in TIFF, assure it is 16-bit and ProPhotoRGB. As I read the history embedded in the JPEG image file, the image posted seems to have been created by PS. My suggestion is to 'save' from PS and return to LR and create the output JPEG from LR, using the export colorspace sRGB.
The fix may be as simple as updating the colorspace of the resulting JPEG. But, I fear it's more complicated, but not a detail I can "see" in your workflow simply from reviewing the resulting output JPEG.
Summary: maintain ProPhoto RGB at all times during the edit workflow, maintaining either the RAW in LR or embedded within an PSD, or via the maximum bit-depth of a 16-bit TIFF. Use LR to convert the final edited result to sRGB when outputting JPEGs for sharing / posting.
Jul 21, 2020 00:36:07 #
Karl's Bird Photography wrote:
Any ideas what happened when I processed this photo in LR/PS? The top portion of the background is pixelated (I think that is the right term).
What you are seeing is called banding. It happens when you have a field with a single(or similar) color and a gradient with low contrast. It is a limitation low bit files, artifact of jpeg conversions and also a product of wrong exposure.
Jul 21, 2020 01:16:35 #
Jul 21, 2020 02:17:41 #

The drop from 61MP to 7.3MP takes quite a lot of compression. Unless your need for small files is urgent, use less compression. Check the Quality slider in the Export section. Or perhaps you've left the "Limit File Size" box checked.
If you've been using that level of compression for some time but only recently been seeing the blockiness, it's possible it's been there all the time but you've only just started to notice. The effect is subtle and it shows up only in specific circumstances. In the posted example it seems to be connected to the magenta/green colour axis, which suggests it may be aggravated by the wrong WB/Tint settings. If you don't manage to find the root cause, some colour denoise should help.
Whatever the cause is, it's not a major problem because it's not obvious until you zoom in on it. And I suspect that with less compression it'll either go away completely or be reduced to insignificance, even when pixel-peeping.
Jul 21, 2020 07:18:47 #
billnikon
Loc: Pennsylvania/Ohio/Florida/Maui/Oregon/Vermont
Karl's Bird Photography wrote:
Any ideas what happened when I processed this photo in LR/PS? The top portion of the background is pixelated (I think that is the right term).
All I see is a dark image. The Sony a7r4 has a tendency toward noise at higher iso's.
Jul 21, 2020 08:11:23 #
quixdraw wrote:
Don't see that on my monitor - good shot, just a little dark - a tiny tweak is all it would take.
Same here. Nice shot. I like the gradient.
Jul 21, 2020 10:12:12 #

Karl's Bird Photography wrote:
Any ideas what happened when I processed this photo in LR/PS? The top portion of the background is pixelated (I think that is the right term).
It looks OK on my monitor. Just needs lightening up a little.
Jul 21, 2020 11:48:18 #
amfoto1
Loc: San Jose, Calif. USA
On my calibrated monitor, viewing the online JPEG in ProPhoto colorspace is overly dark.
Once it's downloaded and opened in Photoshop using ProPhoto, the image lightens up quite a bit on my calibrated monitor. Part of the problem is simply that the image wasn't converted to sRGB for online display. Most web browsers and such cannot display ProPhoto... sRGB color space is the standard.
However, once the image is converted to the narrower sRGB color space, the "banding" in the background becomes more of a problem.
The most probably "solution" would be to:
1. If it's a RAW file, take the original image into Photoshop as a 16 bit, ProPhoto or Adobe RGB file (TIFF or PSD, I don't know if it matters... though it might). If it's a JPEG, there's likely no recovering it. The data that's missing and creating the banding in the background would be gone and there's no getting it back. (This is a good example image for why it's important to shoot in RAW.)
2. Assuming it's a RAW, once it's opened in Photoshop, as described above in #1, select the background to lighten and blend it using slight blur. Some noise reduction might help it, too. The primary reason for lightening up the background is to better separate the bird from the background. In particular, the bird's head and the background behind it are too similar tonality in the image as it was posted originally.
3. During this process, while the background is selected out as a separate layer, it's also possible to apply some selective sharpening to just the bird and post it's standing upon, avoiding applying it to the background (because sharpening that will likely increase any pixelization and banding).
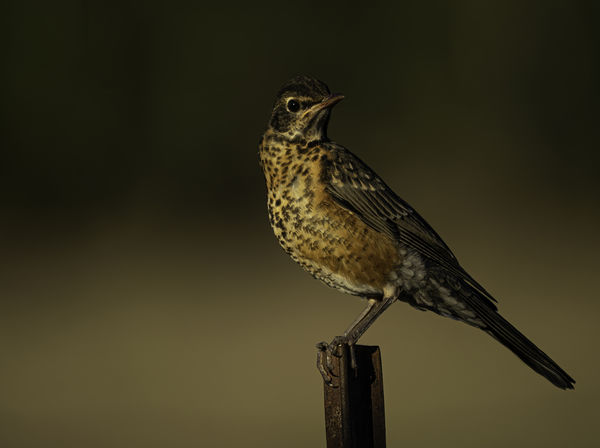
I hope you don't mind, below is a quick edit done using these steps. It's NOT successful correcting the banding effects in the background, because the JPEG was all that was available to work with. Instead working from a full size, original RAW file would likely have produced better results. This editing example is only able to show the effects of lightening up the background a bit and selectively sharpening the bird. Unfortunately, lightening the background also increases the appearance of banding.
Also notice how the image changes simply by converting it from ProPhoto to sRGB. I made no changes to the colors at all, besides that profile conversion, but that causes colors to appear a bit different. (I use Firefox browser that's color calibrated.... last time I checked, some other browsers aren't. Also, my monitor is calibrated. For these reasons, if you are using a different browser or viewing with an uncalibrated monitor, what you see might differ.)
Finally, if it were my image I'd spend a bit more time blending the transition line between the bird and the background. When selective sharpening and softening are done on an image, it can look too abrupt and unrealistic. On my own images where I do this type of edit, I also usually do some very careful, time-consuming blending at a transition line like this.)
Once it's downloaded and opened in Photoshop using ProPhoto, the image lightens up quite a bit on my calibrated monitor. Part of the problem is simply that the image wasn't converted to sRGB for online display. Most web browsers and such cannot display ProPhoto... sRGB color space is the standard.
However, once the image is converted to the narrower sRGB color space, the "banding" in the background becomes more of a problem.
The most probably "solution" would be to:
1. If it's a RAW file, take the original image into Photoshop as a 16 bit, ProPhoto or Adobe RGB file (TIFF or PSD, I don't know if it matters... though it might). If it's a JPEG, there's likely no recovering it. The data that's missing and creating the banding in the background would be gone and there's no getting it back. (This is a good example image for why it's important to shoot in RAW.)
2. Assuming it's a RAW, once it's opened in Photoshop, as described above in #1, select the background to lighten and blend it using slight blur. Some noise reduction might help it, too. The primary reason for lightening up the background is to better separate the bird from the background. In particular, the bird's head and the background behind it are too similar tonality in the image as it was posted originally.
3. During this process, while the background is selected out as a separate layer, it's also possible to apply some selective sharpening to just the bird and post it's standing upon, avoiding applying it to the background (because sharpening that will likely increase any pixelization and banding).
I hope you don't mind, below is a quick edit done using these steps. It's NOT successful correcting the banding effects in the background, because the JPEG was all that was available to work with. Instead working from a full size, original RAW file would likely have produced better results. This editing example is only able to show the effects of lightening up the background a bit and selectively sharpening the bird. Unfortunately, lightening the background also increases the appearance of banding.
Also notice how the image changes simply by converting it from ProPhoto to sRGB. I made no changes to the colors at all, besides that profile conversion, but that causes colors to appear a bit different. (I use Firefox browser that's color calibrated.... last time I checked, some other browsers aren't. Also, my monitor is calibrated. For these reasons, if you are using a different browser or viewing with an uncalibrated monitor, what you see might differ.)
Finally, if it were my image I'd spend a bit more time blending the transition line between the bird and the background. When selective sharpening and softening are done on an image, it can look too abrupt and unrealistic. On my own images where I do this type of edit, I also usually do some very careful, time-consuming blending at a transition line like this.)
Jul 21, 2020 12:54:27 #

Jul 21, 2020 13:56:25 #
Lots of great information. Thanks to everyone for the help. Now that I have all this new info, I need to dig into this and fix the problems.
Jul 21, 2020 14:24:31 #
CHG_CANON wrote:
From the image file, it's hard to say why the back... (show quote)
Looks like noise rather than pixelation.
If you want to reply, then register here. Registration is free and your account is created instantly, so you can post right away.