Two-color brushes?
Jun 30, 2020 14:14:01 #
I have never used brushes beyond the round one (sometimes fuzzy). I recently had occasion to try to make some specialized brushes for my family group shot identification project. I found that they were only one color (black). I expect they could be changed to another color but what I really wanted was a brush with both black and white.
Application:
When I have a group shot I want to ID everyone in the photo. For shots with a few people I have a pretty good way to produce an outline of the people, at which point I can number them and add names to the bottom of the image. But when there are 20 or 30 people in the photo it's tough to get the outline by the method I'm using. A brush with a generic head and shoulders would be nice, but with only one color, I either have a solid color brush or just an outline. I would like a black outline with white fill. That way when there are a couple people in close proximity, the first brush would get overwritten by the second brush so you can see that one head is definitely behind the other.
Anyone know of a way to do a two-color brush like that? Did some googling and didn't find anything useful. Only been at this in limited free time for a couple days now (plus family visiting).
(Convert Group Photo to Outline Using Photoshop)
More detail on my original thought:
Here is a photo of a large group of people. Trying to form an outline becomes somewhat cumbersome using my method outlined in the reference above.

My thought was to make an outline of a head and shoulders and use it as a stamp. The stamp would have a black outline and a white fill. That way I could overlap stamps and the white would cover the outline of the head/shoulders behind it. I start with an elliptical marquee, then add a triangular selection to form a head and shoulders. Then I convert that into a path, fill the path with white and stroke the path with black.


If I convert this into a brush, all I get is the black outline. Placing a transparent layer over the photo and using the brush gives me just the black outlines, which don't show which one is in front and which in back.


I can do what I want by taking that head and shoulders image on a transparent background and copying it onto a layer above the photo. But then I have to duplicate the head and shoulders layer and then move it over to the proper position. I have to do that for each head.


It would just be SO much easier if I could use a brush instead. Move mouse, click.
Application:
When I have a group shot I want to ID everyone in the photo. For shots with a few people I have a pretty good way to produce an outline of the people, at which point I can number them and add names to the bottom of the image. But when there are 20 or 30 people in the photo it's tough to get the outline by the method I'm using. A brush with a generic head and shoulders would be nice, but with only one color, I either have a solid color brush or just an outline. I would like a black outline with white fill. That way when there are a couple people in close proximity, the first brush would get overwritten by the second brush so you can see that one head is definitely behind the other.
Anyone know of a way to do a two-color brush like that? Did some googling and didn't find anything useful. Only been at this in limited free time for a couple days now (plus family visiting).
(Convert Group Photo to Outline Using Photoshop)
More detail on my original thought:
Here is a photo of a large group of people. Trying to form an outline becomes somewhat cumbersome using my method outlined in the reference above.
My thought was to make an outline of a head and shoulders and use it as a stamp. The stamp would have a black outline and a white fill. That way I could overlap stamps and the white would cover the outline of the head/shoulders behind it. I start with an elliptical marquee, then add a triangular selection to form a head and shoulders. Then I convert that into a path, fill the path with white and stroke the path with black.
If I convert this into a brush, all I get is the black outline. Placing a transparent layer over the photo and using the brush gives me just the black outlines, which don't show which one is in front and which in back.
I can do what I want by taking that head and shoulders image on a transparent background and copying it onto a layer above the photo. But then I have to duplicate the head and shoulders layer and then move it over to the proper position. I have to do that for each head.
It would just be SO much easier if I could use a brush instead. Move mouse, click.
Jun 30, 2020 15:26:16 #

I am intrigued by the possibility! Hopefully, someone will have the answer. Brusheezy offers "two-tone brushes" so there has to be a way! Maybe try Googling that term?
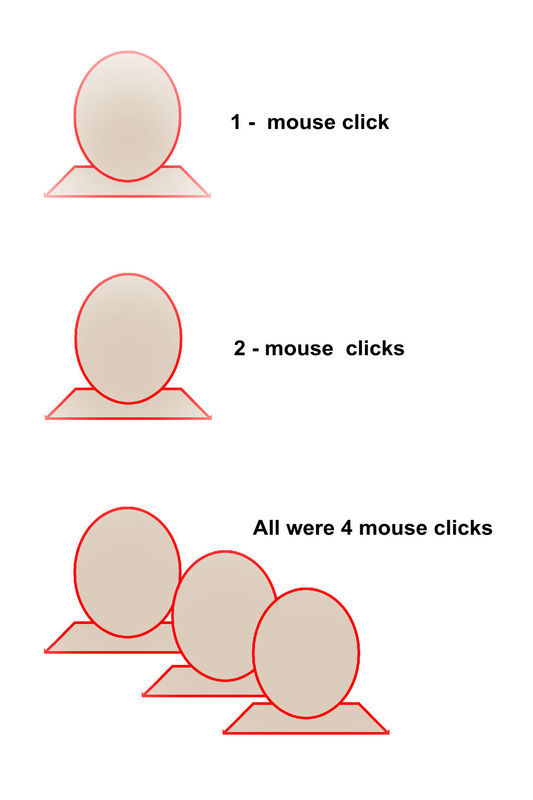
If there is no other option, you could do your clicks with black, then change color swatch to white and reduce the size of brush slightly and click each spot again. I suspect you will be more fastidious with your placement than I was here in this demo
If there is no other option, you could do your clicks with black, then change color swatch to white and reduce the size of brush slightly and click each spot again. I suspect you will be more fastidious with your placement than I was here in this demo
Jun 30, 2020 16:13:05 #
Whenever I get a new tool, I try to use it for something it was never designed for.
Jul 1, 2020 06:42:07 #

DirtFarmer wrote:
Whenever I get a new tool, I try to use it for something it was never designed for.
The mixer brush may work for you.
Catch is ... first mouse click is not at full opacity.
Example attached.
8 min video on making the mixer brush.
https://www.youtube.com/watch?v=mgNeaYN4hHI
Jul 1, 2020 08:19:07 #

Don't think you can make a 2 color brush. Have you tried creating a custom shape? Here is a "You Tube video" that explains how much better than I could explain it.
https://youtu.be/h7oxtRVXwxA
BTW, if you can't do 2 color shape, place you shape in white, then add outline via Blend options, copy and paste effects from lay to layer.
https://youtu.be/h7oxtRVXwxA
BTW, if you can't do 2 color shape, place you shape in white, then add outline via Blend options, copy and paste effects from lay to layer.
Jul 1, 2020 09:16:58 #
I've made a number of brushes, and it really is quite easy. Have a look at these YouTube videos:
https://www.youtube.com/watch?v=9tNDSMpeTXg
https://www.youtube.com/watch?v=NEpbQlyxRuw
Even though these are for PSE, I'd think that it works much the same in PS.
I think that if you put the image you want to use for the brush, on a new document, you can take it from there.
https://www.youtube.com/watch?v=9tNDSMpeTXg
https://www.youtube.com/watch?v=NEpbQlyxRuw
Even though these are for PSE, I'd think that it works much the same in PS.
I think that if you put the image you want to use for the brush, on a new document, you can take it from there.
Jul 1, 2020 09:26:59 #
Morning Star wrote:
I've made a number of brushes, and it really is quite easy. Have a look at these YouTube videos:
https://www.youtube.com/watch?v=9tNDSMpeTXg
https://www.youtube.com/watch?v=NEpbQlyxRuw
Even though these are for PSE, I'd think that it works much the same in PS.
I think that if you put the image you want to use for the brush, on a new document, you can take it from there.
https://www.youtube.com/watch?v=9tNDSMpeTXg
https://www.youtube.com/watch?v=NEpbQlyxRuw
Even though these are for PSE, I'd think that it works much the same in PS.
I think that if you put the image you want to use for the brush, on a new document, you can take it from there.
Brushes are indeed easy. But they are a single color and I need two, white for the body of the brush and a black outline. Once I have a brush I can make it any color I want, but only one.
Jul 1, 2020 09:50:19 #
OnDSnap wrote:
Don't think you can make a 2 color brush. Have you tried creating a custom shape? Here is a "You Tube video" that explains how much better than I could explain it...
That works. I just make the selection and convert to a path. I don't have to fill the path nor stroke it. That can be done at application time by settings on the selected shape. Also, the fill and stroke don't have to be black and white.
Not quite as simple as a brush would be but it does the job. When you click on the image to place the shape it gives you a dialog to set the width and height and whether to place the shape in the center and whether to preserve proportions. If you preserve proportions, you only have to set either the width or the height and the other is calculated by the aspect ratio of the shape. You want to place the shape in the center so you can control where it is placed more easily.
Once you set the parameters correctly, the shape will be the same on the next click. It takes two actions to place the shape: click on the spot you want it, and hit enter to accept the parameters in the dialog. Not quite as easy as a brush would be but much easier than copying the shape otherwise.
Jul 1, 2020 09:53:27 #
Jul 1, 2020 11:03:41 #

Just curious. What will the final image look like? A composite or two separate pics.
Jul 1, 2020 11:22:56 #
Fotoartist wrote:
Just curious. What will the final image look like? A composite or two separate pics.
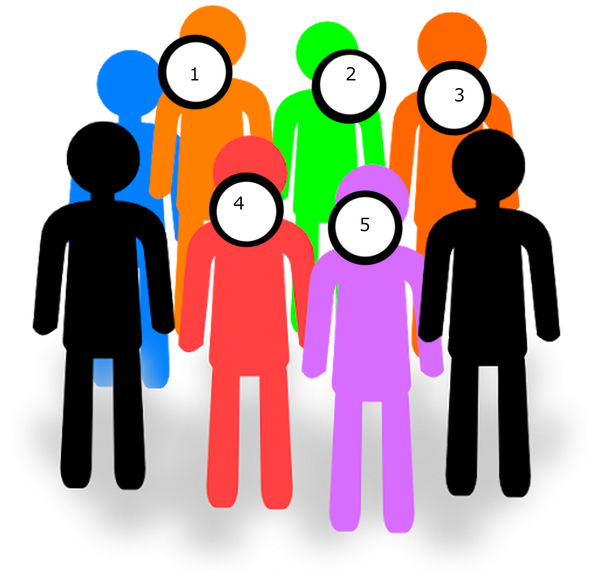
Here's an example where I was able to make an outline. I put numbers on the heads and made a list of names. The final image is a composite of the original, the outline, and the text.
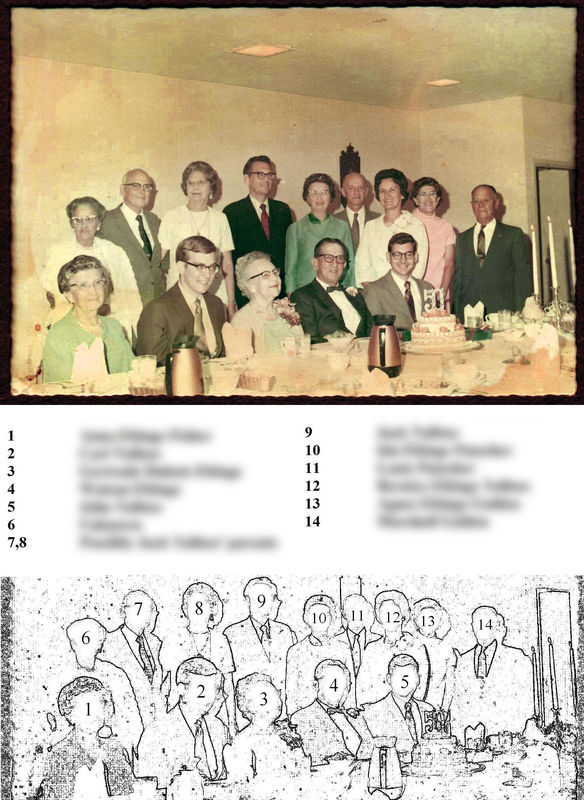
What I was trying to do was handle group shots with a lot of people close together (second shot) where it was difficult to get a reasonable outline. (PS, the second shot, probably from 1947, is not my family, but was a project for the local Historical Society. We got all the names. And several of the people are still in town.
Last, I put the head and shoulders shapes on the large group shot to see what it would look like. Haven't put numbers on yet. I might want to truncate the shoulders a bit. Still thinking about it.


Jul 1, 2020 11:45:31 #
I see! It will be two separate pics, maybe printed on both sides? A brilliant approach. I will be remembering this the next time I have to do it. Thanks.
Jul 1, 2020 12:58:33 #
DirtFarmer wrote:
Last, I put the head and shoulders shapes on the large group shot to see what it would look like. Haven't put numbers on yet. I might want to truncate the shoulders a bit. Still thinking about it.
Last, I put the head and shoulders shapes on the large group shot to see what it would look like. Haven't put numbers on yet. I might want to truncate the shoulders a bit. Still thinking about it.
Image #4 ... each head shape a separate layer ?
Jul 1, 2020 14:05:41 #
dannac wrote:
Image #4 ... each head shape a separate layer ?
Since the head shapes are applied separately for each head, they are each a separate layer. Not only that, the numbers I will be putting on the head shapes will all be on separate layers as well. That makes a total of 139 layers for that picture (1 photo, 69 heads, 69 numbers).
I would probably group the head shapes and the numbers just to pretty up the layers panel, but it's not necessary.
Jul 1, 2020 14:07:31 #
Fotoartist wrote:
I see! It will be two separate pics, maybe printed on both sides? A brilliant approach. I will be remembering this the next time I have to do it. Thanks.
Actually, I prefer to have it all on one image (like the first example). That way the photo and the ID will not get separated. If someone wants to print the photo without the ID, a simple crop is all that is needed. But the whole point was to arrange things so that the ID was always with the photo.
If you want to reply, then register here. Registration is free and your account is created instantly, so you can post right away.