Mamiya/Sekor 500 DTL
May 22, 2020 09:24:39 #
foxfirerodandgun
Loc: Stony Creek, VA
I recently picked up this camera in its original leather cover with the following lens:
mamiya/sekor 50mm 1:2
mamiya/sekor 35mm 1:2.8 w/ Hard leather case
Vivitar Telephoto 135mm 1:2.8 w/ Hard leather case
All three lens appear to be in excellent condition with no signs of internal fungus or dust.
Externally the camera body itself appears to be in like-new condition with dust & tiny particles visible in the viewfinder. Judging by their appearance the light seals probably need to be replaced, however, internally everything looks clean and intact. The shutter releases properly and the film advance operates properly. I have not replaced the battery to check out the exposure meter at this point. After a bit of research I understand that the max shutter speed for the 500 DTL is 1/500 of a second, and that the 1000 DTL model has a shutter speed of 1000 of a second.
Now for my questions.
1) The price paid for the camera & lens is negligible so what would be a "ballpark" charge to have the camera body fully serviced & light seals replaced by a reputable camera repair shop and is this camera worth the effort?
2) I have used Raleigh Camera Service in Raleigh, NC in the past with excellent results and fair pricing. I can't locate them through Internet searches and have lost their contact information, so I assume that they are no longer in business. With that said, what camera repair shops could anyone recommend?
3) Where can I find reasonably priced 35mm film both color & black & white?
All comments welcomed. Many thanks.
May 22, 2020 10:07:42 #

Back about five years ago I went to the KEH booth at the annual camera show at the Javits Center in NYC. I described a Mamiya system I owned and wondered what they would give me for it. The system was two bodies, a J model and a 1000 model, a 45mm, 55mm, 80mm, macro lens, 200mm, 2x extender, waist level viewer, a pentaprism, several 120 and 220 film inserts. They offered 245.00 to 275.00. I told the guy before I would sell at that price I would fill the bodies with cement and use them as door stops! Now, film has come back somewhat and some photographers are using it more than before. I would imagine the system described above would go in a private sale for around 700.00. The system you describe would go for much less. I would not think of having the equipment cleaned and upgraded unless it is important to you that you have a film camera and plan to do quite a bit of shooting with it. Otherwise, just keep it as legacy equipment like some of us do with old equipment and use it as something interesting to set on a bookshelf.
May 22, 2020 10:31:50 #

KEH is my go-to but I saw one body there for $12 , but it has a huge dent in the prism housing.
Otherwise, check E-Bay for sold listings.
Some interesting tidbits can be found here that apply to both the 500 and 1000 DTL.
Like battery type and the fact that not all Pentax lenses will mount, if you were to get one.
https://www.kenrockwell.com/mamiya/1000-dtl.htm
Years ago, I used to sell these at the camera department when I worked at the base exchange.
A lot of the major camera stores carry film.
Check your local one first, they need your business.
B&H has a lot of choices
Freestyle https://www.freestylephoto.biz/category/1-Film?attr%5B%5D=1-3
May 22, 2020 11:20:36 #

foxfirerodandgun wrote:
I recently picked up this camera in its original l... (show quote)
There are light seal kits available I bought mine from EBAY. They are easy to install your self. We have a local shop in the next state over Rhode Island that still works on these older cameras and the last CLA I had done on my Leica M2 they charged me $100. They do all my work. I’m sure there is a shop near you. I think there is a couple of shops in Richmond
May 22, 2020 11:51:03 #
GoofyNewfie wrote:
KEH is my go-to but I saw one body there for $12 , but it has a huge dent in the prism housing.
Otherwise, check E-Bay for sold listings.
5D=1-3
Otherwise, check E-Bay for sold listings.
5D=1-3
eBay is hardly necessary. The “$75 outfit” category is huge and it’s members easily recognized. Thaz the valuation +/- $35. All the value is in the lenses. No one is looking for that camera but plenty of users are looking for m42 lenses.
You could use the lenses yourself on an affordable Fuji, Sony, etc. their utility value is far beyond their dollar value due to the brand name.
May 22, 2020 11:54:09 #

The Mamiya Sekor 500 models were decent performers especially for cameras at the low end of the price scale. The bodies share literally everything with the 100 except the top shutter speed (Urban camera legend has it that you can modify the shutter speed selector to get that speed as well) and the two metering choices are useful and fairly accurate. In 1970, it listed at $179.95 and was often discounted as a loss leader. This was the same price as a Canon FX, the two best low end choices. For another twenty bucks you could get a Nikkormat FS, Yashica TL, or Canon TL-QL, but you had to step up to $220 to get the Mamiya 1000DTL. For comparison, that would be $1200 for the 500 and $1450 for a 1000 in today's dollars.
I've seen many of these in good condition on eBay at about the $50 range. The 28mm Mamiya lens is a decent lens - you can find them for under $20, but there are many better choices for an M42 Pentax mount. That's one of the good things about this camera - the wide variety of lens choices available. The Vivitar 135mm is, IMHO, not much of a lens, but you can find plenty of Vivitar and Soligor models for ten bucks or so. If I were you, I'd look for a used Pentax 135mm/f3.5, which is a great lens and can be found well under $50.
As others have said, the light seal repair is easy-peasy, and you can buy the foam pre-cut to the right size for about ten dollars. You can also buy a piece of foam at a craft store or online source for two or three dollars and cut it to size with an X-acto knife.
There are many repair shops that will do mail order, but I don't really think you need one.
Batteries will be your biggest challenge, as the Mamiyas did not have a bridge circuit to allow the use of 1.5 volt batteries available today. You cn either buy an adaptor online (eBay or Amazon) to allow you to use 1.4 volt hearing aid batteries which don't last long but are very cheap, or you can buy "Wein" cells online for about $4-$5, which have the proper 1.35 volt output.
As to film, Amazon is probably your cheapest source.. KEH B&H, Hunt's and other online retailers also sell film, the more you buy, the cheaper the unit price. Kodak Gold is probably the best bargain, but Kodak Portra 400 is the gold standard. Ilford B&W film is better than Kodak's, IMHO, and Fuji color films offer different personalities and seem to be mostly a "love 'em or hate 'em" thing with many photographers.
I shoot a lot of film, and I'll be glad to answer any other questions.
Andy
May 22, 2020 12:07:41 #
User ID wrote:
.... All the value is in the lenses. No one is looking for that camera but plenty of users are looking for m42 lenses.
You could use the lenses yourself on an affordable Fuji, Sony, etc. their utility value is far beyond their dollar value due to the brand name.
You could use the lenses yourself on an affordable Fuji, Sony, etc. their utility value is far beyond their dollar value due to the brand name.

May 22, 2020 12:28:07 #
User ID wrote:
eBay is hardly necessary. The “$75 outfit” category is huge and it’s members easily recognized. Thaz the valuation +/- $35. All the value is in the lenses. No one is looking for that camera but plenty of users are looking for m42 lenses.
You could use the lenses yourself on an affordable Fuji, Sony, etc. their utility value is far beyond their dollar value due to the brand name.
You could use the lenses yourself on an affordable Fuji, Sony, etc. their utility value is far beyond their dollar value due to the brand name.
Maybe utility value, but not much cash. If anyone thinks so, I've got a bunch of nice clean third party glass from the 60s and 70s in M42, Canon breech lock, and Minolta mounts. They're not worth the postage costs of shipping them in today's market. The only sought after marques are Nikon, Canon, and Pentax branded, plus of course, anything German. I s'pose this is a source of dirt-cheap bargain glass for some MILC shooters, but there are many other affordale choices in higher end lenses.
Andy
May 22, 2020 12:44:51 #
AndyH wrote:
Maybe utility value, but not much cash. If anyone ... (show quote)
There are Facebook groups dedicated solely to “vintage” glass. I don’t see the draw for most of the images they post, but a few of the results can be stunning.
May 22, 2020 14:08:38 #
foxfirerodandgun
Loc: Stony Creek, VA
Thank you for your comments Bridges, GoofyNewfie, turp77, User ID, AndyH. Being a "Nikon snob" I haven't had any experience with a mamiya camera or the screw type M42 lens. What would be the best, safest, and easiest way to clean the viewfinder prism to remove the dust and other particles? I may try to sell the package at a later date, but for the near future I may just get a few rolls of film & try it out. Many thanks again.
May 22, 2020 14:36:09 #
foxfirerodandgun wrote:
.... What would be the best, safest, and easiest way to clean the viewfinder prism to remove the dust and other particles? .
May 22, 2020 15:01:15 #
May 22, 2020 15:06:13 #
foxfirerodandgun wrote:
Thank you for your comments Bridges, GoofyNewfie, turp77, User ID, AndyH. Being a "Nikon snob" I haven't had any experience with a mamiya camera or the screw type M42 lens. What would be the best, safest, and easiest way to clean the viewfinder prism to remove the dust and other particles? I may try to sell the package at a later date, but for the near future I may just get a few rolls of film & try it out. Many thanks again.
Sadly, there is no real way to clean the interior glass of a prism. I once tried it on an old, cheap SLR for the experience, and it wasn't pretty. You can blow out dust on the mirror and bottom of the focusing screen, and on the viewfinder, which may help. It's also possible to gently, very very gently, clean the mirror surface and bottom of the focusing screen with a Q-tip and isopropyl alcohol.
If you want to attempt the prism disassembly, be prepared for failure. Once you begin, it's hard to go back or stop incomplete. The process is to first find a manual for disassembly or find an online repair video. Then you remove the top cover and whatever screws or clamps hold the prism assembly to the top plate of the camera. You have to be extremely careful not to disturb the meter wiring during this process. I'm not sure, in this case, how the wires to the meter are connected to the prism sensors, but you would likely have to unsolder them. And that's only the start....
Now you have to disassemble the prism assembly, probably using a hair dryer or heat gun to moderately heat it up and gently pull apart the elements. They are probably cemented with balsam, and you will need some balsam or another transparent, thin, cement to put the prism back together. Clean the glued surfaces of remaining balsam with a soft microfiber cloth and hydrogen peroxide until they're sparkly clean. Then reassemble the prism one piece at a time, based on the drying time for the cement you're using. It's exactly the same process you'd use to disassemble and clean a lens, but without the central alignment problems. When you have glued each joint and waited for it to dry, inspect carefully for separation and clarity. If there are problems, disassemble and reglue.
Now you've got the prism back together, give it one final look through the viewfinder eyepiece. If it's perfectly clear, praise the Lord and go buy a lottery ticket. If it's worse than it was when you started, try to contain your shock, and reattach the wires. From there, it's just a matter of reassembling the top section and meter in the reverse order you took it apart.
If that hasn't discouraged you (maybe you haven't been paying attention?) it's actually kind of a fun, though tedious, process. The catch is that it's not worth doing except on an expensive and badly clouded prism. Of course, that's exactly the type of camera that you shouldn't attempt this on except as an absolute last resort. It will be expensive to send it out to a pro, but if it's your prize Icarex, it might be worth it. On a 500DTL, you won't be risking anything but your own time because there is no way it's worth sending out a $50 camera for a $200-$300 repair job.
Maybe someone will be interested in learning this skill (or in poking their eyeballs with sharp sticks) as I was, and be tempted to attempt it. But for most of us, blowing out all the accessible dust and dirt and living with the result is the best idea.
Andy
PS: I am reminded that some SLRs use non-cemented prisms or mirror prisms like low level DSLRs. It's a lot easier if that's the case, but I have no idea which cameras might use this method. You may also find that the viewfinder separates easily from the prism, and that the space between them is where the dust is located. You can determine that after getting the top cover off without doing further damage. If so, that's a big improvement for a low effort. Good luck!
May 22, 2020 15:07:16 #
foxfirerodandgun wrote:
I don't think so. 
Only good for Canon.
Evidently the Mamiyas weren’t sealed very well. Ken Rockwell’s review link I sent you showed a really dirty screen/viewfinder as well. I don’t recall ever having a viewfinder that dirty. Though most of my 35mm SLR’s had removable screens and prisms so I could clean them easier.
May 22, 2020 15:09:35 #

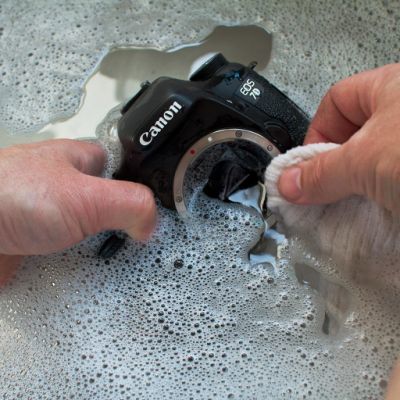
Before doing what Andy said check the foam surrounding the focusing screen and make sure they are OK. If they disintegrated they may fly all over when you blow air on it.
The washing is good but only works for Canon EOS DSLR. Not even with their film cameras. Works best with the 1DX series and 5D series. May not work on the Rebel.
The washing is good but only works for Canon EOS DSLR. Not even with their film cameras. Works best with the 1DX series and 5D series. May not work on the Rebel.
If you want to reply, then register here. Registration is free and your account is created instantly, so you can post right away.