When is a re-sized photo not a re-sized photo in PS CS6?
Apr 24, 2020 14:33:24 #

I was given 18 photos of varying sizes and pixels.
I was asked to crop and re-size to a preset; 1" x 1"
Not a problem on the screen.
However, when i opened a few to see how they were, most of the photos almost filled the entire viewing screen. Why?
I also made a table 5 columns x 2 rows.
The goal was to place each photo within each cell.
When I inserted the photo(s) once again the photo was at least a 5"x5" or larger. Why?
Am I saving the resized/cropped photo differently than is required of the 1 x 1 size wanted?
HELP!!
Thanks
SqBear
aka Dave
Apr 24, 2020 15:00:14 #
SqBear wrote:
I was given 18 photos of varying sizes and pixels.... (show quote)
Photoshop is perfect for things like this. I would create a file at a reasonable PPI. The pictures are going to end up at 1"x1", really small, so I would probably choose a PPI about 150. My file would be my paper size. Lets say 8.5x11. (Could be any size) On this canvas, using guides and the ruler, I would create a 1"x1" spot in which to drag each picture. You only need one spot like this on the canvas because you are only using it to size one picture at a time. I would open one of those photos in PS and drag it onto the new canvas. I would place one corner of the dragged file into one corner of the box. It should snap to it. The rest of the picture will leak out probably way past the edges of the box. Control T gives you the transform command. Do that, grab one of the corners that is outside the box it to fill the box. The photo will get smaller and smaller as you move it. Make it line up with the guides as best you can. You are probably going to have to trim it some to make it fit 1"x1" perfectly. Thats just another step that you can figure out. Wa laa... 1"x1" picture on its own layer at 150PPI. Drag it somewhere else on your canvas and repeat with another picture. A job and problem like this is really pretty quick and easy in Photoshop and probably many other programs. When they are all on the canvas you can move them about to make it look the way you want it too. Using 'snap to guides' really helps.
...Cam
Apr 24, 2020 15:02:25 #
Lucian
Loc: From Wales, living in Ohio
Does not matter what they looked like on the viewing screen when you clicked on them to see them, what matters is when you go to "Image" and then choose "Size" and then see if it says 1 x1 inches. If it does then all is well. If is shows a different size, then you are doing something somewhere.
Apr 24, 2020 16:02:28 #
RichieC
Loc: Adirondacks
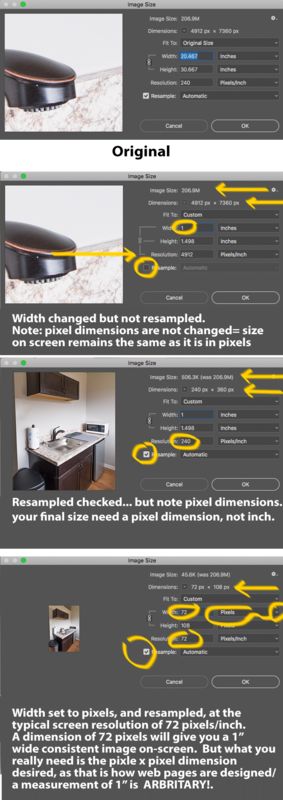
1" is not a good way to ask or supply an image for online. you need another figure... resolution. ie 1 x 1" at 72dpi. The best way is to ask what pixel x pixel dimension is needed as that is how web page code is written- in pixels. inch measurements is not!~.
See attached image.
Obviously I only worked with one dimension... if you need a square image, you'd first have to crop square. then whatever you enter- ie width or height, the chain icon ( In the bracket to the left of width and height) turned on means the ratio of width/height, in your case, square will remain as you should expect. If you click it off, whatever you enter in width or height will change independently of each other and stretch or compress your image, not sure why you would want to do that.
Apr 24, 2020 18:58:01 #
CamB wrote:
Photoshop is perfect for things like this. I would... (show quote)
Thanks Cam!
I'll work on the suggestion.
Not quite clear on it yet, but I'll figure it out... eventually.
Thanks again!!
Apr 24, 2020 19:03:10 #
Lucian wrote:
Does not matter what they looked like on the viewing screen when you clicked on them to see them, what matters is when you go to "Image" and then choose "Size" and then see if it says 1 x1 inches. If it does then all is well. If is shows a different size, then you are doing something somewhere.
Lucian, this is what i was referring to... I "cropped" the photos to a pre-set to 1x1. Saved the file, opened in Windows viewer and it was at least 5x5 if not 5x7! The 1x1 pre-set is marked as "Square".
Make sense?
Thanks for the reply to my question!!!
SqBear
aka Dave
Apr 24, 2020 19:12:55 #
RichieC wrote:
1" is not a good way to ask or supply an imag... (show quote)
RickieC, Thanks for the information and the screen shots.
I'm not using the photos for on-line, they are to be used in an Ad. As I say, I inserted a table into Word, then inserted the 1x1 photo in the first cell and so on.. Each time I inserted a photo in a cell, it was BIG!!
I then had to size it to the size I needed via the "Transform" spots around the photo. Took FOREVER and i had 14 photos to insert for the ad. Turns out now that I have 18 photos...which now will require more transformation.
Guess, what I am asking, when I crop the photo to a 1x1, whey is it not a 1x1?
Thanks again RickieC, i will study your reply diligently!!
SqBear
aka Dave
Apr 25, 2020 06:21:45 #

Hi Dave. When using the cropping tool, are you typing in both width and height at 1" and setting the ppi to 72 or 96?
Apr 25, 2020 08:38:02 #
35B
Loc: Australia
When you use the crop tool and select 1x1, it is a ratio. The image could be 2" x 2" or 3" x 3" or any size where the width is the same as the height.
I regularly use a crop of 2x3 for my 4" x 6" prints
Hope this makes sense.
35B
I regularly use a crop of 2x3 for my 4" x 6" prints
Hope this makes sense.
35B
Apr 25, 2020 12:04:23 #
yssirk123 wrote:
Hi Dave. When using the cropping tool, are you typing in both width and height at 1" and setting the ppi to 72 or 96?
yssirk123, The Crop pre-set a drop down menu, when I click on that it inserts the 1 x 1 for me. I guess this is a double safety?
As far as setting the ppi, where is this setting?
I have the photo on the screen in the crop mode and I cannot locate the ppi settings?
Could you advise me?
Thanks
Dave
Apr 25, 2020 12:09:10 #
35B wrote:
When you use the crop tool and select 1x1, it is a ratio. The image could be 2" x 2" or 3" x 3" or any size where the width is the same as the height.
I regularly use a crop of 2x3 for my 4" x 6" prints
Hope this makes sense.
35B
I regularly use a crop of 2x3 for my 4" x 6" prints
Hope this makes sense.
35B
35B, yes, I use the same settings for a 4x6 crop as well and it seems to work out pretty good.
HOWEVER, . . when ordering the prints online, Costco, Sam's, etc. they advise me that the prints are 2, 3, 6 mg each and caution me. Thus, I open Irfanview and crop to 4x6 and the pixels drastically drop. I cannot see any difference in quality using this method.
Thanks for your reply!!
Dave
Apr 25, 2020 18:14:16 #
SqBear wrote:
yssirk123, The Crop pre-set a drop down menu, when I click on that it inserts the 1 x 1 for me. I guess this is a double safety?
As far as setting the ppi, where is this setting?
I have the photo on the screen in the crop mode and I cannot locate the ppi settings?
Could you advise me?
Thanks
Dave
As far as setting the ppi, where is this setting?
I have the photo on the screen in the crop mode and I cannot locate the ppi settings?
Could you advise me?
Thanks
Dave
Dave - you might want to not use the crop preset, which is just a ratio and doesn't specify width or height specifically. Instead, choose the crop menu option labeled W x H x Resolution, and input 1 in the width box, 1 in the height box, and either 72 or 96 in the resolution box. Also make sure that the last box shows "px/in".
Hope this helps.
Apr 26, 2020 06:36:47 #
yssirk123 wrote:
Dave - you might want to not use the crop preset, which is just a ratio and doesn't specify width or height specifically. Instead, choose the crop menu option labeled W x H x Resolution, and input 1 in the width box, 1 in the height box, and either 72 or 96 in the resolution box. Also make sure that the last box shows "px/in".
Hope this helps.
Hope this helps.
yssirk123, well, at least I found the "Crop" from the image drop down menu...However, I have a photo on the screen. The Crop selection is greyed out, cannot use this feature. I have a CS6 Student/Teacher version and it cannot be up graded and I do not receive any updates, of which I'm sure the program is outdated.
Thanks for your help and explanation!
Stay safe
Dave
(I'll keep trying...something!)
Apr 26, 2020 13:44:17 #

yssirk123 wrote:
Dave - you might want to not use the crop preset, which is just a ratio and doesn't specify width or height specifically. Instead, choose the crop menu option labeled W x H x Resolution, and input 1 in the width box, 1 in the height box, and either 72 or 96 in the resolution box. Also make sure that the last box shows "px/in".
Hope this helps.
Hope this helps.
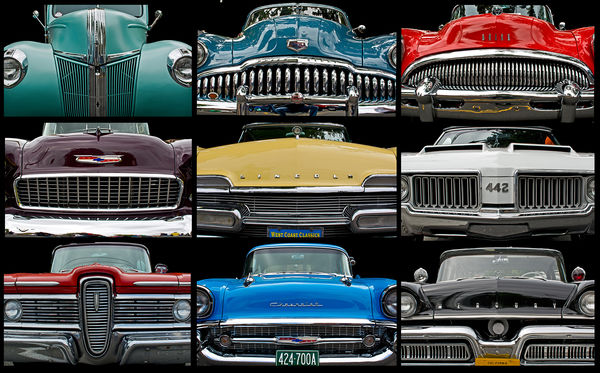
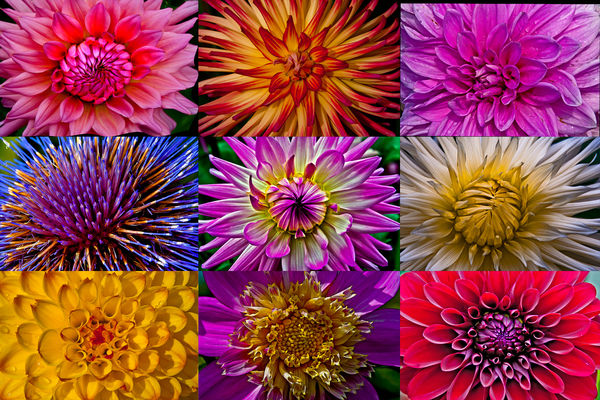
The first thing I would consider is this: As illustrated above, if the aspect ratio of the original 18 images are not perfectly square, you will lose some of each image when cropping to a square aspect ratio such as 1:1. With that understood, this can be easily accomplished. I would first create a blank "new file". That is where I would place each image in the composite. I would then open each image, select all of it and copy it to the new file I created. Then using the edit --> free transform command, I would size and move it to where I want it in the new file. I would do that for all 18 images then flatten the composite. Here's a couple composites I did this way in the distant past. I did them with PS CS5.
Apr 26, 2020 19:03:09 #
saxman71 wrote:
The first thing I would consider is this: As illus... (show quote)
saxman71, Thanks for the reply!!
That is basically what i was trying to achieve without having to resize each and every photo and not get the White spaces beside each photo from the borders!!
I really am an amateur when it comes to things like this.
Guess, what i expect is when there is a pre-set size, this is what i want, nothing more or different!!
But, then using the pre-sets, this is what I am NOT getting at all.
Saxman71, THANKS for the reply and to all UHH members that replied, THANK YOU.
I have copied each reply and will try to get the same results that is/was described to me patiently by you!!
Dave


If you want to reply, then register here. Registration is free and your account is created instantly, so you can post right away.