Extending sun rays, your help please
Apr 5, 2020 13:28:47 #

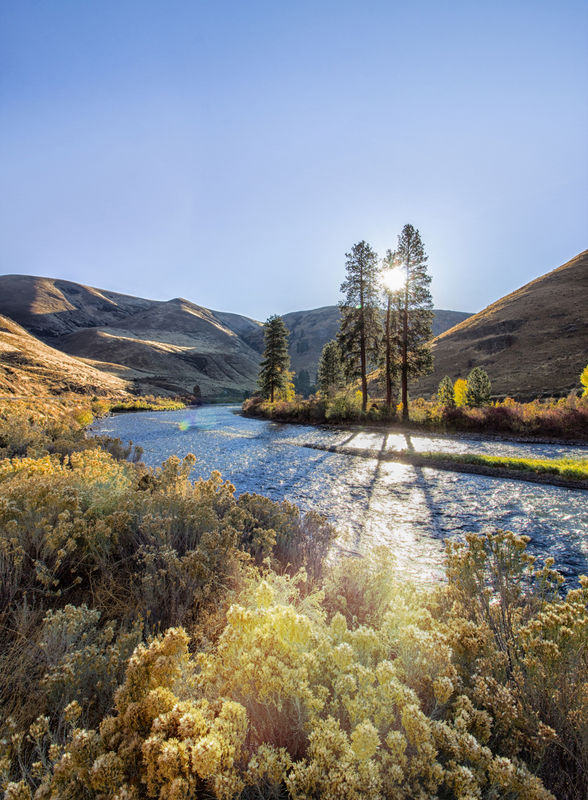
It was suggested that rather than simply lightening the foreground a bit, I should extend the shafts of sunlight between the trees' shadows, bringing them to bottom edge of frame.
#1 is my effort, futzing with blend modes, luminosity, color and dodging. #2 is the original for you to show me a better way
Many thanks!
#1 is my effort, futzing with blend modes, luminosity, color and dodging. #2 is the original for you to show me a better way
Many thanks!

Apr 5, 2020 14:05:20 #
Apr 5, 2020 14:06:18 #
You accomplished your task with flair (pun intended). IMHO You took an oh well photo to a WOW. Did you just play around with blend modes and such or did you have a general plan in mind. Just curious because a lot of my attempts to create something out of nothing successes are just random luck.
Apr 5, 2020 14:07:45 #
cyclespeed wrote:
Hi, thanks for your comment. No, just PS Elements, Nik Collection and an old Topaz Simplify Do you use Luminar 3 or 4? Very easily done there.

Apr 5, 2020 14:09:06 #
Curmudgeon wrote:
Funny you should mention random, because that is what I did with another photo after I posted this, and I managed to "luck" onto a better blend mode. I'll post info and a revised pic after I see if anyone else wants to try an edit.You accomplished your task with flair (pun intended). IMHO You took an oh well photo to a WOW. Did you just play around with blend modes and such or did you have a general plan in mind. Just curious because a lot of my attempts to create something out of nothing successes are just random luck.
Thanks Jack!
Apr 5, 2020 14:44:02 #
I can say a few ways for Lightroom and photoshop users. In Lightroom you can anchor an adjustment tool at one size in one spot then hold down shift and click on a new spot to get a straight line. If you start small then change the size of the tool on the other end it will graduate the line thickness from small to large. Photoshop tools like dodge and burn also do the straight line trick, but won't do the graduated size, so you have to make multiple passes with a smaller tool.
Apr 5, 2020 14:45:55 #
bleirer wrote:
That LR trick sounds very handy! PS Elements works similar to PS in that regard. I did hold down the shift key for the straight line, though maybe I should try a harder edged brush?I can say a few ways for Lightroom and photoshop users. In Lightroom you can anchor an adjustment tool at one size in one spot then hold down shift and click on a new spot to get a straight line. If you start small then change the size of the tool on the other end it will graduate the line thickness from small to large. Photoshop tools like dodge and burn also do the straight line trick, but won't do the graduated size, so you have to make multiple passes with a smaller tool.
Apr 5, 2020 14:57:23 #
Linda From Maine wrote:
That LR trick sounds very handy! PS Elements works similar to PS in that regard. I did hold down the shift key for the straight line, though maybe I should try a harder edged brush?
Maybe a little, but keep it subtle, I think, so it doesnt look 'photoshopped.'
Another way that gives a lot of control is a layer with a 'hide all' mask above the base. Brighten this whole layer then white paintbrush with small flow to reveal just the 'rays'.
Apr 5, 2020 15:11:34 #

Linda From Maine wrote:
It was suggested that rather than simply lightening the foreground a bit, I should extend the shafts of sunlight between the trees' shadows, bringing them to bottom edge of frame.
#1 is my effort, futzing with blend modes, luminosity, color and dodging. #2 is the original for you to show me a better way
Many thanks!
#1 is my effort, futzing with blend modes, luminosity, color and dodging. #2 is the original for you to show me a better way
Many thanks!
Create a new empty layer over the image.
Draw straight lines beyond the ends in dark grey or dark brown.
Play with blends. If you get anything you like, flatten and you're done.
Apr 5, 2020 15:18:54 #
bleirer wrote:
Will try, thanks!Maybe a little, but keep it subtle, I think, so it doesnt look 'photoshopped.'
Another way that gives a lot of control is a layer with a 'hide all' mask above the base. Brighten this whole layer then white paintbrush with small flow to reveal just the 'rays'.
Another way that gives a lot of control is a layer with a 'hide all' mask above the base. Brighten this whole layer then white paintbrush with small flow to reveal just the 'rays'.
Apr 5, 2020 15:19:41 #
l-fox wrote:
For the rays, or is this for the tree shadows?Create a new empty layer over the image.
Draw straight lines beyond the ends in dark grey or dark brown.
Play with blends. If you get anything you like, flatten and you're done.
Draw straight lines beyond the ends in dark grey or dark brown.
Play with blends. If you get anything you like, flatten and you're done.
Apr 5, 2020 15:24:44 #
Linda From Maine wrote:
For the rays, or is this for the tree shadows?
Trees...were it mine I wouldn't mess with the rays.
Apr 5, 2020 16:08:13 #
bleirer wrote:
I realized that the way I'm used to - and currently prefer - is to change opacity and selectively mask, if needed. Just personal preference and familiarity.Another way that gives a lot of control is a layer with a 'hide all' mask above the base. Brighten this whole layer then white paintbrush with small flow to reveal just the 'rays'.
I did a bit of hard brush on the edges of the bright areas, filled in between those "lines" with soft brush. Subtlety seemed key, as you suggested.
---
I decided to try Larry's suggestion for extending the shadows while also doing the brightening to the sunlit areas. Note that most layers have some masking, and I also adjusted opacity. People will see differently depending on their monitors and will probably also have different preferences re the amount of color and brightness. These adjustments are easily changed with layer opacity and/or the blend mode.
As a last step, one I realized was needed after posting, is to add Nik glamour glow to the sunlit section of foregroud. Then I brightened a little, but now it looks a skosh too bright

Time for a break! Thank you all for your time and interest.


Apr 5, 2020 17:32:40 #
twosummers
Loc: Melbourne Australia or Lincolnshire England
Luminar has this function built in - very easy and flexible. Give it a try
Apr 5, 2020 17:37:33 #
twosummers wrote:
Thanks, but no more software for me - a New Year's Resolution Luminar has this function built in - very easy and flexible. Give it a try
If you want to reply, then register here. Registration is free and your account is created instantly, so you can post right away.