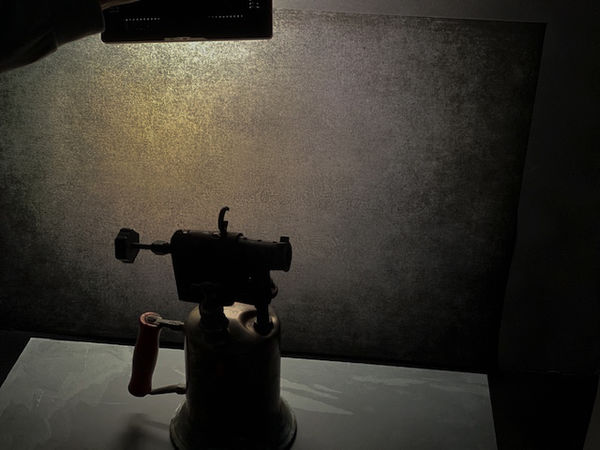
Antique Blow Torch
Feb 19, 2020 05:29:35 #

A belching beast, like this one, struck fear in my childhood heart when my dad started it.
Jim-Pops put in gasoline, pump up the pressure and make the dragon breath flames ... dramatic shots for sure.
Jim-Pops put in gasoline, pump up the pressure and make the dragon breath flames ... dramatic shots for sure.
Feb 19, 2020 08:26:29 #

Feb 19, 2020 09:04:27 #
foggypreacher
Loc: Dickinson, Texas
Jim-Pops wrote:
I have been faceted with the work that Harold Ross... (show quote)
I like it. Another technique I have not tried, but as I learn Photoshop better, I will. Examples such as this of various techniques, inspire others of us to try. Thank you very much.
Feb 19, 2020 09:30:13 #
Feb 19, 2020 12:05:12 #
Feb 19, 2020 12:09:20 #
dpullum wrote:
A belching beast, like this one, struck fear in my childhood heart when my dad started it.
Jim-Pops put in gasoline, pump up the pressure and make the dragon breath flames ... dramatic shots for sure.
Jim-Pops put in gasoline, pump up the pressure and make the dragon breath flames ... dramatic shots for sure.
Yes, I was going to mention that originally they used gasoline and if it leaked, and many did, you could have a monumental fire. People rebuild these now but use different fuels, good idea.😲
Feb 19, 2020 12:10:01 #
jaymatt wrote:
I have one of those old fellows lying around the farm somewhere.
I have one of those old fellows lying around the farm somewhere.
Don't light it.😲
Feb 19, 2020 12:10:42 #
foggypreacher wrote:
I like it. Another technique I have not tried, but as I learn Photoshop better, I will. Examples such as this of various techniques, inspire others of us to try. Thank you very much.
Thank you and you're welcome.👍
Feb 19, 2020 12:11:20 #
pfrancke wrote:
enjoying what you are doing - looks like fun to play with.
Give it a try, great indoor project.👍
Feb 19, 2020 13:35:34 #
Jim-Pops wrote:
Give it a try, great indoor project.👍
how do you recommend getting started using these techniques on still life images? You are right, 1700 is a little too steep... Did you watch his free videos from his site? Anyway, your projects look wonderful and inspiring!!
Feb 19, 2020 13:48:39 #
pfrancke wrote:
how do you recommend getting started using these techniques on still life images? You are right, 1700 is a little too steep... Did you watch his free videos from his site? Anyway, your projects look wonderful and inspiring!!
I watched his videos and bought his tools, also kind of expensive. He doesn't give a lot of technique away and I'm not sure if what I do in Photoshop is the same but have been going trial and error ever since.
Jim
Feb 19, 2020 13:54:45 #
Jim-Pops wrote:
I watched his videos and bought his tools, also kind of expensive. He doesn't give a lot of technique away and I'm not sure if what I do in Photoshop is the same but have been going trial and error ever since.
Jim
Jim
if I may ask.. how long are your exposures? I gather that you make a number of exposures and manually stack and mask in PS. I assume his light is special how (warmth?)..
So I set up a nice still life, with a background. Have a stable camera and use a shutter controller thingy, tethered is nice because you can review images quickly, fully dark room so that longer exposers are possible?
Anyway, it looks fascinating for among other reasons, it is fully controlled. Anything that you care to share will be very welcome - that's for sure!
Feb 19, 2020 14:59:05 #
My exposure were 6 sec. They were longer than needed. I swept the light over the areas. You have to keep the light moving or you will get unwanted hot spots. I did use a remote trigger.
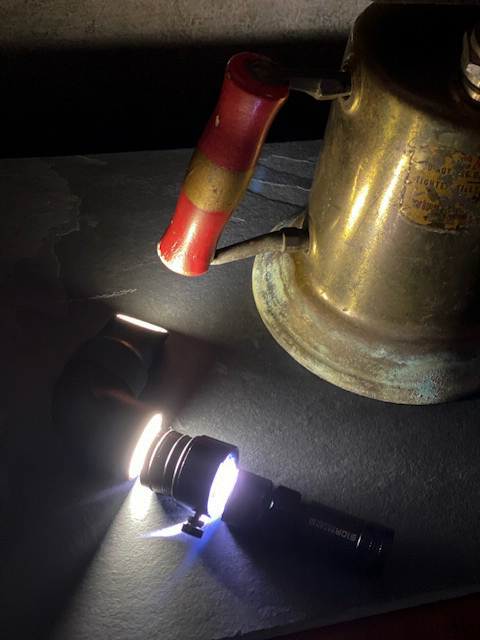
On Ross's web site he will indicate the rechargeable 3 level output flashlight and the adapter + defusers that I use. The wand light extension I bought but haven't use but once, not on this picture. I use the flashlight in many of my pictures without any bending defusers I just wrap the end in an old piece of plastic shower curtain to defuse light.
My first shot might not be how he teaches its how I got what I got. I held a LED light above and behind for the background. I got the color how I wanted it and then made a mask for the blow torch. I then had all my other layers reference the mask. In doing so new light introduced would never overspill onto the background.
My second picture shows the flashlight the adapter and the defuser and how it bends the light.
If you would like to talk in more detail you can PM me and we might connect on the phone.
Jim
Feb 19, 2020 15:19:59 #
Jim-Pops wrote:
My exposure were 6 sec. They were longer than need... (show quote)
hey thank you Jim - this is the first time in my photography journey that I am waiting for darkness to fall. For sure, this will get me started. I found a piece of PVC pipe and put a small diffuser on the end of it and a small flashlight can go into the pipe held/packed in with paper towels.
For me, the pipe is not bent, but the flash diffuser I have aims to the side, so the light is reflected somewhat and is defused. (we'll see how it goes).
Thanks you for wonderful - get started - material. This will be Fun.
If you want to reply, then register here. Registration is free and your account is created instantly, so you can post right away.