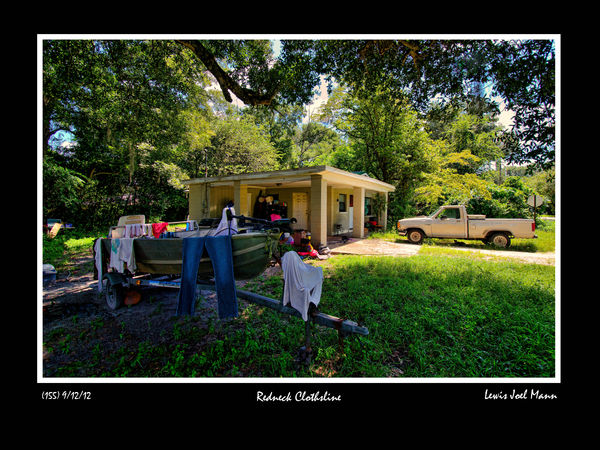
"Redneck Clothsline" (pseudo, semi, almost, not quite ...HDR)
Sep 10, 2012 16:45:38 #

I went out to shoot today. My intent was to work with my recently obtained Promote Control as my D3100 has no AEB function. But, I also shot some hand-held solo images.
"Redneck Clothsline" was shot with my D3100 in Auto/no flash mode using a Nikkor 10 -24mm zoom (set at 10mm). Here's my workflow after uploading my SD card via Nikon Transfer:
1, Create a +2EV and a -2EV exposure using PS Elements 10 Camera Raw and save as Tiff.
2, Run each exposure through Topaz Denoise and save.
3, Merge the 3 exposures via PSE10's Photomerge and save as Tiff. Then create duplicate for further processing.
4, Run the merged Tiff duplicate through Topaz Infocus for very slight adjustment and save.
5, Open Topaz photoFXlab (via PSE10 Filter tab) and duplicate.
6, Run duplicate through Topaz Adjust (my own presets).
7. Final ajdustment using photoFXlab dynamic and saturation sliders then back to PSE10.
8, in PSE10 access Topaz Adjust to create white border.
9, in PSE10 create 14.4 x 10.8 inch black canvas. Then insert the image, resize and add the text.
When I type it out it sounds like a lot of work. But, I enjoy it. This image is sized to print on glass by Fracture.
Any constructive comments are always welcome. I'm still learning!
Redneck Clothsline
Sep 10, 2012 16:56:37 #
Sorry about the duplicate post. I didn't think the first post made it to UHH.
Sep 10, 2012 21:39:13 #
I like your subject matter and the steps you have used to process but could I offer a couple of suggestions. Firstly its important to get the verticals and horizontals correct. You can see that your building is leaning to the right. An easy fix in PSE. Secondly I would suggest that by denoising at the early stage (even with Topaz Denoise which I use and of which I am a fan) you potentially lose too much detail which you can't add back in later. I find it works better to denoise when you import back into back into PS (or elements) after you have used Topaz Adjust. This has the advantage that you can selectively denoise using layers. By that I mean that if I have say a noisy sky I will denoise that because noise shows up so strongly in the sky but in textured areas such as grass or rocks you don't notice the noise and by not reducing the noise or reducing it less you retain more detail. My final suggestion is about the strong magenta/green chromatic problems that are showing up in the trees and in some of the clothes in the foreground on the left. This is a pain with many lenses (including mine) but is amplified by the HDR process and by Topaz. I can't remember if PSE has lens correction to fix this (PS does but I think elements does not) so you can get round it by selecting the effected areas, then desaturating the magenta and green fringes. The eye is much more forgiving of grey fringes than purple and green ones.
Hope this all helps. I really like what you have done and don't want to come across as being negative because I have written so much. Its just that I was lucky enough to have lots of good advice given to me on forums like this and I am keen to repay where I can. I look forward to seeing more from you.
Peter
Sep 10, 2012 22:09:38 #
conkerwood wrote:
I like your subject matter and the steps you have ... (show quote)
Thank you Peter. I appreciate your comments. I think it was Socrates who said "a wise man knows what he doesn't know." I, sir, make no claims to be a wise man, but I do know that I am in the early learning stages of digital processing.
This was a hand-held shot so I was not paying strict attention to the verticle lines of the building. I seem to remember a video tutorial somewhere on how to straighten in PSE. I'll have to play with that.
Regarding Denoise, I've processed both ways; always after when I merge RAW files in Photomatix. This time, since I created the +2EV and -2EV from the 0EV, I thought I'd give PS Photomerge a try. You have given me the idea to re-merge via Photomatix, then Denoise.
Since I used Photomerge there was no opportunity to correct chromatic aberations ...another reason to redo in Photomatix.
By "selecting affected areas" are you suggesting masking? I do use Remask 3, but I don't know how to cut out an area surrounded by similar colors.
I'll repost the image after I reprocess. Stay tuned.
Sep 11, 2012 07:12:15 #
Superb HDR work. Looks very much better when viewed downloaded. I would clone in the top right areas to darken the edges, clone out the rounded object on the left, burn in the BBQ unit or even clone it out. I find them dragging my eyes out of the picture from the clothes lines.
Sep 12, 2012 21:18:44 #
LOL....I sometimes use a tree - guess that makes me a redneck too!! Nice job....
If you want to reply, then register here. Registration is free and your account is created instantly, so you can post right away.