Glass Ball
Jan 29, 2020 22:57:03 #
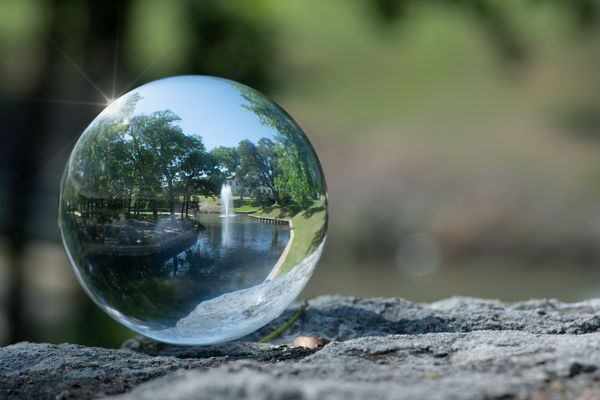
Shooting with the glass ball is fun but your image is upside down. The image is so much easer to view if you rotate the ball.
Here was my process for making this picture. Depending on you skill level with photoshop this could be basic and nothing new but others have wanted to learn more about layers and different tools.
Steps I did to rotate the ball using Photoshop CC on a MacBook. PCs might have you to hold a different key for some of the moves.
1) Open Photo
2) Make a duplicate layer
3) Grab your Elliptical Marquee tool. Move your tool to the upper left of the ball. Hold the Shift key and drag the mouse down to lower right. Holding the shift key keeps the tool as a circle. You might have to do this a few time to get close to the proper size of the ball. As you complete making the selection you will see what they call marching ants. Make sure you blow up your picture so you can see the edges between the marching ants and the ball. When I did it my marching ants indicated the selection was too small. To fix this Go to Selection>Modify>Expand. It will ask you how many pixels to expand. When I did it I expanded 4 Pixels. Now look and see if it was a enough. When I did it I had to do expand 3 or 4 more times to get it right.
4) Now that you have the selection make a copy of it Command C. Add a new blank layer. Now paste the selection Command V.
5) Now you have to rotate this new ball Layer. Hold Command T to activate the transform tool. Grab a corner and pull it around 180 degrees.
6) Next move is up to you. You will need a Lens Flair brush. I got mine by going on my internet browser and searched for "Lens Flair Brush Photoshop." Choices will come up and I chose Brusheezy for free brushes to download and install.
7) Now that you have the brushes installed pick one I think mine was #3000. Make a new layer. Make sure your color for the brush is white. Position it over the upper left corner, have brush set to 100% and hit once. I now went to the brush tool in the upper left screen hit and opened it then rotated the brush about an 1/8 of a turn. Now went back to my layer and hit the same spot again.
8) I thought my lens flair was to sharp so I added gaussian blur to my lens flair layer, about 5 pixels
If you want to try this process you can download my picture and rotate the ball back to the proper position upside down.
Jan 29, 2020 23:22:34 #

Thanks!! I have wanted to learn how to do that. I appreciate you taking the time to explain it.
Jan 29, 2020 23:33:34 #

Jan 30, 2020 08:00:12 #

Jan 30, 2020 08:09:18 #

Jan 30, 2020 08:27:30 #

Thank you so much for posting this tutorial, Jim! I am a beginner, just starting out and trying to learn Photoshop. I read a lot and have been watching videos, but haven't been very successful in trying apply what I think I've learned. One of these days I hope to get it!
Patty
Patty
Jan 30, 2020 08:53:28 #

I have one of those glass balls and am familiar with the rotation process. I think I may have to dig it up and play with it some. Thanks for the detailed explanation, a good refresher explanation for me.
Jan 30, 2020 09:17:55 #
CindyHouk wrote:
Thanks!! I have wanted to learn how to do that. I appreciate you taking the time to explain it.
You'r welcome😊
Jan 30, 2020 09:27:56 #
PattyW60 wrote:
Thank you so much for posting this tutorial, Jim! I am a beginner, just starting out and trying to learn Photoshop. I read a lot and have been watching videos, but haven't been very successful in trying apply what I think I've learned. One of these days I hope to get it!
Patty
Patty
I'm thinking about trying to add something like this once a week for beginners just like you.
I'm not sure how your computer works but this is how I learned much of what I know.
I open up my browser and go to YouTube. You can type in something like Layers in Photoshop.
Watch the video. If it is something that looks interesting and something you want to try I will start it over again.
Now pause the Video
Keep the internet open and now open one of your pictures in photoshop.
Go bak to YouTube and play the first part and pause. Go to your photo that is open in photoshop and do that step.
Back to YouTube for next step. Pause and now your picture. Back and forth. Now the lesson becomes personal and has a purpose. It is so much easer to remember something that is improving one of your own pictures.
Have fun on your journey,
Jim
Jan 30, 2020 09:35:10 #

Simple gadgets go a long way to make photography interesting. Your tutorial on uprighting the ball image is very useful and well detailed --- useful to more than just beginners.
Jan 30, 2020 09:37:17 #
NJFrank wrote:
I have one of those glass balls and am familiar with the rotation process. I think I may have to dig it up and play with it some. Thanks for the detailed explanation, a good refresher explanation for me.
That what it take some time. Just a little refresher course.
This particular process using the Elliptical Marquee tool while holding down the shift key I had forgotten until I saw someone using it on a YouTube project. It makes the perfectly round circle and then the Expand tool to make it fit perfectly. I'v started using the Expand tool and the contract tool a lot more now when fixing selected areas for masking.
Jan 30, 2020 09:38:27 #
Jim, I added this topic to Tutorials by UHH Users:
https://www.uglyhedgehog.com/t-184368-1.html#10148446
If you can think of better key words than "upside down" I will change
https://www.uglyhedgehog.com/t-184368-1.html#10148446
If you can think of better key words than "upside down" I will change
Jan 30, 2020 10:02:33 #
dpullum wrote:
Simple gadgets go a long way to make photography interesting. Your tutorial on uprighting the ball image is very useful and well detailed --- useful to more than just beginners.
Thanks happy to see you found it useful.👍
Jim
Jan 30, 2020 10:47:11 #
Jim-Pops wrote:
I'm thinking about trying to add something like th... (show quote)
Thanks, Jim! Great advice! I just bought a bigger monitor, and plan to open two windows on it at the same time. One will have a tutorial, the other will be my photoshop work space. I think it will help to have them side by side. One of these days, I'll try to post something I'm working on....when I get that far! ;)
Jan 30, 2020 11:07:44 #
PattyW60 wrote:
Thanks, Jim! Great advice! I just bought a bigger monitor, and plan to open two windows on it at the same time. One will have a tutorial, the other will be my photoshop work space. I think it will help to have them side by side. One of these days, I'll try to post something I'm working on....when I get that far! ;)
Sounds like a plan.👍
If you want to reply, then register here. Registration is free and your account is created instantly, so you can post right away.