Help with B&W
Jan 29, 2020 10:58:20 #

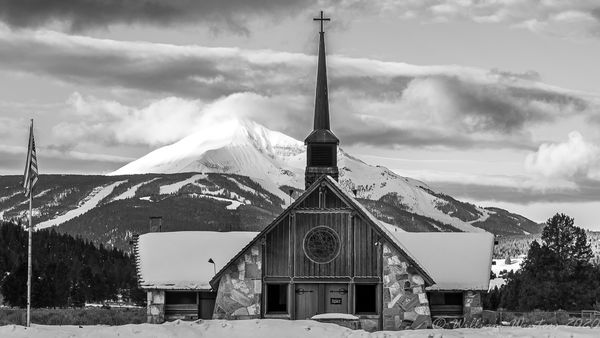
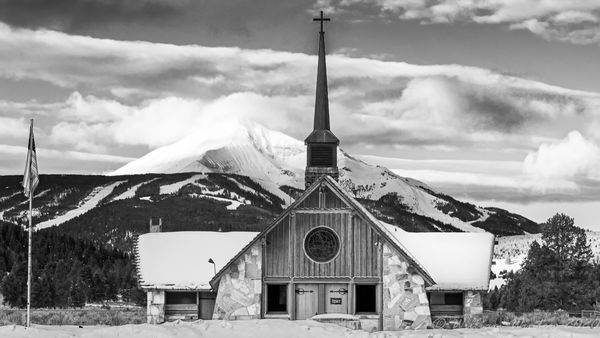
I am not well versed at B&W so any suggestions are welcome and you are welcome to give it a try and repost
Jan 29, 2020 11:01:00 #

Two quick tips. Burn down the sky(1/2 stop?) Dodge the building......ps you have a haloing effect from over sharpening........look at the spire.........
Jan 29, 2020 11:03:48 #
jeep_daddy wrote:
I am not well versed at B&W so any suggestions are welcome and you are welcome to give it a try and repost
I think you are being too critical on yourself. The Black and White version has great tonal value from WHITE to BLACK.You did great.
Jan 29, 2020 11:23:40 #

I like it very much, with the exception of the halo around the spire as photosbytw points out. Looks like it is in the color too, so you'll want to go back to the point where you introduced the effect.
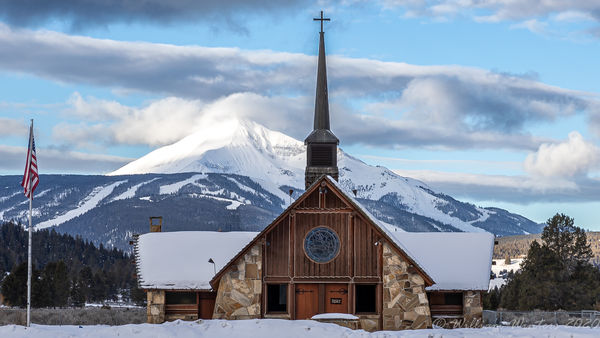
Would you please tell us if you started with jpg or raw, and what software you used to convert to b&w? Thanks!
Would you please tell us if you started with jpg or raw, and what software you used to convert to b&w? Thanks!
Jan 29, 2020 13:40:15 #

If you can adjust the brightness of the colours after conversion to B&W, try brightening red, orange and yellow and darkening blue. Try shifting Whites and Highlights fully left and then lifting brightness till it looks about right overall. And don't be shy with the contrast. You might find that the snow on the church roof needs to be selected and lightened.
.
.
Jan 29, 2020 17:47:00 #
Linda From Maine wrote:
I like it very much, with the exception of the halo around the spire as photosbytw points out. Looks like it is in the color too, so you'll want to go back to the point where you introduced the effect.
Would you please tell us if you started with jpg or raw, and what software you used to convert to b&w? Thanks!
Would you please tell us if you started with jpg or raw, and what software you used to convert to b&w? Thanks!
I started with a raw image and I use LR Classic. I used LR Classic to edit the color version, then I made a virtual copy and converted to B&W using LR B&W #9 preset.
Would you like to see the raw image without an edits.
Jan 29, 2020 17:58:28 #
photosbytw wrote:
Two quick tips. Burn down the sky(1/2 stop?) Dodge the building......ps you have a haloing effect from over sharpening........look at the spire.........
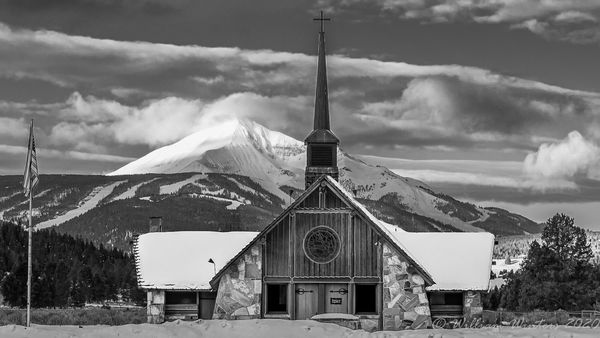
You are absolutely right about the sharpening. I went way overboard on sharpening. I turned it off and wala, the halo is gone. So I redid the sharpening with much milder settings. Thanks for pointing that out. I'm usually not to aggressive on the sharpening. I had a brain fart.
Jan 29, 2020 18:00:24 #
R.G. wrote:
If you can adjust the brightness of the colours after conversion to B&W, try brightening red, orange and yellow and darkening blue. Try shifting Whites and Highlights fully left and then lifting brightness till it looks about right overall. And don't be shy with the contrast. You might find that the snow on the church roof needs to be selected and lightened.
.
.
Great job. I like yours very much & I've given some of your suggestions a try & fixed the oversharpening problem and halo
Jan 29, 2020 18:05:00 #
jeep_daddy wrote:
I don't think needed now that you know sharpening was the culprit with your halo. R.G. demonstrated a terrific alternate viewpoint also. Thanks again.I started with a raw image and I use LR Classic. I used LR Classic to edit the color version, then I made a virtual copy and converted to B&W using LR B&W #9 preset.
Would you like to see the raw image without an edits.
Would you like to see the raw image without an edits.
Jan 29, 2020 18:50:38 #
Linda From Maine wrote:
I don't think needed now that you know sharpening was the culprit with your halo. R.G. demonstrated a terrific alternate viewpoint also. Thanks again.
Thanks Linda....
Jan 30, 2020 08:08:43 #

What R.G. said. That should give the image the pop I was referring to.
Jan 30, 2020 09:25:30 #
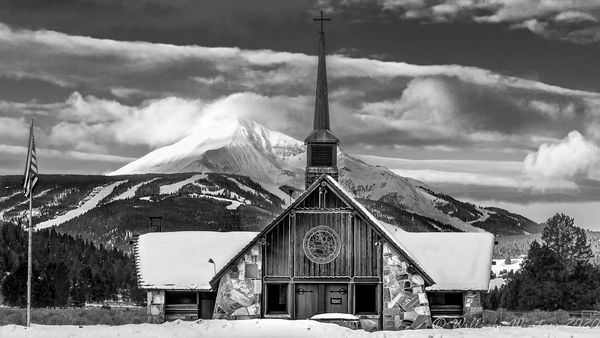
This is a tough one. It was exposed for probably mid tones and the dynamic range of the scene far exceeded what the camera was able to record, leaving the sunny mountain slope blown out, while almost everything forward of the mountain was in shade. My thought was to not to try to outwit what was going on, but to accept that you are looking past the building at the bright slopes. The building is there but you are seeing it with your peripheral vision. So I selected the sky and sunny slope, and toned down the highlights and sharpened up the mountain details to hold interest. The bright area draws your eye directly to the mountain. When I reversed the selection and worked at the shady area, my goal was to have it not distract from the main subject yet remain somewhat interesting for cursory examination.

Jan 30, 2020 12:24:03 #
jeep_daddy wrote:
I am not well versed at B&W so any suggestions are welcome and you are welcome to give it a try and repost
Hi jeep-daddy, I saw your other post and didn't realize you posted here also. I though this image needed more contrast and a little D&B for my preference.
Everything I did in this image was done in LR also, except I used PS to remove the halos around the church and horizon. I also noted that the snow highlights on the mountain were clipped, but this wasn't a major problem.
In LR, I converted your color to B&W.
In the B&W panel, decreased the cyan & blue to add contrast to the sky. I wanted the mountain and clouds to stand out more. I increased the red a little to brighten the wood face of the church just a little.
In the basic panel I increased the shadow and decreased the blacks, to brighten the snow from grey to white without clipping the highlights. I still wasn't satisfied with the snow color, so I used a brush to further whiten the snow on the roof and foreground. The details in the mountain top were still muted so using a brush, I decreased the highlights and increased texture to bring out a little more detail in the snow. I followed up with a little D&B around a few areas of the image. I finished with a global contrast adjustment. As a final step I used PS to remove the haloing that was present in the original color image.
Now I prefer your B&W image over the color image.
BTW, this is a very nice image you took. It lent itself very well to a B&W conversion.
Thanks for sharing
Mike
Jan 30, 2020 14:28:55 #
SalvageDiver wrote:
Hi jeep-daddy, I saw your other post and didn't r... (show quote)
Thank you Mike. You did an excellent job and I really appreciate your step by step and detailed processes. I am wondering how to dodge and burn using LR. I know how in PS but never done it in LR.
Jan 30, 2020 16:39:17 #
jeep_daddy wrote:
Thank you Mike. You did an excellent job and I really appreciate your step by step and detailed processes. I am wondering how to dodge and burn using LR. I know how in PS but never done it in LR.
Dodging and burning in LR is actually quite easy, no more difficult than using PS. You have 5 tools available to select the area to lighten or darken.
1. Brush Tool
2. Radial Filter
3. Gradient Filter
4. Auto Mask (with the brush tool)
5. Range Mask
Tools 1-3 creates a pseudo-mask or a mask overlay, very similar a PS layer mask modified with a brush or gradient tool (linear/radial). Tools 4-5 are modifier of the mask overlay.
The Auto mask selects an edge based on both luminosity and/or color. It is similar in concept as the lasso tool in PS.
The Range Mask is a fairly recent addition to LR but extremely powerful. It allows you to modify the masks (1-4) to limit the mask to either a selected color or luminosity range. The Color function in LR is similar to the Select|Color Range in PS. The Luminance function is the same as the Select|Color Range|[Highlight/Midtone/Shadow] with exactly the same controls. It's just a way of applying a luminosity mask.
To burn an area, select one of the filters, such as the brush tool. Brush over the area you want to burn and reduce the exposure slider in the Mask control box. To dodge, just increase the exposure slider. To make the mask visible, toggle the 'O' key. In addition to being able to lighten or darken a local area, you can apply any of the modifiers in the Mask control box. For example, I increased texture in your mountain using the brush tool and just increased the texture slider.
If you want to eliminate part of the mask, you can either select Erase at the bottom of the Mask control box or just press the Option (Alt for PC) key and you will see the + sign in the middle of the brush change to a - sign. Then you brush over the masked area you want to remove similar to the white brush in a layer mask in PS.
This is just a brief introduction to D&B in LR. It's actually quite easy once you do it a couple of times. There's also some good youtube videos on this subject. If you use PS instead of LR exclusively, these same features are in ACR and work exactly the same way.
My workflow is to start in LR and go to PS on an as-needed basis. These tools reduces my need to use PS as often as I did in the past. For me, the Range Mask was a huge addition to LR since I was already using luminosity masks in PS. Now I only go to PS for the tougher problems.
Hope this helps you
Mike
If you want to reply, then register here. Registration is free and your account is created instantly, so you can post right away.