Luminar 4 Sky Replacement
Jan 13, 2020 12:27:01 #
Examples of my focus stacked images of my Wyoming Division model Railroad are in another post. Here are examples of using the newer Luminar 4 post processing program and its Sky Replacement function to mask out the upper structure and continue the "sky" painted on the backdrop of a bench up to the top of the photo.
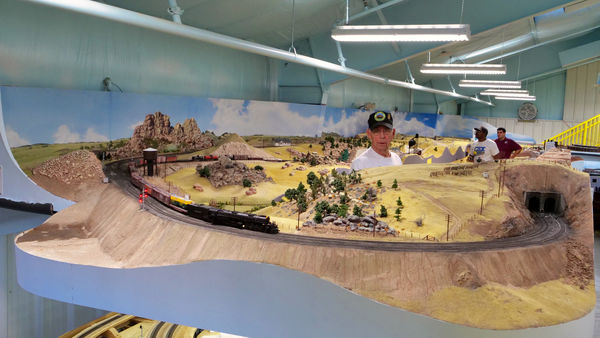
The Luminar 4 Sky Replacement does not work if the sky does not continue to the top of the image, but nearly all scenes taken outside have sky at the top. But my model railroad is inside a building with extensive structure over the painted "sky." So the program must be "fooled" with sky added in a layer mask too cover the structure of the building. The first attachment shows a photo with no sky replacement, and it could use it to cover the ceiling, sprinkler pipe, yellow mezzanine stairs, and lights.
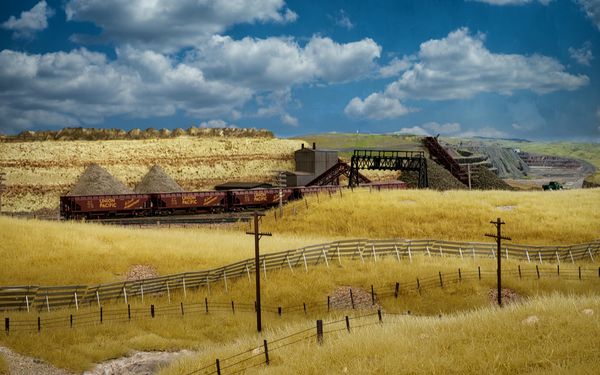
The next three photos have had Sky Replacement. The first was done by Paul Saumure. Paul imports a stock sky to a new layer either from the Luminar 4 library that shows when "AI Sky Replacement" is selected or from a sky he earlier photographed. This makes the new sky layer cover the whole image, so using "Layer Transformation," it is moved up to the right place over the existing "sky" (the backdrop). Then click "Edit mask," select "brush," adjust brush size, set the "Opacity" to 100%, and paint any gaps or other needed areas. "Over-spray" can be dealt with by toggling between the "paint" and "erase" keys.
When OK press blue "Done" button, and wait for processing thermometer to show completion.
This is how Paul taught me, but my cloning and painting leaves a lot to be desired. I always got a strong discontinuity between the two sky portions. So here is how I continue. This also works with a backdrop sky at angle to the photo, where a lot of painting may be required, and the result is a non-uniform sky, part from the original and part from the layer.
With two skies that are uneven, overlapping or not, but no gap of non-sky, do another sky replacement of the two skies on another new layer. This will cover both former skies (that had a "seam" between them, probably) and leave the image with a whole new uniform sky.
Then do any post processing required. Here are two examples that formerly had the walls, lights, A/C ducting, sprinkler pipes, and mezzanine as in the first picture.
The Luminar 4 Sky Replacement does not work if the sky does not continue to the top of the image, but nearly all scenes taken outside have sky at the top. But my model railroad is inside a building with extensive structure over the painted "sky." So the program must be "fooled" with sky added in a layer mask too cover the structure of the building. The first attachment shows a photo with no sky replacement, and it could use it to cover the ceiling, sprinkler pipe, yellow mezzanine stairs, and lights.
The next three photos have had Sky Replacement. The first was done by Paul Saumure. Paul imports a stock sky to a new layer either from the Luminar 4 library that shows when "AI Sky Replacement" is selected or from a sky he earlier photographed. This makes the new sky layer cover the whole image, so using "Layer Transformation," it is moved up to the right place over the existing "sky" (the backdrop). Then click "Edit mask," select "brush," adjust brush size, set the "Opacity" to 100%, and paint any gaps or other needed areas. "Over-spray" can be dealt with by toggling between the "paint" and "erase" keys.
When OK press blue "Done" button, and wait for processing thermometer to show completion.
This is how Paul taught me, but my cloning and painting leaves a lot to be desired. I always got a strong discontinuity between the two sky portions. So here is how I continue. This also works with a backdrop sky at angle to the photo, where a lot of painting may be required, and the result is a non-uniform sky, part from the original and part from the layer.
With two skies that are uneven, overlapping or not, but no gap of non-sky, do another sky replacement of the two skies on another new layer. This will cover both former skies (that had a "seam" between them, probably) and leave the image with a whole new uniform sky.
Then do any post processing required. Here are two examples that formerly had the walls, lights, A/C ducting, sprinkler pipes, and mezzanine as in the first picture.


Jan 13, 2020 16:39:10 #
Verryl wrote:
Examples of my focus stacked images of my Wyoming ... (show quote)
Incredible model layout. Great job with Luminar 4 and your clever process.
Jan 13, 2020 17:12:52 #
Jan 13, 2020 21:18:42 #
Jan 14, 2020 06:38:56 #

Jan 14, 2020 07:58:15 #
Jan 14, 2020 09:23:34 #

Really Fab, luv the truck in last pic with dust cloud behind it as if moving. How was that accomplished?
Jan 14, 2020 10:27:17 #
davyboy
Loc: Anoka Mn.
Verryl wrote:
Examples of my focus stacked images of my Wyoming ... (show quote)
Absolutely stunning!
Jan 14, 2020 11:07:22 #
Ahh...I can't see the dust. Do you mean the old flat bed driving toward the backdrop with the tracks directly behind it? I see a shadow from the overhead lights.
I checked with Allen Montgomery, who did that scene, and no dust. He's good, very good, but not that good.
I am impressed with how well he blended the bench top scenery with the photo backdrop. Here and in many other places it is very hard standing there to see where they meet. To me it is especially amazing considering the photo backdrop was done 3 years ago, so he had to match the ground cover dirt/foliage/etc. If the ground was done first, it would be easier to photo process the backdrop color to match.
Thanks for your interest.
Verryl
Jan 14, 2020 11:51:32 #
tomad
Loc: North Carolina
Verryl wrote:
Ahh...I can't see the dust. Do you mean the old fl... (show quote)
I think he meant the "ton" of easily seen dust being kicked up by the pick-up truck in the upper left portion of the landscape...
I'm guessing that's part of a painted backdrop; not an actual miniature truck.
Jan 14, 2020 12:25:02 #
tomad wrote:
I think he meant the "ton" of easily seen dust being kicked up by the pick-up truck in the upper left portion of the landscape...
I'm guessing that's part of a painted backdrop; not an actual miniature truck.
I'm guessing that's part of a painted backdrop; not an actual miniature truck.
I guess you're right, it sure looked real to me, I thought maybe he had that truck on a track or something.
Bob
Jan 14, 2020 12:34:38 #

Jan 14, 2020 12:44:43 #

Verryl wrote:
Examples of my focus stacked images of my Wyoming ... (show quote)
That is sooo life-like it's hard to beleieve that they're not. Very nice work.
Jan 14, 2020 16:06:56 #
Oh, is that cool or what! I've always wanted to do something like that and have never had the time and money (well, maybe the money but definitely not the time). Enjoy
Jan 14, 2020 19:04:32 #
Oh, I see it now. Yes it is part of the photo backdrop done several years ago.
Sorry, I was focused on the 3D bench part. The comment does call to attention how well Allen blended the landscape to the first done backdrop.
Verryl
Sorry, I was focused on the 3D bench part. The comment does call to attention how well Allen blended the landscape to the first done backdrop.
Verryl
If you want to reply, then register here. Registration is free and your account is created instantly, so you can post right away.