Photograph old family photos
Jan 4, 2020 11:26:46 #
I do a lot of family history and like to have pictures to go with names. I might have the opportunity to view a relatives old family photos and possibly copy them. I won't know what the photos are until I see them and am unsure how much time I will have to access them. I have a scanner but think photographing them might be faster if I'm not allowed much time.
I have a Sony a6500 with a FE 1.8/50 lens and a FE 3.5-5.6 /28-70 lens. My setup is a tripod with a ball head pointing the camera down with the photos being on a gray board with two Emart Photo Studio 5500K full spectrum lights off to the sides.
Will one lens be better than the other in this situation? Does anyone have any tips for taking photos of old pictures?
Thanks
John
Jan 4, 2020 11:34:16 #
John Ryberg wrote:
I do a lot of family history and like to have pict... (show quote)
John,
Your setup sounds good. I would consider using a macro lens for sharpness and the use of a polarizing filter to eliminate shadows from glossy images.
Jan 4, 2020 11:46:52 #

Since your 50 is a prime lens it should will be the sharpest of the two. Set the aperture around f-4, focus carefully and use low ISO. I also suggest setting a single correct exposure in manual mode and leaving that setting for all copies. If you were to use an auto setting it will likely change brightness from print to print depending on tonal values therein. To set exposure, place a white sheet of paper on your board and with "highlights" blinking on your camera, adjust shutter speed until the "blinkies" stop. This will place whites in their correct tonal value and all darker colors will also fall in to their appropriate levels, virtually eliminating the need for later adjustments in post.
Jan 4, 2020 11:47:06 #
John Ryberg wrote:
I do a lot of family history and like to have pict... (show quote)
If you don't have a Macro lens, and any use for it after the shoot you could always rent one
Jan 4, 2020 11:53:50 #
I recently completed (almost) a project like that with hundreds of photos dating from the mid 1800's. One thing that I found absolutely necessary was a thin piece of glass to lay on top of the photographs to hold down curls and corners. The non reflective glass used in photo frames can be found in craft stores like Michael's and they can cut the glass to whatever size you want. A piece about an inch wider and taller than the biggest photo is ideal.
I used a macro lens but I don't know that that is necessary.
I used a macro lens but I don't know that that is necessary.
Jan 4, 2020 14:01:35 #
Back in the '60s I copied pictures foe cash. I usedI used a situp much like yours but a co[y stand. I used a 50mm lens with closeup filters when needed. Good luck and have a great time; - Dave
Jan 4, 2020 14:09:26 #

At my studio, we do quite a bit of copy and photo-restoration work for clients, museums and archives.
Of course, whatever is scannable, that is, the originals will fit in the scanner and are not too fragile or behind glass,etc., should produce good results for good digital files and prints.
If, however, the photographs are not scannable or you would prefer to photograph them, here's my setup recommendations and explanations.
Old photographs can have various surfaces, some may be problematic- they can be on glossy paper and very reflective, old prints can burnish with age, pressure, or friction and become glossy in spots, some may be on textured papers such as "silk, satin, or kind of a canvas or burlap simulated finished paper. The technique to preclude unwanted glare and reflection or any kind of surface interference and maintaining good contrast is to use POLARIZED light sources and a POLARIZING filter on the camera lens and of course, proper copy light,
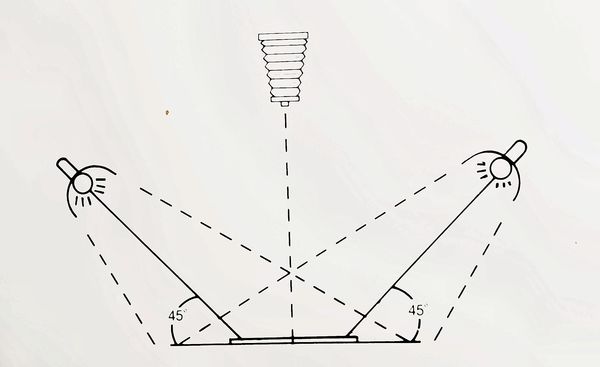
You can use two LED (continuous light sources) or two electronic flash units, preferably a monolights with modeling lamps. Each light is fitted with a plastic polarizing filter and oriented in the same direction. The CPL filter (glass) is on the camera lens. Each light is placed at 45 degrees to the print surface and is equidistant, thereby providing even light across the entire surface of each print.
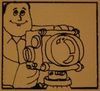
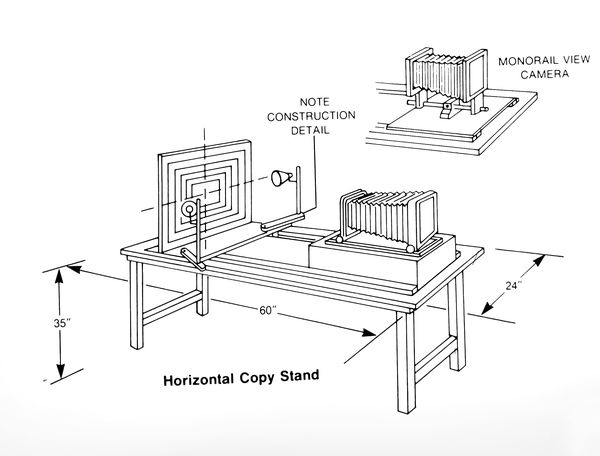
You can set this up on the floor or on a will with a makeshift copy board. In the shop I have a copy stand as illustrated in the attached diagram. If I have to work on location, I get some black Foam-Cor board and place it on an easel or hang in on the wall and shoot horizontally, keeping the camera level and parallel to the wall.
I focus on each print and rotate the polarizing filter until all reflections disappear and good contrast is obtained. With continuous light or modeling lamps, you can SEE the effect-If you use speedlights you will have to do a bit of experimentation on the first print as to polarization and once you have it, you can leave everything in place and do all on the prints. Set up the lights, firstly, for the largest prints and leave them in place for the entire run. Separate the originals as to size so you don't' need to move the camera back and forth very much within each size category. If your time is limited this can go very fast once you have the basic setup locked in.
Exposure can be determined in the first print- bracketing is advisable.
Originals can be held in place by improvising with 4 small paper clip held in place by pushpins and securing the prints at their very edges. I have held them in place on a refrigerator door with little magnets using black wrapping paper as a backing. Low-tack painter's masking tape is hand as well. OR, you can shoot on the floor but I find it fast to move the came to accommodate different sized original much faster with the wall setup. If you happen to have a metal copy board with magnetic strips- that is ideal. If any of the originals are badly warped or curled, you can shoot the under clean glass- the polarization will accommodate that as well.
A macro lens is nice but any good quality lens will do the job. A norma to sligh longer focal length will enable a practical working distance and preclude any linear distortion as long as you keep things square and parallel.
An ISO setting of no more than 200 will yield noiseless files. If you can shoot at 2 or 3 f/stop down for the maximum aperture you will get good lens performance and adequate depth of filed for minor focus errors. Use a tripod to ensure steadiness and more easily maintaining camera level and parallelism.
Damage of faded prints might require exposure changes- save them for last. Many damages can be healed, cloned and filled in during post-processing. Contrast and tone can also be adjusted.
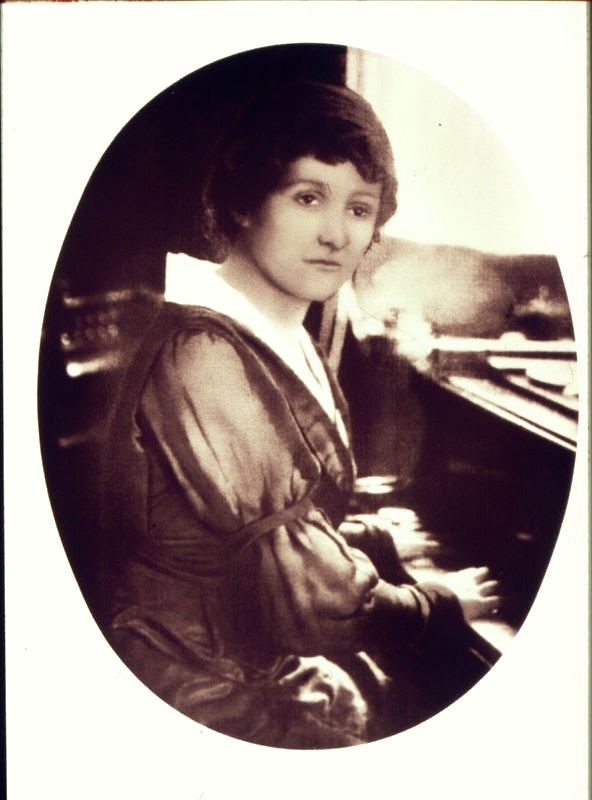
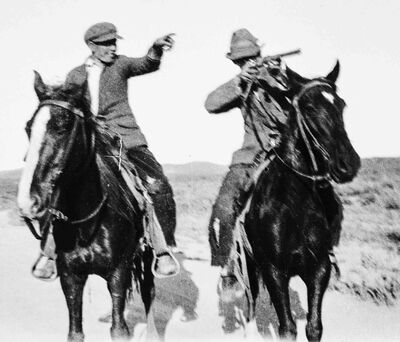
Image shown is copied form a small "cabinet size" image. Theorigna sepia tone recorded well in color capture. The surface was uneven but the polarization remedied that issue.
The plastic (acetate) polarization filters, for the ligh, are available at B&H and other professional dealerships. Mine are large enough for 12" lights- the are each about 12x12 inches. If you have smaller lights, like speedlights, you can buy one and cut it in half. Any good quality CPL filter will suffice- I use B+W and Sing-Ray models.
Of course, whatever is scannable, that is, the originals will fit in the scanner and are not too fragile or behind glass,etc., should produce good results for good digital files and prints.
If, however, the photographs are not scannable or you would prefer to photograph them, here's my setup recommendations and explanations.
Old photographs can have various surfaces, some may be problematic- they can be on glossy paper and very reflective, old prints can burnish with age, pressure, or friction and become glossy in spots, some may be on textured papers such as "silk, satin, or kind of a canvas or burlap simulated finished paper. The technique to preclude unwanted glare and reflection or any kind of surface interference and maintaining good contrast is to use POLARIZED light sources and a POLARIZING filter on the camera lens and of course, proper copy light,
You can use two LED (continuous light sources) or two electronic flash units, preferably a monolights with modeling lamps. Each light is fitted with a plastic polarizing filter and oriented in the same direction. The CPL filter (glass) is on the camera lens. Each light is placed at 45 degrees to the print surface and is equidistant, thereby providing even light across the entire surface of each print.
You can set this up on the floor or on a will with a makeshift copy board. In the shop I have a copy stand as illustrated in the attached diagram. If I have to work on location, I get some black Foam-Cor board and place it on an easel or hang in on the wall and shoot horizontally, keeping the camera level and parallel to the wall.
I focus on each print and rotate the polarizing filter until all reflections disappear and good contrast is obtained. With continuous light or modeling lamps, you can SEE the effect-If you use speedlights you will have to do a bit of experimentation on the first print as to polarization and once you have it, you can leave everything in place and do all on the prints. Set up the lights, firstly, for the largest prints and leave them in place for the entire run. Separate the originals as to size so you don't' need to move the camera back and forth very much within each size category. If your time is limited this can go very fast once you have the basic setup locked in.
Exposure can be determined in the first print- bracketing is advisable.
Originals can be held in place by improvising with 4 small paper clip held in place by pushpins and securing the prints at their very edges. I have held them in place on a refrigerator door with little magnets using black wrapping paper as a backing. Low-tack painter's masking tape is hand as well. OR, you can shoot on the floor but I find it fast to move the came to accommodate different sized original much faster with the wall setup. If you happen to have a metal copy board with magnetic strips- that is ideal. If any of the originals are badly warped or curled, you can shoot the under clean glass- the polarization will accommodate that as well.
A macro lens is nice but any good quality lens will do the job. A norma to sligh longer focal length will enable a practical working distance and preclude any linear distortion as long as you keep things square and parallel.
An ISO setting of no more than 200 will yield noiseless files. If you can shoot at 2 or 3 f/stop down for the maximum aperture you will get good lens performance and adequate depth of filed for minor focus errors. Use a tripod to ensure steadiness and more easily maintaining camera level and parallelism.
Damage of faded prints might require exposure changes- save them for last. Many damages can be healed, cloned and filled in during post-processing. Contrast and tone can also be adjusted.
Image shown is copied form a small "cabinet size" image. Theorigna sepia tone recorded well in color capture. The surface was uneven but the polarization remedied that issue.
The plastic (acetate) polarization filters, for the ligh, are available at B&H and other professional dealerships. Mine are large enough for 12" lights- the are each about 12x12 inches. If you have smaller lights, like speedlights, you can buy one and cut it in half. Any good quality CPL filter will suffice- I use B+W and Sing-Ray models.
Jan 4, 2020 22:53:06 #

Jan 5, 2020 08:57:16 #
John Ryberg wrote:
I do a lot of family history and like to have pict... (show quote)
If photos are loose or removable or pages removable scanning would be way faster. setting up for each photo and if different sizes would be a huge pain in the butt.
I did this decades ago before decent scanners and had a RB67, copy stand and lights. Worked but I use a scanner now and save tons of time.
Jan 5, 2020 09:15:54 #
garrickw
Loc: Wyoming Mn.
Scanner only.. on this really.. I have done a lot of these for different peoples families and it goes pretty fast with a scanner .. a scanner will remove yellowing on old photos and eliminate some scratches its the only way to go.. my opinion I have the A6500 and would not use it for this what a pain it would be
Jan 5, 2020 09:29:40 #
JennT
Loc: South Central PA
I have done this extensively!
I use an Epsom scanner at 800 dpi---scan to a folder on my desktop and import into Lightroom to photoshop---enlarge, trim, crop-process in black and white, sepia etc. sometimes sharpen, but not usually as I am amazed by the quality of some of the 100 year old images.
Often I add a large (white or sepia) border at the bottom and include relevant text----
to finish, I package all copies, including the original, in a folder----NOTE: Check the back of photos for relevant information-- scan and include-----
Jan 5, 2020 09:31:42 #
JennT wrote:
I have done this extensively! br br I use an Epso... (show quote)
Yes, the back information is essential.
Jan 5, 2020 09:51:08 #
gvarner
Loc: Central Oregon Coast
A dedicated macro lens would give you the best edge to edge sharpness.
Jan 5, 2020 12:21:11 #
A copy stand can be easier to use, and faster to set and reset, than a tripod.
With tripods you must adjust lights to avoid a shadow from the legs, and need to work around the legs while changing the originals you are copying.
If you don’t want to buy a copy stand, you can make one for a relatively small cost.
Elaborate copy stands have lights attached, eliminating the need for light stands. These lights are usually set at an angle where polarizing filters are not required for copying flat objects. If you need polarized light for controlling reflections when photographing 3-D objects or polished metal items, it can be easier to use them with a copy stand.
With Many used photo enlargers available for low cost, you might find one which converts into a copy stand.
Carry your own baseboard. A piece of 3/4” plywood, anywhere from 9” x 12” to 12” x 15” ( 225x300mm to 300x375mm) works well. Paint it white, gray or matte black (something neutral that won’t affect colors) You can paint the two sides different shades if you wish!
To quickly center photos as you change them: draw one or more straight pencil lines on your base board. An intersecting line forms a reference point for the corner of the photos.
Double-sided tape used inside the corners helps hold flat the frequently curled photos. Put the tape on the base board: a light touch holds the original and allows it to be changed easily, without damage. I apply strips diagonally across the corners of my work area (in the center of the base board) so they hold several sized pictures. When the tape loses its tack I replace it.
For ‘problem’ photos which won’t stay down I carry a sheet of glass and set it on top. When the photos are held down with glass you need to be careful with reflections. Stray room light hitting shiny spots on your camera creates small, bright, reflections which are not removed with polarizing filters. I either wrap the camera and shiny metal column of my copy stand with a piece of black cloth or cut a hole in a piece of black cardboard, just big enough for the lens to fit through. Hold it on with tape.
Start with the largest photo and work down to the smallest. Get them as square as possible so you don't need to rotate the digital copies before cropping off extraneous borders.
Good luck and have fun.
Jan 5, 2020 12:39:56 #
MCHUGH
Loc: Jacksonville, Texas
E.L.. Shapiro wrote:
At my studio, we do quite a bit of copy and photo-... (show quote)
I used a simular technique with polarized light and a polarize filter back when I had my studio. I did a lot of photo copies and it was amazing what the results could be. Also I found that I could use the same setup using ortho film and processing it in paper developer in the darkroom to bring out detail that could not be seen with the naked eye. The drawback to this was it picked up any and all imperfections present in the print. Retouching was a real difficult task requiring both negative and positive retouching techniques. The results was worth the effort.
If you want to reply, then register here. Registration is free and your account is created instantly, so you can post right away.