Creating a new studio
Oct 30, 2019 20:07:44 #
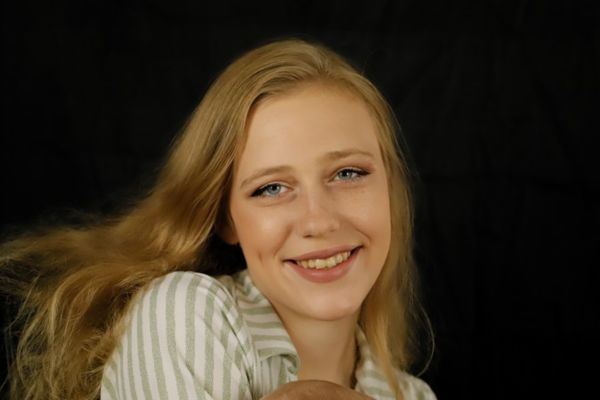
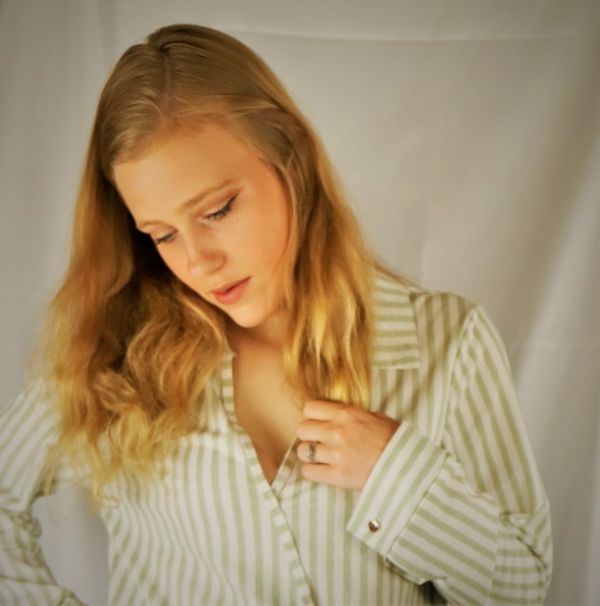
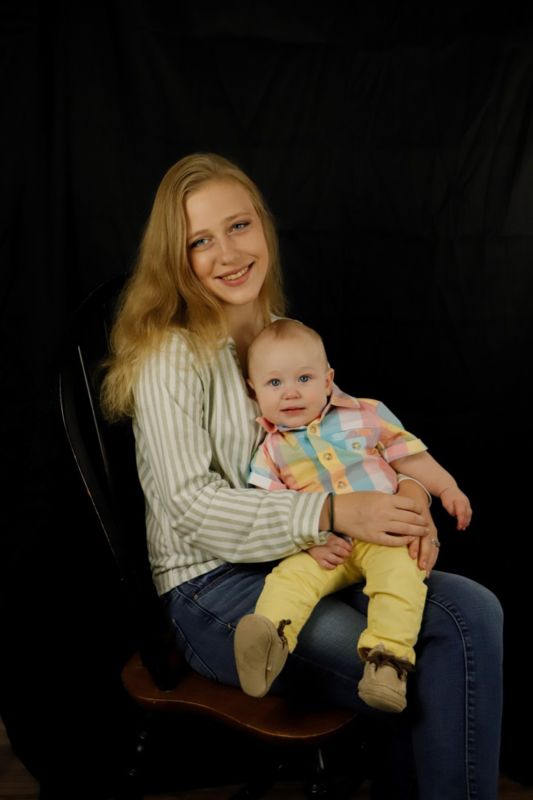
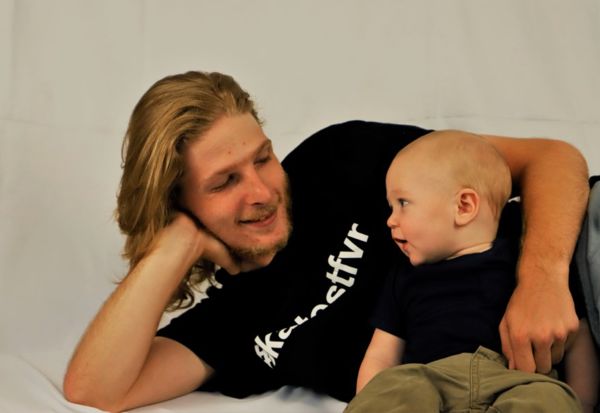
Hello and thank you in advice for all who give advice on this subject. I am currently in the process of turning a 12 by 16 room into a portrait studio in my home. It has only one overhead light which I’m thinking about removing completely and just using a small lamp to work with while my studio lights are not in operation. For lighting I have two three bulb 14x24 soft boxes and 3 single bulb shoot through umbrellas and two single bulb bounce umbrellas that came in a kit with white, black, and green backdrops. I also have to godox T865 with transmitter that I mount on stands when needed. The walls are being painted a light grey and ceiling white. The room has one window. Can anyone advise me on anything I should change and what I should do about the window. The walk in closet is turned into a dressing room with mirrors on three walls. I have included a few photos I took for a friend while the room was being transformed. Advise me on what I need to do differently please. Shot with a Canon 6Dii and Canon 50mm 1.8 lens

Oct 30, 2019 20:38:38 #
Grey seamless is the most versatile paper in my opinion. Not only can you change the background colors by lighting it with gels, using an overlay or soft light blending modes in Photoshop with layer masking can create unique textures.
Both continuous lights or strobes have their own benefits. Continuous work well with infants whereas strobes have the advantage freezing action. I use strobes mostly in the studio.
As far as darkness in the studio, to have control of your ambient set your ISO close to the sync speed of the light. With the correct shutter speed, ISO, and aperture, ambient light can be controlled by the short shutter speed. To get a baseline, take a picture with minimal ambient light at 1/160 or 1/200 ISO 100. If you can lift the exposure 2-3 stops without having apparent ambient light affecting the exposure, you have adequate control over the ambient in the room.
Oct 30, 2019 21:24:05 #

Oct 30, 2019 21:42:30 #
out4life2016 wrote:
Hello and thank you in advice for all who give adv... (show quote)
You are off to a great start with the images you posted. Very natural posing. I would consider also using the window light with a gold reflecting disks
https://www.ebay.com/itm/5-in-1-portable-Round-Collapsible-Multi-Disc-studio-Photo-Lightning-Reflector/182173450226?hash=item2a6a623ff2:g:irwAAOSw~CRTqz9f
Oct 30, 2019 22:08:01 #
Haydon wrote:
Grey seamless is the most versatile paper in my op... (show quote)
Thank you I will break down and do some test shots this weekend with your advice and different settings. Portrait photography is new to me swing as for a year I was only shooting landscape photos with a Canon T3 and basic lenses
Oct 30, 2019 22:10:15 #
PixelStan77 wrote:
You are off to a great start with the images you posted. Very natural posing. I would consider also using the window light with a gold reflecting disks
https://www.ebay.com/itm/5-in-1-portable-Round-Collapsible-Multi-Disc-studio-Photo-Lightning-Reflector/182173450226?hash=item2a6a623ff2:g:irwAAOSw~CRTqz9f
https://www.ebay.com/itm/5-in-1-portable-Round-Collapsible-Multi-Disc-studio-Photo-Lightning-Reflector/182173450226?hash=item2a6a623ff2:g:irwAAOSw~CRTqz9f
Thank you for the advice. I ordered a set of reflectors off amazon that comes with a silver, gold and white collapsible.
Oct 30, 2019 22:13:02 #
Vietnam Vet wrote:
Use the window light for portraits.
I have tried using just the window lighting for portraits and didn’t really get the image I was after. It leaves some pretty hard lined shadows that I didn’t think looked very professional. Maybe need to try it on a cloudy day or different times since most daytime hours the light shines pretty bright through it
Oct 30, 2019 22:15:38 #
out4life2016 wrote:
Thank you I will break down and do some test shots this weekend with your advice and different settings. Portrait photography is new to me swing as for a year I was only shooting landscape photos with a Canon T3 and basic lenses
A really cheap reflector that you might find more usable in closed quarters can be found for a $1.00 a sheet being white foamboard found at most Dollar Stores. If they have black foamcore, it can be used as negative fill. The best window light can found on the north side. Many potential studios look for that before renting commercial space.
Oct 30, 2019 22:18:04 #
Haydon wrote:
A really cheap reflector that you might find more usable in closed quarters can be found for a $1.00 a sheet being white foamboard found at most Dollar Stores. If they have black foamcore, it can be used as negative fill. The best window light can found on the north side. Many potential studios look for that before renting commercial space.
Thank you I will certainly try those, any way that can cut down on cost is always appreciated
Oct 30, 2019 22:20:46 #
Haydon wrote:
A really cheap reflector that you might find more usable in closed quarters can be found for a $1.00 a sheet being white foamboard found at most Dollar Stores. If they have black foamcore, it can be used as negative fill. The best window light can found on the north side. Many potential studios look for that before renting commercial space.
Thank you unfortantly I am using space I already have and the window is on the west side. Wish I was talented enough and had enough money to do this full time but for now it’s mainly just an expensive hobby while I’m home and not driving truck
Oct 31, 2019 06:49:47 #

Hayden offers some fine advice.
One thing you can think about is either large, 4x8’ foamcore sheets to make a large reflector or light absorbing blocker. Two sheets can be tape hinged on one edge with gaffers tape. A more permanent version can be a moveable wall to do a similar function. Think of two sheets of 1/4 or 1/2” ply standing about 16” apart by separating panels. One panel white or light gray and the other black. The space between the panels can have shelves for storage of bulky items. The whole thing can be mounted on larger casters to be easy to move around. The whole thing could be assembled for $125-$200.
A 7’ parabolic umbrella with diffuser panel can be useful. Cost is $100 for the umbrella and $30 for the diffuser panel.
There are tons of videos for ideas on portraits on YouTube. I recommend Robert Harrington’s with single speedlite and reflectors and full of ideas for small studio.
Oct 31, 2019 07:12:00 #
Notorious T.O.D. wrote:
Hayden offers some fine advice. br br One thing... (show quote)
Thank you, I will look his videos up and hopefully learn a lot of new information
Oct 31, 2019 10:29:58 #
billnikon
Loc: Pennsylvania/Ohio/Florida/Maui/Oregon/Vermont
out4life2016 wrote:
Hello and thank you in advice for all who give adv... (show quote)
There is no one way to set up a studio. And there is no right way or wrong way to set up a studio.
You need to shoot, you need to read, you need to look at as many video's as possible. Here are a few to look at, when your done with ALL of these, look at some more, shoot some more and read some more. But most important, develop your OWN style, not some one else's. Stay true to your development as a photographer.
https://video.search.yahoo.com/search/video;_ylt=A0geKLoj77pd__wA63VXNyoA;_ylu=X3oDMTEyamZhMGRqBGNvbG8DYmYxBHBvcwMxBHZ0aWQDQTA1OTlfMQRzZWMDc2M-?p=how+to+set+up+a+simple+photography+studio&fr=mcafee
Oct 31, 2019 11:10:53 #
billnikon wrote:
There is no one way to set up a studio. And there ... (show quote)
Thank you. I will watch these videos and many more. Developing my own still is most important to me. I’m looking for something unique to my shooting habits and likes
Oct 31, 2019 11:32:34 #

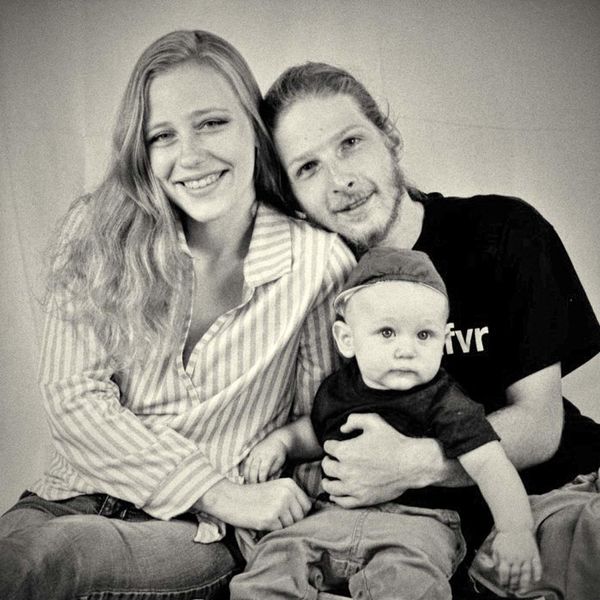
You have a good start, shown by your presented examples, what we may call "family photographs."
You ask for advice. Mine: I prefer natural skin tones when doing color portraits. Orange skin tones offend the visual sense because artificial.
I note that orange skin tones have become so common now that others accept this effect without question. This unflattering effect likely arose from the pressure on professional photographers who did not want to spend the extra time and effort to adjust for natural skin tones. They wanted to submit an invoice soon in order to collect their pay. So these professionals simply put a CTO (color temperature orange) filter on the their lens to orange up skin tones. This effect also supposedly made individuals with pale skin tone look suntanned and therefore healthy. Etc.
Going on, I downloaded one of your offered photographs to tweak it to give you an example of the potential of your work. The smaller size of the download along with its PNG file format limited my range of improvement, such that I could not extract a decent color rendition of the download to remove enough orange in the skin tones. So I loaded the downloaded file into Silver Efex Pro to convert it to black-and-white. I also cropped the edited version to a one-by-one format as the best for this pose.
You can see that this alternate process does justice to the subjects in your photograph.
Studio lighting presents its own learning curve, but I found it not that difficult to learn -- partly because you the photographer control all the lighting. I learned by the additive method, adjusting one light at a time, such as the hair light for its best effect, and so on. I had to give up my home studio when I moved to a cabin in the foothills. I miss it
Note that can find lighting diagrams and tutorials on the Internet to instruct you and give you ideas for effective lighting for a home studio. Portraiture is very satisfying photographic work.
Good luck.
out4life2016 wrote:
Hello and thank you in advice for all who give adv... (show quote)
Edited version -- B&W
If you want to reply, then register here. Registration is free and your account is created instantly, so you can post right away.