How to remove purple branches
Sep 3, 2012 13:54:58 #

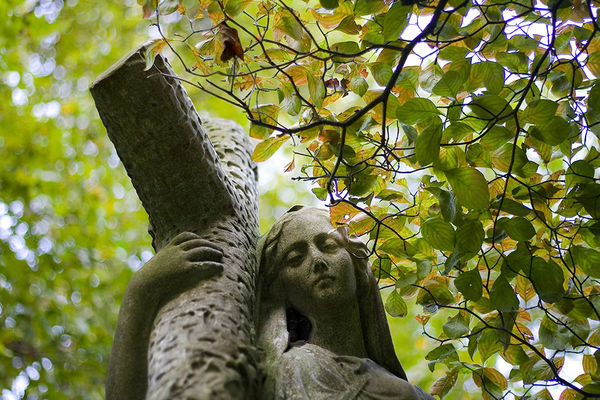
Seeing as the photocontest theme this week was comedy/tragedy, I went to the cemetery to take some pictures.
I loved this photo, as she is looking right at the viewer.
Does anyone know why some of the branches in this photo have a purple thing going on here and there.
And how do I fix it?
I have photoshop CS3. First time I'm using it. I love what it's done with the rest of the image, just can't figure out the black branches.
Also, any other tweaks you would suggest?
Also, if I wanted to print this as an 8x10, how should I resize it?
Sep 3, 2012 15:00:20 #
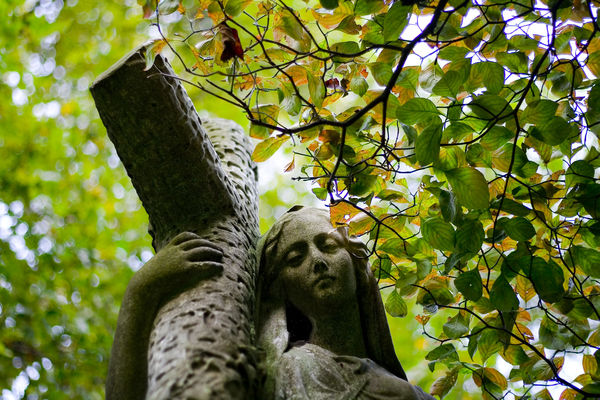
Actually,
I like this version of it better, but still, the purple branches.
I like this version of it better, but still, the purple branches.
Sep 3, 2012 15:30:08 #
FilmFanatic
Loc: Waikato, New Zealand
The purple branches are a result of Chromatic Aberration inside the lens, mainly you see it in high contrast areas like this.
I am a Lightroom user so don't know how to fix in CS3, but I am sure if you google Fix CA CS3 you will get a bunch of answers
I am a Lightroom user so don't know how to fix in CS3, but I am sure if you google Fix CA CS3 you will get a bunch of answers
Sep 3, 2012 17:06:38 #

You have had the purple issue answered, but let me bring up something else.
If you are going to enter this as your image for Tragedy, think about this: The rendering of tragedy is someone else's rendition- not yours. You just have a picture of a statue. I judge print competitions several times a year and I would disqualify this one as not your art - you took a picture of another person's art.
That does not mean it is not a good image - it is - but not as a representation of tragedy.
If a judge accepts this he or she is Santa Claus. :-)
Sep 3, 2012 17:10:31 #
Hi Captain,
Thanks,
I wasn't going to enter it, just happened to get it that day. It was an image that I liked and want to clean up.
I tried using the chromatic aberration tool but it didn't work. cs3 only has blue/yellow and red/cyan. Neither of them help.
Any other ideas?
Thanks,
I wasn't going to enter it, just happened to get it that day. It was an image that I liked and want to clean up.
I tried using the chromatic aberration tool but it didn't work. cs3 only has blue/yellow and red/cyan. Neither of them help.
Any other ideas?
Sep 3, 2012 17:27:29 #
cristinaberkley wrote:
Hi Captain,
Thanks,
I wasn't going to enter it, just happened to get it that day. It was an image that I liked and want to clean up.
I tried using the chromatic aberration tool but it didn't work. cs3 only has blue/yellow and red/cyan. Neither of them help.
Any other ideas?
Thanks,
I wasn't going to enter it, just happened to get it that day. It was an image that I liked and want to clean up.
I tried using the chromatic aberration tool but it didn't work. cs3 only has blue/yellow and red/cyan. Neither of them help.
Any other ideas?
It has been a while since I used CS3 - CS6 has a "Remove Chromatic Aberration" tool - It does not specify the color. There is also a "Defringe" tool. I have not had to use them, but I understand they are a big improvement over previous methods.
These are in the new Camera Raw 7.1.
I understand these programs are expensive, but they have tools that keep getting better.
Sep 4, 2012 00:29:41 #

Quick fix.
Try this. Zoom in on the purple area. Choose Select>Color Range.
Move the eye dropper to a good representative area of the purple color and click on it. Change the fuzziness util you see the purple selected.
Ctrl C and ctrl V to copy and past the selection in a new layer
select >reselect to bring back the selection.
choose a brush and change the color to black. Paint the selection black on the new layer. Merge the two layers.
PP
Sep 4, 2012 02:20:24 #

Here is a full length video on how to correct Transverse Chromatic Aberration in PS. It was the old solution before Adobe added the capability in their latest release of Camera RAW. It is also a nice explanation of what it is. I haven't looked at the video in a while. I just found the link in one of my older post.
http://blog.lynda.com/2011/04/05/dekes-techniques-14-fixing-chromatic-aberrations-in-photoshop/
Enjoy Russ.
http://blog.lynda.com/2011/04/05/dekes-techniques-14-fixing-chromatic-aberrations-in-photoshop/
Enjoy Russ.
Sep 4, 2012 11:10:07 #

CaptainC wrote:
You have had the purple issue answered, but let me... (show quote)
Captain, I never thought of taking a photo of artwork in this way which makes total sense. I just take photos as a hobby, but I am now thinking that I am in need of a course in photo etiquette. Thanks for bringing this to my attention. I will certainly be more aware.
Sep 4, 2012 11:51:28 #

cristinaberkley wrote:
Seeing as the photocontest theme this week was com... (show quote)
Resize to exactly 8 inches tall by whatever long it happens to be at 300 ppi and save it as a new file under a different name. Keep the 8 inch side as is, crop a couple inches off the long side to bring it down from around 12 inches or so to exactly 10 inches for the correct height to width ratio to print. Then save that as the new file name plus add 8X10 300ppi to the file name.
Which end to trim, or part off both ends, is your compositional choice. Your subject being off center is a good thing when you're considering what to trim off because of rule of thirds.
By the way, I've seen your work in other threads. I think you have an excellent eye for composition and subject matter. You're going to go far!
Sep 4, 2012 23:07:25 #

cristinaberkley wrote:
Seeing as the photocontest theme this week was com... (show quote)
In Lightroom 4 or CS6 Adobe Camera Raw they have a new lens calibration feature that will fix CA really fast. I've applied the 50mm f1.8 lens correction to your image and the next tab over lets you fix CA - slider to 3 or 4 and fixed.

Sep 5, 2012 09:32:16 #
Good find Jeep Daddy. I just got that software but didn't know how to do it.
Sep 17, 2012 13:17:13 #

Reading this I had to go and check this out myself and found this which I feel is a very good way to understand and explain CA:
http://mansurovs.com/what-is-chromatic-aberration
http://mansurovs.com/what-is-chromatic-aberration
Oct 4, 2012 10:50:12 #
Thanks Jeep Daddy, that's fantastic.
Thanks for all the great advise everyone. So much fantastic info here. Time to get a notebook and start taking notes.
Happy shooting everyone.
Thanks for all the great advise everyone. So much fantastic info here. Time to get a notebook and start taking notes.
Happy shooting everyone.
Oct 4, 2012 14:32:51 #

You dont say what camera and lens you are using.
The more recent cameras and particularly the DSLRs are able to do a lot of in-camera fixing, particularly if the camera is able to identify the attached lens. The camera can adjust the relative size of the 3 color images in the RAW data from the sensor so that the colour fringing disappears. This amounts to altering the focal length of the lens for each of the different colours and thus exactly corrects the chromatic aberration. Taking RAW images is a good idea because this preserves the ability of post-processing to correct chromatic aberration if the camera has failed to since the three separate colour images are still available. If you compress to a JPEG then the three images reduce to one. Barrel/pincushion distortion is also fixeable without the owner even being aware that that has happened. Its one good reason to use Nikon lenses on Nikon cameras and Canon lenses on Canon cameras, etc. A given manufacturers camera can have an internal library of the corrections need for each of their own lenses, including the correction needed at different zoom, focus and aperture settings. It also means that the manufacturers can cut more corners in lens design if they know that the powerful processor in the camera can fix the problem.
The more recent cameras and particularly the DSLRs are able to do a lot of in-camera fixing, particularly if the camera is able to identify the attached lens. The camera can adjust the relative size of the 3 color images in the RAW data from the sensor so that the colour fringing disappears. This amounts to altering the focal length of the lens for each of the different colours and thus exactly corrects the chromatic aberration. Taking RAW images is a good idea because this preserves the ability of post-processing to correct chromatic aberration if the camera has failed to since the three separate colour images are still available. If you compress to a JPEG then the three images reduce to one. Barrel/pincushion distortion is also fixeable without the owner even being aware that that has happened. Its one good reason to use Nikon lenses on Nikon cameras and Canon lenses on Canon cameras, etc. A given manufacturers camera can have an internal library of the corrections need for each of their own lenses, including the correction needed at different zoom, focus and aperture settings. It also means that the manufacturers can cut more corners in lens design if they know that the powerful processor in the camera can fix the problem.
If you want to reply, then register here. Registration is free and your account is created instantly, so you can post right away.