Fanciful Composite (inspired by Curmudgeon)
Sep 30, 2019 10:18:04 #

A couple of days ago, Curmedgeon PM'd me and asked if he could use an image I had posted of a light tunnel through some dark foliage. I gladly asked him to proceed, asking to see his composition. He posted it as "Just for Fun" https://www.uglyhedgehog.com/t-612066-1.html
I had had the same idea as he did, that the image would make a nice background for a composite image. So I went ahead and produced what I had in mind.
.
I had had the same idea as he did, that the image would make a nice background for a composite image. So I went ahead and produced what I had in mind.
.
Sep 30, 2019 10:34:37 #
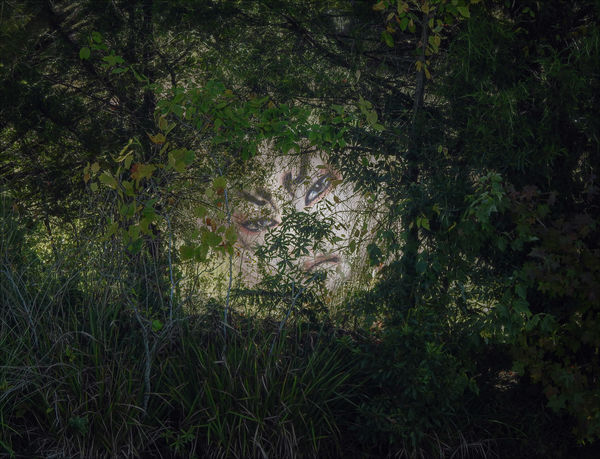
To get this effect, I started with my original "Light Tunnel" image.
I then employed PS CC 2019 "Magic Wand Tool", making sure the Contiguous block was turned off, then clicked several times in the light green areas of the tunnel. I did this because I wanted to leave some of the darker green images in the photo so it looked like I was looking through the woods to see a nebulous "spirit" in background. After I had made that selection, I inverted the mask (Select>Inverse), then did a CTRL-J to send the masked image to its own layer. In the image below, it looks as if the mask is white, but this is to represent transparent pixels that will allow any image below it to show through.
I then added my Kabuki Lion Dancer ( https://www.uglyhedgehog.com/t-510080-1.html ) to the layers stack, and moved the Masked Background above the Kabuki Dancer's face. I clicked on the Kabuki layer and used Edit>Free Transform to resize and move the face behind the foliage.
.
Original Background
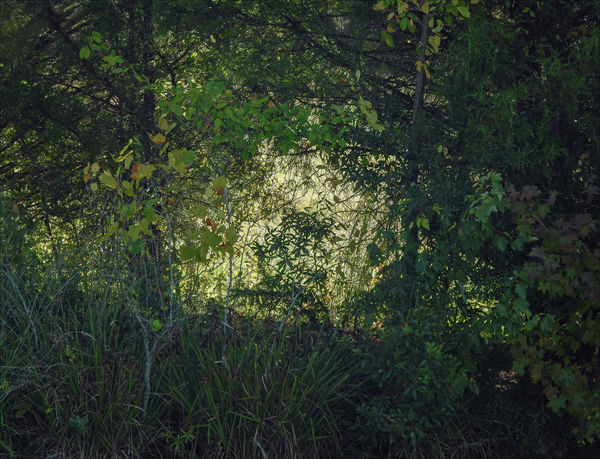
(Download)
Masked with Magic Wand Tool
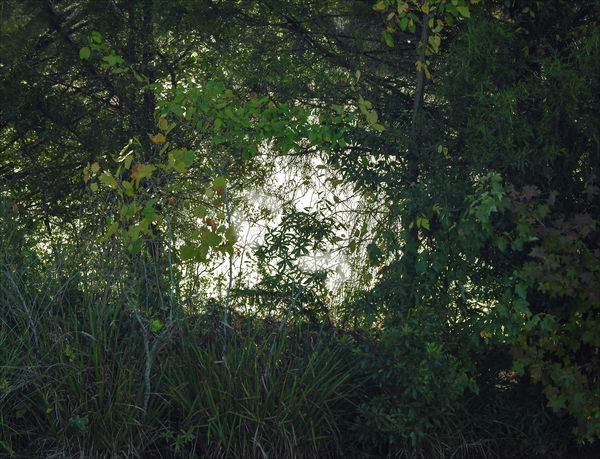
(Download)
Kabuki Lion Dancer
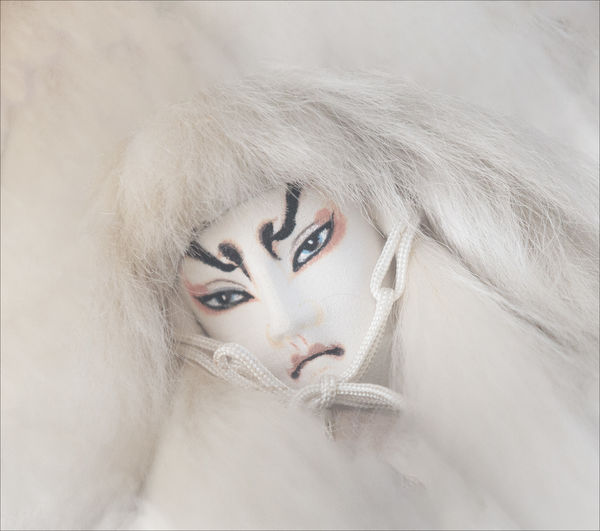
(Download)
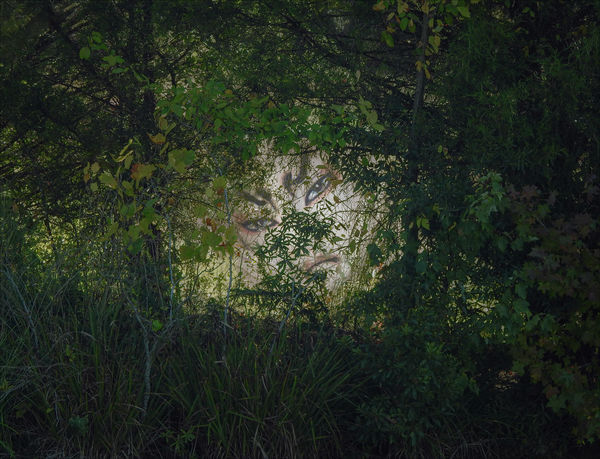
Memories of the Kabuki Dance
(Download)
Oct 1, 2019 06:19:25 #

Yikes, that is one woman I don't wanna fool with. A simple layering with great effect.. better to have saved for my favorite day Halloween.
Oct 1, 2019 11:03:08 #

Oct 1, 2019 15:06:46 #
You did a good job Bob.👍
I downloaded your pictures to try it as if I was doing it for the first time. My results are very similar but using several additional steps. Mine used several different masks, blend-if command and the graduated radial tool to name a few. Photoshop has so many different ways to get nearly the same results.
I downloaded your pictures to try it as if I was doing it for the first time. My results are very similar but using several additional steps. Mine used several different masks, blend-if command and the graduated radial tool to name a few. Photoshop has so many different ways to get nearly the same results.
Oct 1, 2019 19:14:18 #
Interesting composit Bob. I'm glad you waited for October to post this, goes well with the spirit of Halloween.
Thanks for your workflow. Bev
Thanks for your workflow. Bev
Oct 1, 2019 19:25:37 #
Jim-Pops wrote:
You did a good job Bob.👍
I downloaded your pictures to try it as if I was doing it for the first time. My results are very similar but using several additional steps. Mine used several different masks, blend-if command and the graduated radial tool to name a few. Photoshop has so many different ways to get nearly the same results.
I downloaded your pictures to try it as if I was doing it for the first time. My results are very similar but using several additional steps. Mine used several different masks, blend-if command and the graduated radial tool to name a few. Photoshop has so many different ways to get nearly the same results.
Perhaps you would be wlling produce a tutorial of your own? I just save off a copy of pertinent layers to use as illustrations for later discussions of the techniques you mentioned. I'd certainly be interested.
If you want to reply, then register here. Registration is free and your account is created instantly, so you can post right away.