Circles under eyes
Sep 27, 2019 21:14:15 #
I read and tried several strategies for dealing with dark circles under people's eyes in portraits (allergies, sleep deprived, age-related, etc). All seemed a bit fussy and didn't yield stellar results either. The best I've been able to come up with is using the clone brush in PS and cloning at a low opacity from a lighter part of the face. Is there a better way? I use LR and PS.
Thanks for advice.
Thanks for advice.
Sep 27, 2019 21:24:25 #
Sep 28, 2019 05:30:24 #
Sep 28, 2019 11:27:23 #
legion3 wrote:
TRY THE PROGRAM PORTRAIT PRO
Thanks, I'd like a solution for LR and/or PS
Sep 28, 2019 17:03:25 #

Hi, Liam!
Welcome to the advanced portraiture section- good question!
Various undesirable skin conditions under and around the eyes is an age-old issue in portraiture. All of the complaints you have listed (bags, wrinkles, sleeplessness, dark circles, etc. are common.
Sometimes, even the most experienced retouchers have difficulty achieving great results if some of the problems is not addressed in the shooting. Especially, if the eyes are deep-set and there is insufficient illumination in the orbital area of the face (the eye sockets) retouching becomes, as you said, a"fussy" chore.
If the main light or natural light source is too high, not only will you lose good catchlights and sparkle and good shadow detail in the eyes, but the issues around the eyes will be exacerbated. Sometimes a little makeup will help reduce the level of retouching that needs to be applied.
There are many methods of skin retouching such as frequency separation, cloning, and various erasing applications. You can simply dodge the are and reduce the density. The problem I often detect is that many photographers, as good shooter as they are, do not have the training, experience, and skill sets of expert retouchers. Many are not totally familiar with facial structure, from a retouchers point of view and oftentimes not know what to retouch and what not to retouch to maintain a natural likeness of the subject and remove blemishes at the same time and have the work completely invisible to boot! I have done many and electronic retouching for years and I am still somewhat of a clutz at it. Lucky me- since I operate a studio, I have a full-time retoucher who came form the old school of manual work and is quite a wizard in the computer as well. Portrait retouching is an art, in and of itself.
So...Fortunately, programs like Portrait-Pro are designed by folks who have built-in many of the results of the aforementioned skill sets into their program. It's a standalone thing and the price of the downloads is extremely reasonable and the support service is excellent.
To assist you- I have an idea. If you could post a couple of images that you have not been successful with- as to retouching - check the "store original" box and I will have my retoucher have a go at it and suggest a Photoshop or Lightroom method AND I will run it through the Portrait Pro program we keep handy for the heavy volume season. The Portrait-Pro program has various levels. You can go completely automatic or make finite adjustments.
There are many negative comments on this forum about over-retouching and over softening etc. True enough, you don't want to replace someone's face and make the, look like someone else or like they have been embalmed. Some folks will accept a dramatic study showing every wrinkle and pore. Nonetheless, in over 50 years in professional portraiture, I have never been told to "put those blemishes, lines, and wrinkles back"!
All the experienced retouchers I have known or worked with agree that one of the most important skills a retouch can possess is knowing WHEN to STOP retouching any given image.
Looking forward to your response!
Sep 28, 2019 21:06:56 #
E.L.. Shapiro wrote:
Hi, Liam! br br Welcome to the advanced portrait... (show quote)
Ed, this is really, really kind of you. You are competition for the moderator of the UHH Macro forum (Nikonian72), who is similarly helpful and a teacher at heart.
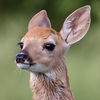
I will only upload one here, as all the shots of my grandniece are similar in this issue. I mostly shoot nature stuff, but once in a while get roped taking pictures of humans. So I don't have a studio. This image is lit by a single, off camera flash pointed at a white wall to camera left. The flash is flagged with a black foamie thing so no flash hits the face directly. There are some overhead florescent lights that I can't turn off. The slight halo is caused by a radial filter that darkens the area of the image other than her face and hands. Sometimes I make the radius smaller so that there is no halo - still deciding on which look I prefer. At any rate, this does not affect her face so is irrelevant to the lighting.
No edits to the skin here.
Thanks again!

Sep 29, 2019 13:05:01 #
Liam! Nice image and expression- you should do more portraits!
Bounce flash, as you employed, is a good improvisation for casual portraiture, however, I suspect the flash unit, perhaps a Speedlight, has no modeling lamp which precludes exact adjustment of the lightning.
Your subject, apparently, does not have very deep-set eyes or especially harsh lines or so-called bags under her eyes. The issue is that the light simply did not make it into her eyes and the orbital area of her face sufficiently enough to illuminate those elements of her facial structure.
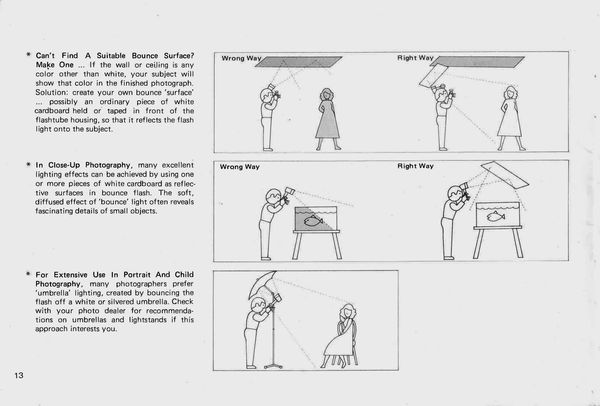
This is a common issue with bounce flash. As per the angle of incidence theory, the main light source becomes the surface from which the light is reflected and if it is high enough the light washes down the face and oftentimes misses the eyes. Yours is not an extreme case in that some light did get into the eyes, however, dense shadows resulted around the eyes, especially underneath. When the light is mounted on the camera and aimed directly overhead, we call the results "raccoon eyes" because the effect is very prominent. Since your light was off-camera, the problem is not as pronounced. One way to prevent this is to use a method called partial bounce whereby the flash unit is aimed upward at about a 45-degree angle whereby some of the raw light strikes the subject and some of the beam strikes the ceiling and/or wall and enable the softer bounce effect. I have included an old diagram for my files to illustrate this method.
If you care to pursue more portrait work, a monolight with a modeling lamp would be an asset whereby you can adjust the light and make certain that there is adequate illumination in the eyes, create the lighting pattern of you choice and watch for the landmark catchlights in the eyes which are one of the indicators of classic portrait lighting. The catchlights in the 11 or 1 o'clock position in the pupil and that there is visible sparkle or shadow detail and color mass in the eye, you are on the right track.
One of my favorite improvisation for impromptu portraiture, when I have no specialized gear in hand, is to use simple window light, preferably from a North lighted or skylighted window. It's easy to move the subject into a good lighting pattern and use a simple silver-like reflector for fill light.
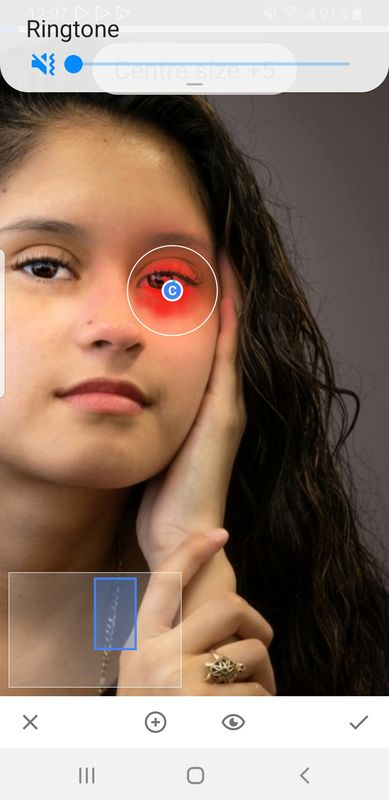
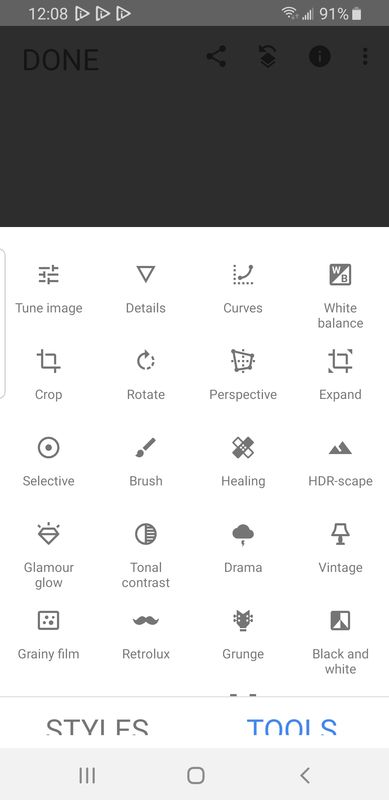
NOW back to post-processing. So...I showed the image to my retoucher and she came up with a multi-layered technique for PhotoShop- Fussy! Easy for her, hard for we non-retouchers. I told her I took up photography because I can't paint! So... she suggested that I try simple dodging and burning techniques. I did this on my tablet with a simple Android app called Snapseed. The app enables selective dodging and burning, indicated by the red circle in the attached screenshot. I dodge the eyes, especially her left eye, and restored the shadow detail in the eyes and lighted the areas around the eyes. The remaining dark lines were removed wi the healing brush- see the tools menu. A slight softening in the "glamour glow" tool and the entire post process took 5 minutes! I'm a lousy retoucher but an experienced custom printer! You can access the FREE app on your cell phone and transfer the image in from your camera. This is a great app for the occasional people shot or any quick edit on location.
Admittedly and frankly speaking, I hate doing my own retouching so much that I hired people (for the last 40 years) to do most of it and I try to preclude as much aesthetic correction in post-processing by addressing most of it in the shooting. I hope this helps!
Bounce flash, as you employed, is a good improvisation for casual portraiture, however, I suspect the flash unit, perhaps a Speedlight, has no modeling lamp which precludes exact adjustment of the lightning.
Your subject, apparently, does not have very deep-set eyes or especially harsh lines or so-called bags under her eyes. The issue is that the light simply did not make it into her eyes and the orbital area of her face sufficiently enough to illuminate those elements of her facial structure.
This is a common issue with bounce flash. As per the angle of incidence theory, the main light source becomes the surface from which the light is reflected and if it is high enough the light washes down the face and oftentimes misses the eyes. Yours is not an extreme case in that some light did get into the eyes, however, dense shadows resulted around the eyes, especially underneath. When the light is mounted on the camera and aimed directly overhead, we call the results "raccoon eyes" because the effect is very prominent. Since your light was off-camera, the problem is not as pronounced. One way to prevent this is to use a method called partial bounce whereby the flash unit is aimed upward at about a 45-degree angle whereby some of the raw light strikes the subject and some of the beam strikes the ceiling and/or wall and enable the softer bounce effect. I have included an old diagram for my files to illustrate this method.
If you care to pursue more portrait work, a monolight with a modeling lamp would be an asset whereby you can adjust the light and make certain that there is adequate illumination in the eyes, create the lighting pattern of you choice and watch for the landmark catchlights in the eyes which are one of the indicators of classic portrait lighting. The catchlights in the 11 or 1 o'clock position in the pupil and that there is visible sparkle or shadow detail and color mass in the eye, you are on the right track.
One of my favorite improvisation for impromptu portraiture, when I have no specialized gear in hand, is to use simple window light, preferably from a North lighted or skylighted window. It's easy to move the subject into a good lighting pattern and use a simple silver-like reflector for fill light.
NOW back to post-processing. So...I showed the image to my retoucher and she came up with a multi-layered technique for PhotoShop- Fussy! Easy for her, hard for we non-retouchers. I told her I took up photography because I can't paint! So... she suggested that I try simple dodging and burning techniques. I did this on my tablet with a simple Android app called Snapseed. The app enables selective dodging and burning, indicated by the red circle in the attached screenshot. I dodge the eyes, especially her left eye, and restored the shadow detail in the eyes and lighted the areas around the eyes. The remaining dark lines were removed wi the healing brush- see the tools menu. A slight softening in the "glamour glow" tool and the entire post process took 5 minutes! I'm a lousy retoucher but an experienced custom printer! You can access the FREE app on your cell phone and transfer the image in from your camera. This is a great app for the occasional people shot or any quick edit on location.
Admittedly and frankly speaking, I hate doing my own retouching so much that I hired people (for the last 40 years) to do most of it and I try to preclude as much aesthetic correction in post-processing by addressing most of it in the shooting. I hope this helps!

Sep 29, 2019 16:03:18 #
E.L.. Shapiro wrote:
Liam! Nice image and expression- you should do mor... (show quote)
Just speaking to the selective dodging and burning, not claiming any portraiture chops, that part is readily available in Lightroom which the OP already has, using the adjustment brush one's whole range of tools is active but just applies the effect to the area you select with the brush, with the amount of feathering you select. The texture tool especially used to be called smoothing (I've read) when it only went in a negative direction, but now it works both ways.
Sep 29, 2019 18:18:20 #
E.L.. Shapiro wrote:
Liam! Nice image and expression- you should do mor... (show quote)
E.L.
Thanks so much for all of this information. Yes, the light was an off-camera speedlight, and no, there was no “moonlight with modeling lamp,” which I am not familiar with. I will be reading and learning about that immediately.
I think I bumped into your retoucher’s multi-layer PS approach on YouTube/PixImperfect before I posted on UHH. The results were fabulous, but I wasn’t able to duplicate the quality in my attempt, most likely due to my inexperience in post.
At any rate, you’ve given me a lot to think about and try, and I appreciate it very much.
Just noticed the “fine print” under your posts (“To teach . . .”). I think I sized you up right the first time :) Your willingness to teach and share represents the best of UHH.
Wm
Sep 29, 2019 20:25:34 #
LiamRowan wrote:
E.L. br br Thanks so much for all of this informa... (show quote)
Good luck and keep me informed as to your progress.
Sep 29, 2019 20:31:16 #
bleirer wrote:
Just speaking to the selective dodging and burning, not claiming any portraiture chops, that part is readily available in Lightroom which the OP already has, using the adjustment brush one's whole range of tools is active but just applies the effect to the area you select with the brush, with the amount of feathering you select. The texture tool especially used to be called smoothing (I've read) when it only went in a negative direction, but now it works both ways.
No doubt! Lightroom has many great features. We use both Lightroom and Photoshop at the studio. I am working out of town very often and use the android app as well. It is a matter of learning the tools, practice and mastery. Leam can apply either method, the theory is the same, just the methodology differs.
Sep 30, 2019 23:10:52 #
In PS post work use the clone stamp with "lighten" selected and adjust opacity/flow accordingly. It's fairly easy to fix. Sample directly below the area you want to retouch to retain a natural tone. Choose sampling on all layers and work the retouch on a new layer.This will allow further flexibility with opacity if you think it's overdone. The trick is to reduce the darkness to the point where it still looks natural.
I reworked camera left eye only to give you the comparison. This took no more than a minute.
I reworked camera left eye only to give you the comparison. This took no more than a minute.

Oct 1, 2019 16:38:15 #
Haydon wrote:
In PS post work use the clone stamp with "lig... (show quote)
Haydon, I deleted my first response. Didn't read carefully enough. Would you be kind enough to post a screen shot of the layer portion of the screen in this approach. I'm missing something. I'm getting good results with the clone stamp with lighten, but not on anew layer. Thanks much!!
Oct 1, 2019 17:29:44 #
Maybe this will help. Again I created a new layer above the background and use the clone stamp with the "Sample all layers" or "Current & Below" in the pull down. I didn't arrow the function of "lighten" in the screenshot. That's a must as you know. Just clarifying. Do all your clone stamping on the "New Layer" above the background.
Take your time in areas where there is an abundance of tonal difference by sampling in small pieces. If you're willing to take 5 minutes and adjust opacity correctly along with clone stamping with changes in flow and opacity you will get a natural look. If you overdo it, it will be noticeable right away. Our eyes are drawn to areas that are the brightest in the image.
One more thing and this is subjective, I wouldn't halo using a radial. Many schools of thought in portrait work believe it's a no no. Use an adjustment brush with exposure gently if you need to push the area selectively. Dodge and burn can be complimentary but that's a creative decision. I'm not against breaking the rules but traditionally highlights are most commonly created by background light(s) or window light.
To reinforce the positive, this is a very good bounce flash shot. I commend you on the black foamie thingy. Neil van Niekerk would be proud.
BTW I hope Ed doesn't think I'm stepping on his toes. I'm not, I have a lot of respect for his timeless replies trying to help here. He's a professional with decades of experience. I wish I would have found my mark earlier in life.

Oct 1, 2019 18:45:03 #
Haydon wrote:
Maybe this will help. Again I created a new layer ... (show quote)
To make sure the OP understands, I believe the reason you advise the new layer is to keep it nondestructive? It would work on the image layer, but would be difficult/impossible to reverse if it didn't look right and the file was saved or the undos ran out. Deleting or erasing the layer is so much easier and could be done anytime.
If you want to reply, then register here. Registration is free and your account is created instantly, so you can post right away.